

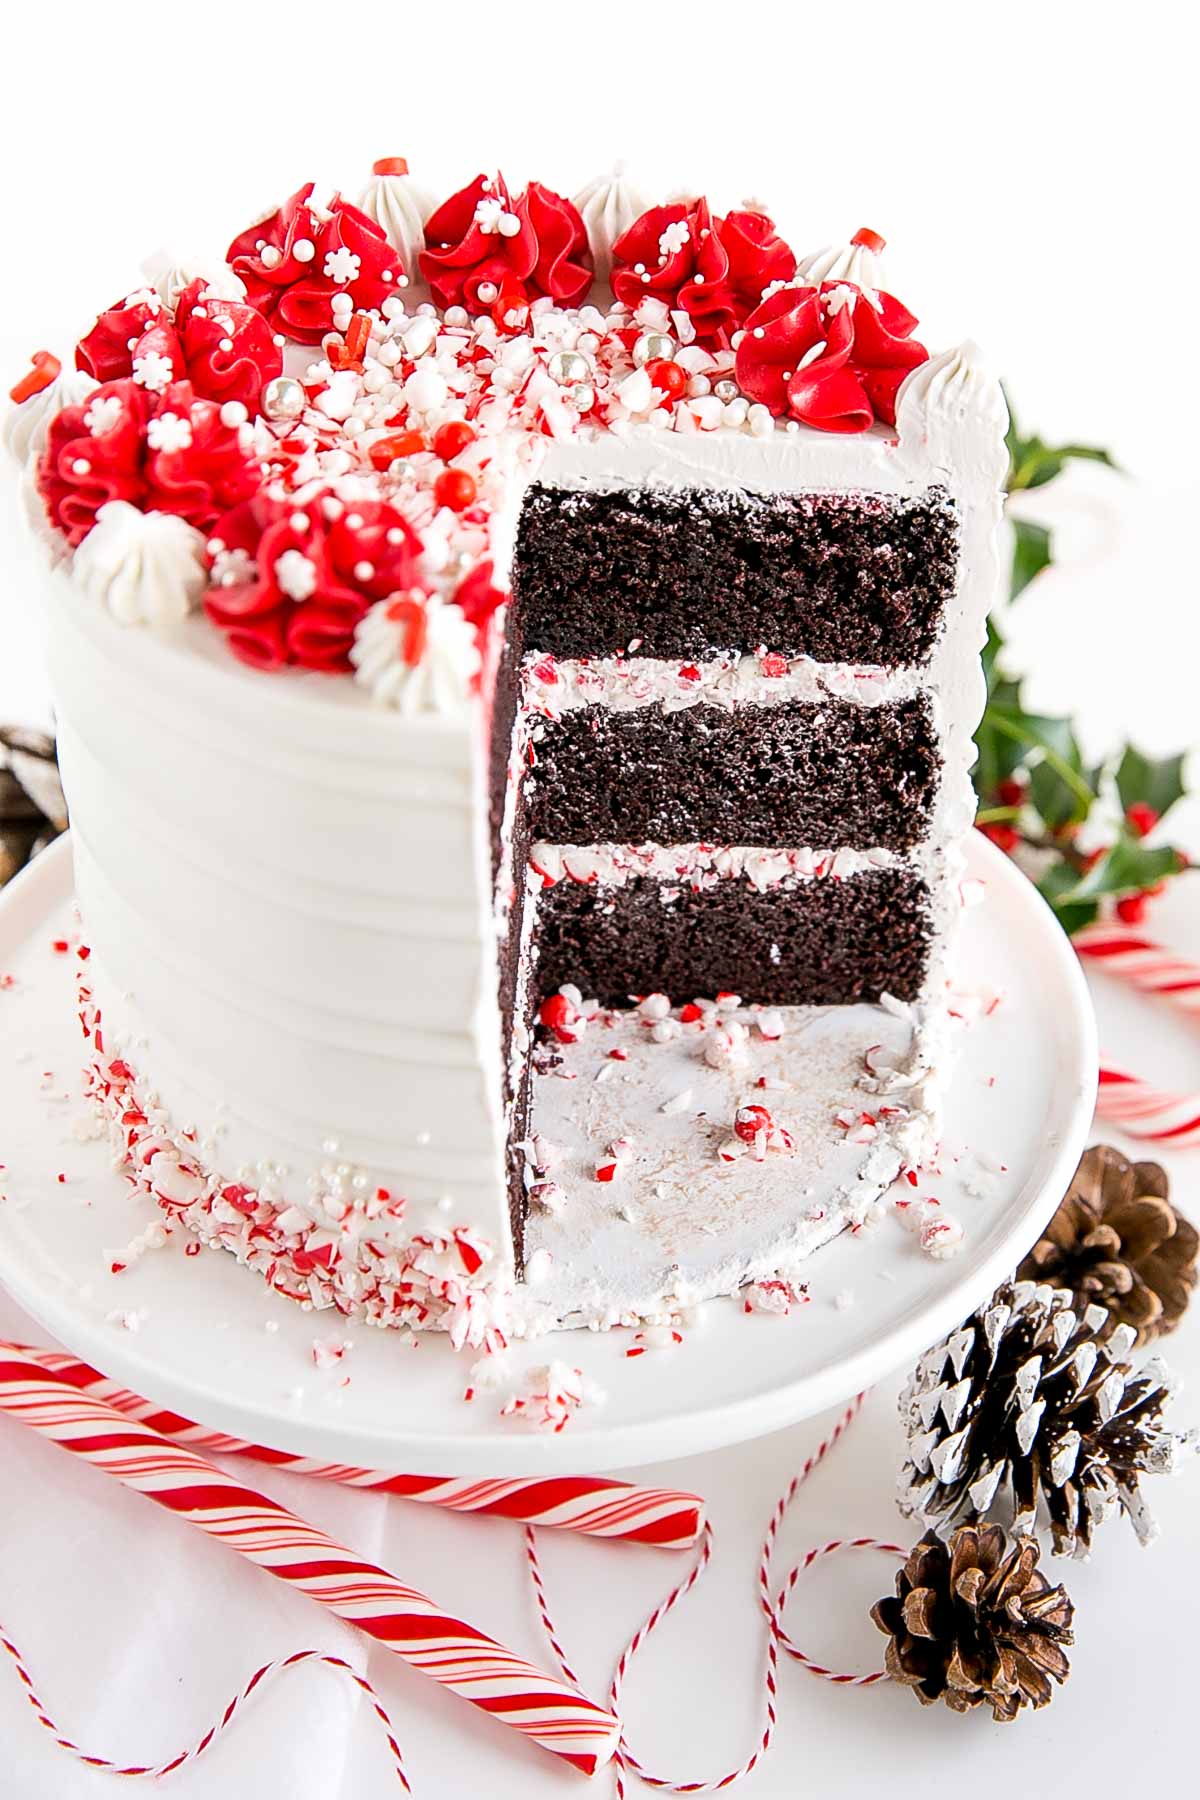
A classic holiday flavor combo in one delicious cake! This Chocolate Peppermint Cake combines rich chocolate cake layers with a silky peppermint frosting.

This recipe has been years in the making. Years! I first planned to make it two years ago, then again last year, but it kept getting pushed aside. I actually love the chocolate-mint combo (hello After Eights!) so I have no idea why I didn’t get to it sooner. I’ve actually had the post sitting in my Drafts since Nov 2018!
Now, a full two years later, I think it’s high time I give this Chocolate Peppermint Cake some time in the spotlight.

How to make this Chocolate Peppermint Cake
This is a very simple flavor combination. Chocolate cake with peppermint frosting. I used my favorite chocolate cake recipe for this, modified slightly for three 6″ pans.
Adding peppermint extract to the cake batter is optional. It depends on how strong a peppermint flavor you want throughout the cake. I didn’t add it because I wanted a contrast of the chocolate cake with the peppermint frosting, but I think it would be delicious either way.
Peppermint Swiss Meringue Buttercream
I used my Swiss Meringue buttercream recipe and simply added some vanilla and peppermint to it. I say simply but it was not at all simple. I could not get that peppermint flavor to be strong enough no matter how much extract I added.
You really should only need 1 tsp or so but I ended up adding over 2 Tbsp and still found it very, very faint. My taste testers did too. Maybe it was the brand of extract I was using and maybe it was just a bad batch, but I would make sure you use a high-quality brand of peppermint extract. Next time I’ll try to hunt some down from Nielsen-Massey.
Cake Tip!
If you prefer a different type of buttercream you could use Ermine Frosting, or a German buttercream, or a simple American buttercream, and just add the extract to taste with those. Each would be equally delicious in its own way.
How to Make Buttercream White
Depending on the type of butter you use, you could find yourself with a fairly yellow-tinted buttercream. This is often the case for me as I find the butter I use to be pretty yellow.
Yellow buttercream is less than ideal for a pretty WHITE and red peppermint cake, right?
Fear not, I have a few tips for you to neutralize that color and help make it more white. I have a detailed post on How to Make White Buttercream where you can see all my tips.
For my frosting here, I first added a bit of violet color gel and then brightened it up with some bright white gel.
How much of each you’ll need to add really depends on how yellow your buttercream is. Be sure to not add too much violet though as your buttercream will start to look grey. I just add a little at a time with a toothpick. Again, have a look through my How to Make White Buttercream post for more details.

Coloring Buttercream Red
Getting rich colors with a Swiss meringue buttercream is next to impossible. It just doesn’t take color as well as an American buttercream and you’ll find that you need to use way more color gel to make any traction.
I used an obscene amount of red color gel to get that tiny bit of frosting deep red.
When I say obscene, I meant it. I took out about 1.5 cups of the white buttercream to tint red (in hindsight, I should have done this before I added the bright white color gel to it, oops) and used an entire brand new container of Wilton no-taste Red plus some leftover Americolor Super Red that I had. It took it to like a dark pink. I let it sit overnight and hoped for the best.
No luck, the color barely deepened at all. So I went and bought more color gel and used another half container (!!) of it in the frosting. It still wasn’t red enough.
Finally, I went off to google for some tips and found this video where she mentions adding a bit of powdered sugar to the buttercream to help it take the color.
In hindsight, it sounds obvious since that’s what helps American buttercream color so well. I was worried it would add some grittiness, but since I was using it only on a small amount of frosting I didn’t think it would matter much. I added about 3 Tbsp of sifted powdered sugar and it totally worked!
So much so that I wondered if it was now too red. Hah.
The powdered sugar actually didn’t add any grittiness at all which was a pleasant surprise.
So from now on, if you’re looking to color your Swiss meringue buttercream, add a bit of powdered sugar to the frosting first. Oh and probably don’t whiten it first like I did! Rookie mistake.
You will still need to use a lot more color gel than you would for an American buttercream, but not nearly as much as I did.

Decorating this Chocolate Peppermint Cake
The decorating of this Chocolate Peppermint Cake veered so much off the initial design that it’s ridiculous. I’m going to share my ideas with you in case you prefer them and want to try them instead. Or maybe you’re just curious.
My initial thought/plan was to line the entire outside of the cake with peppermint sticks. I actually spent $20 purchasing 40 (!!) individual peppermint sticks for this. They are all now sitting in my pantry hopefully to be used sometime next year? Or maybe as stir sticks for hot chocolate over the holidays.
Anyhow, there were a couple of issues with my plan for the peppermint sticks.
First of all, the red candy stripes were a little bit too dark, almost maroon-like. The rest of my Christmas sprinkles etc were more of a happy Christmas red. As I’m writing this I’m thinking back to that scene in The Holiday (which we just watched again last week) where Amanda is telling her editor to use a “happy red, not like a Scorsese red”.
These candy cane sticks were most definitely a Scorsese red. And there was no way I was using more color gel to try to get the frosting to match.
Second, the sticks were all slightly different lengths. Breaking/cutting them was a recipe for disaster so that wasn’t happening. They would have gone all the way to the top of my 6″ three-layer cake too and I just couldn’t think of a way to make that look pretty. Maybe I could cover the tops of them with a pipe border or some other elements but nothing was really coming to mind.
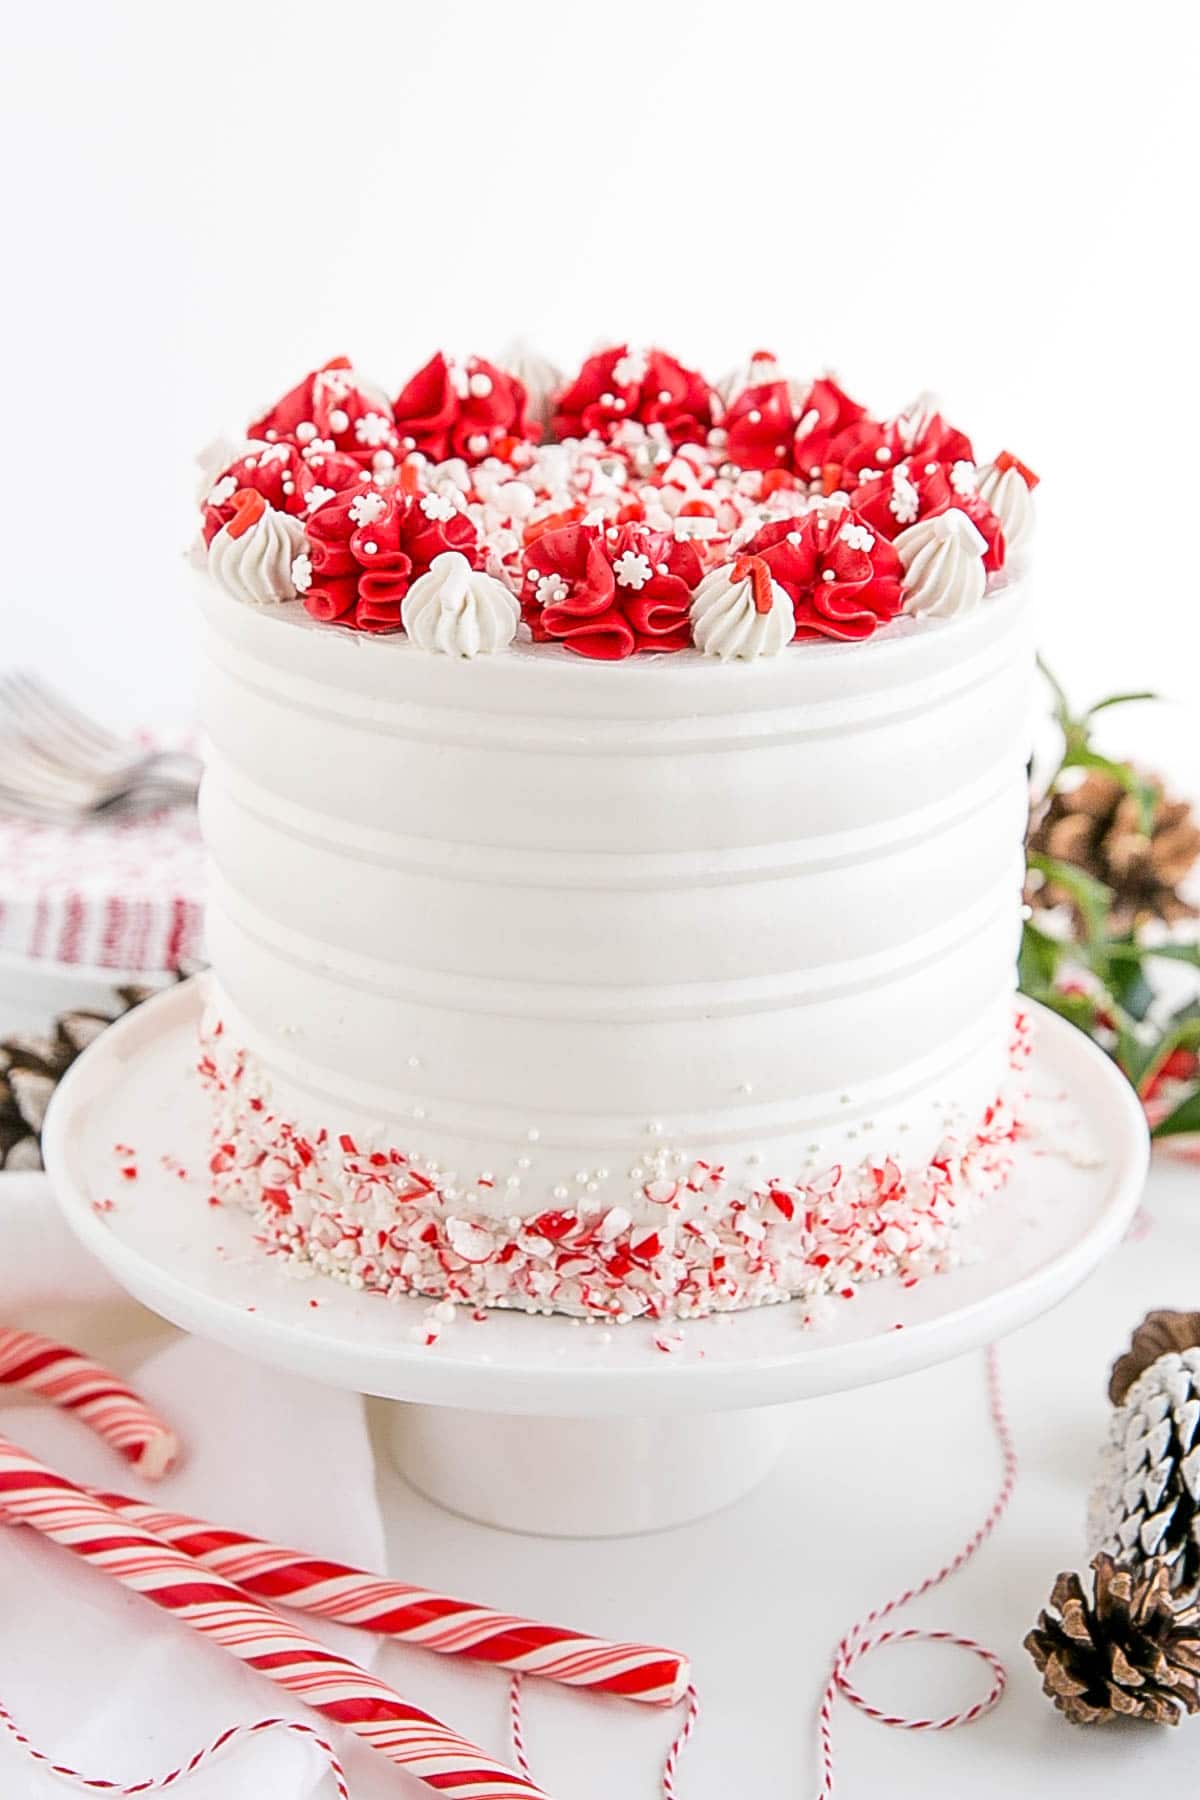
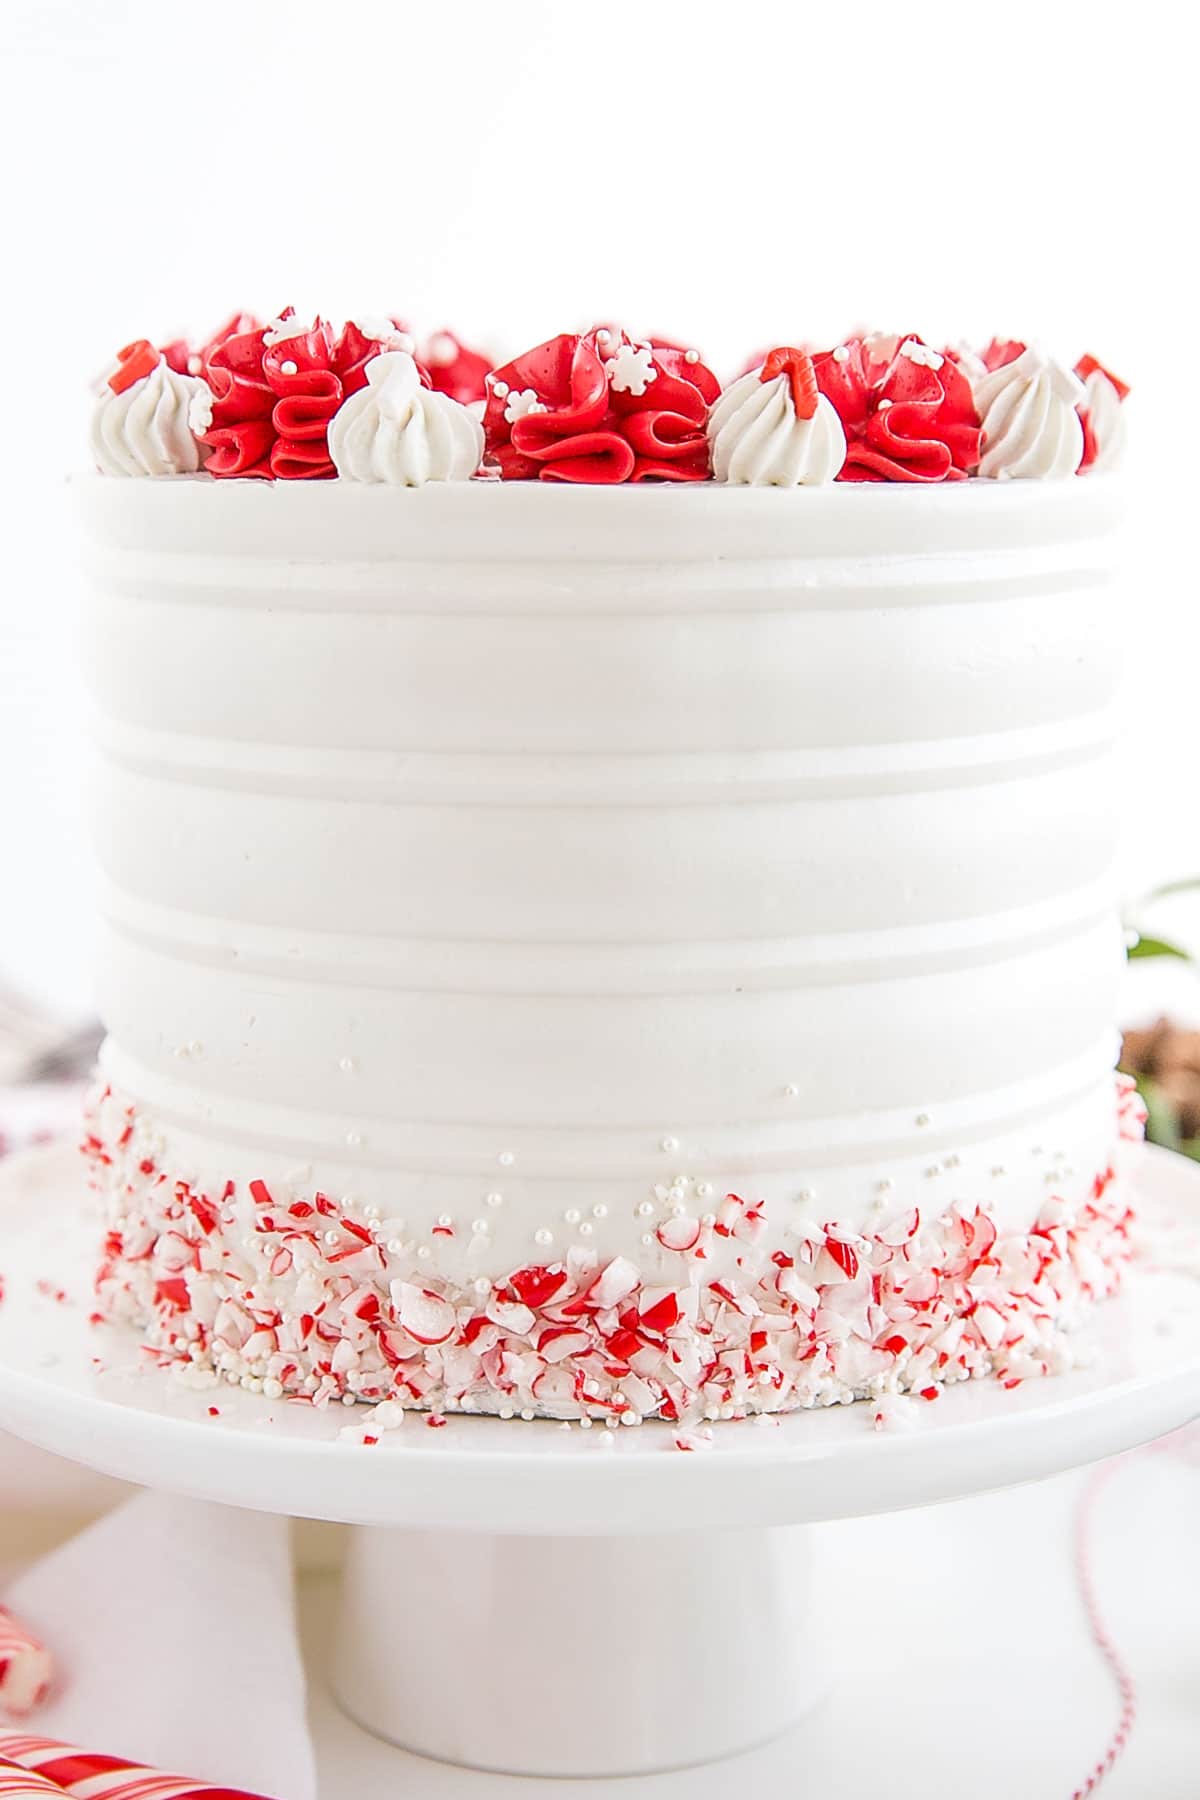
So, that idea got scrapped and the pretty cake-combed sides were born.
In hindsight, I think this is much prettier. It lets the red frosting (that I worked so hard on) stand out and pop.
Another thing I initially planned to do was to stripe the frosting inside like I did with my White Chocolate Candy Cane Cake.
The plan was to pipe alternating rings of red and white to get that candy cane striped effect. You can see what I mean in the slice photo in that post.
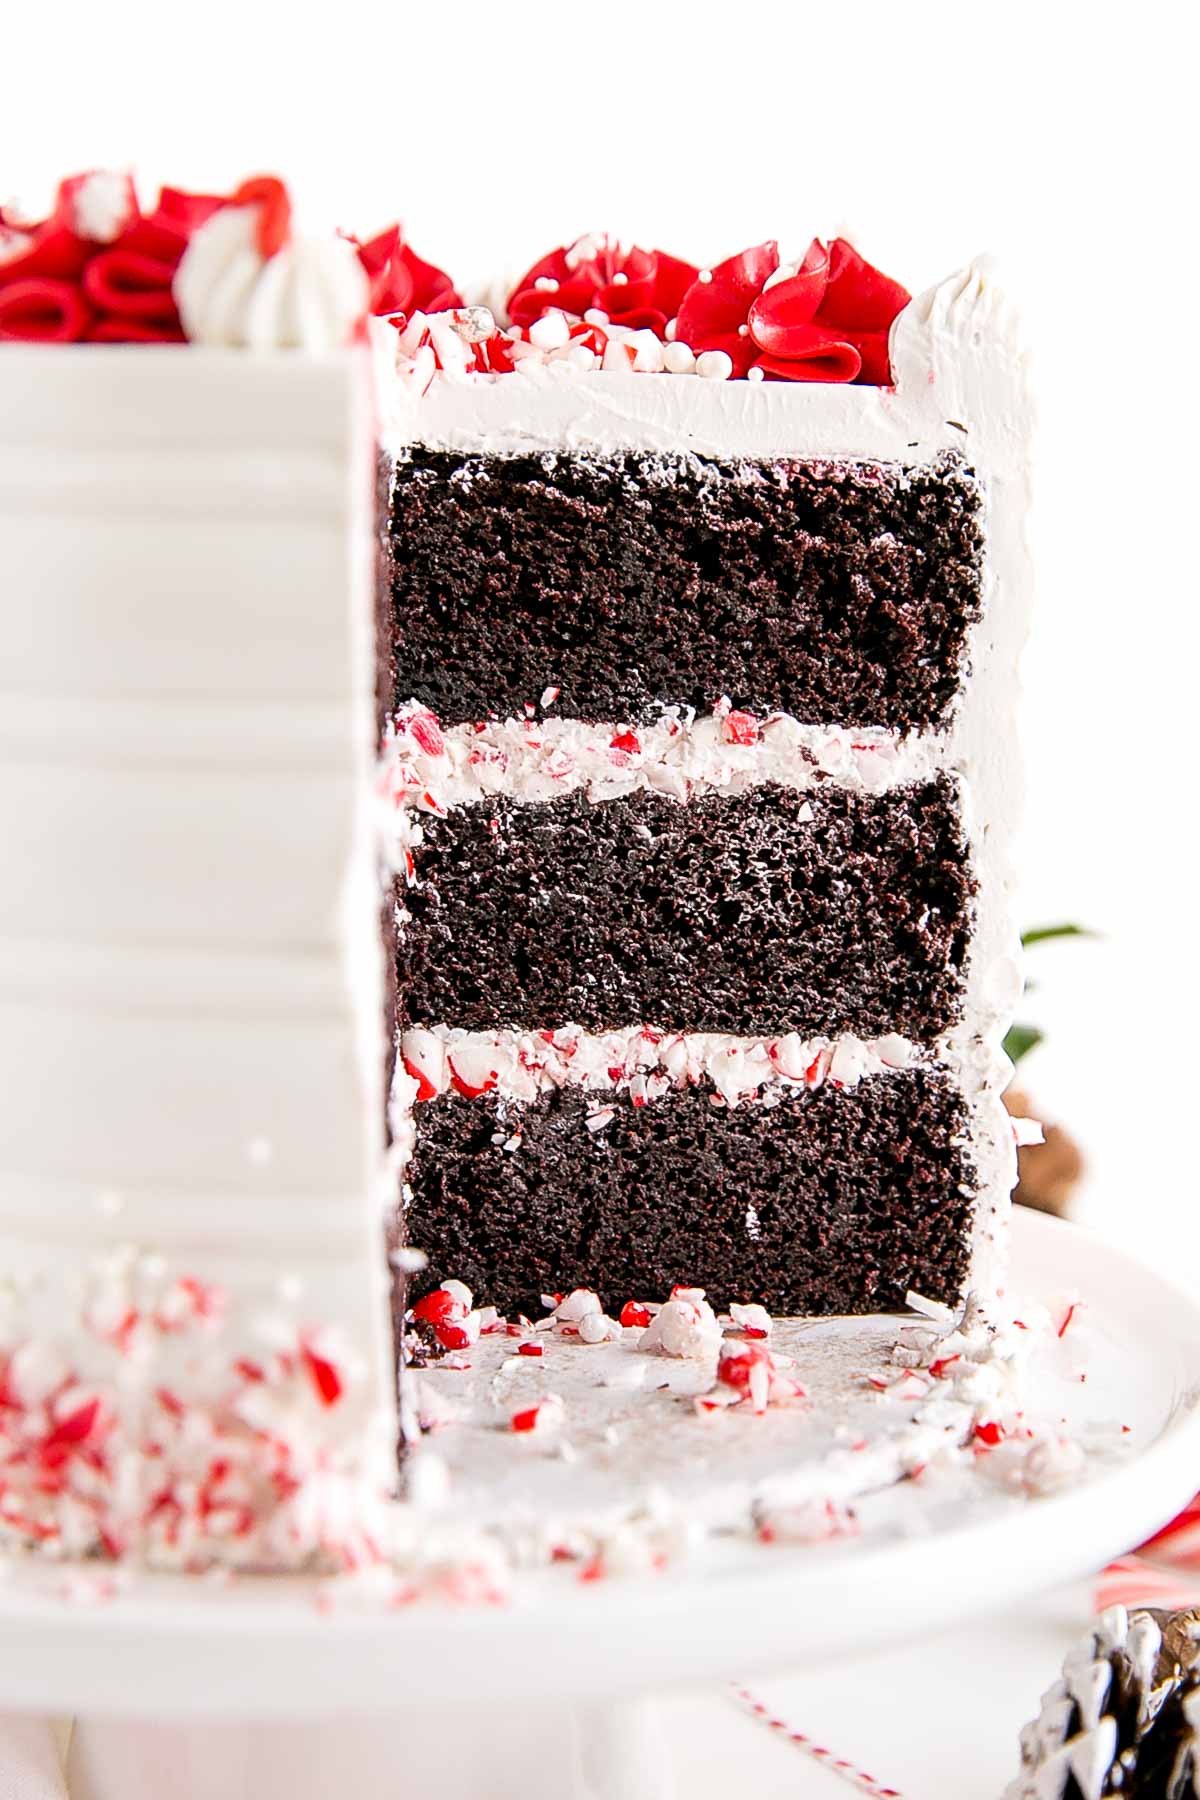
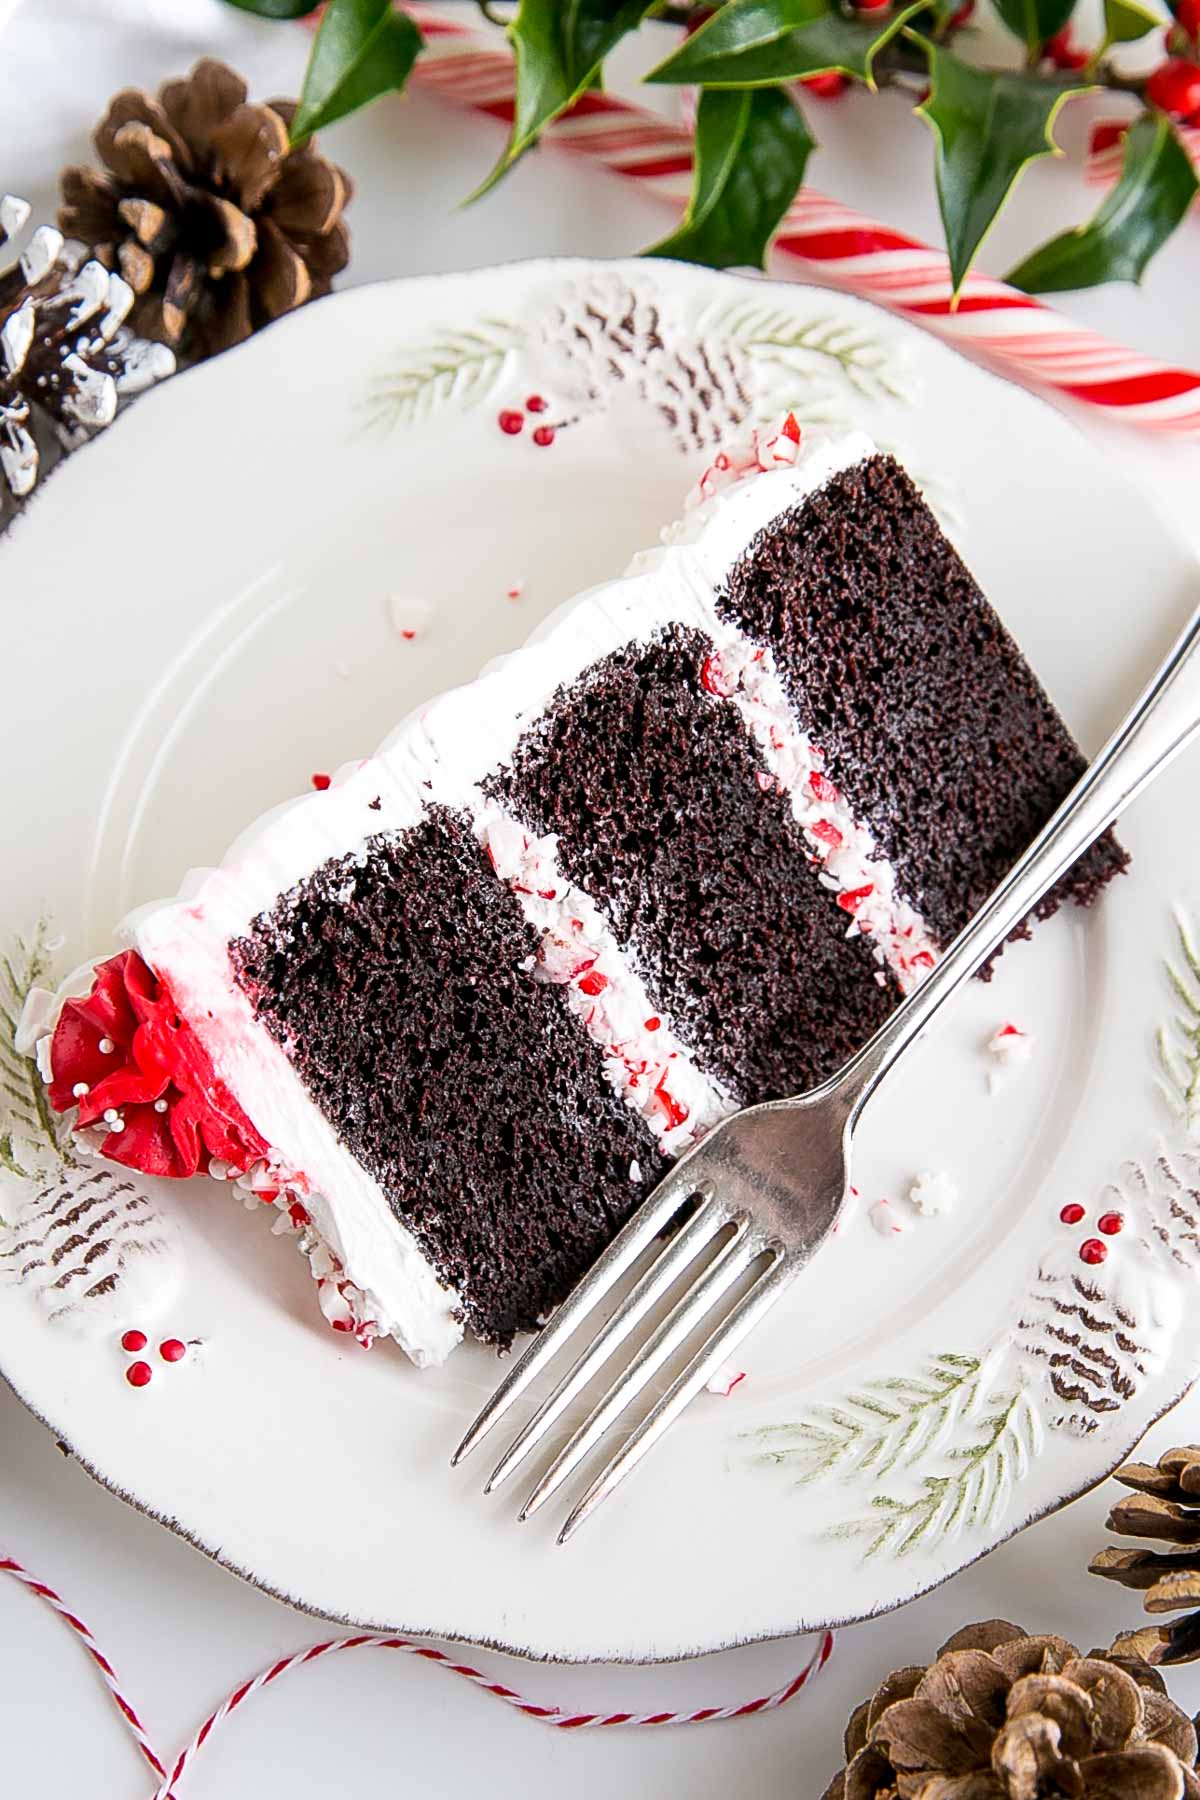
Since I changed the design for the exterior, I decided to keep it simple inside. I thought it would look a little less whimsical and classier which is what I was going for with the new design. Instead, I just sprinkled some crushed candy canes on top of the frosting for each layer. The candy canes will soften over time and get a bit chewier, so just keep that in mind.
The stripes would be super pretty though if you decide to do them. You will need to color more of the frosting red if you plan to do that though!
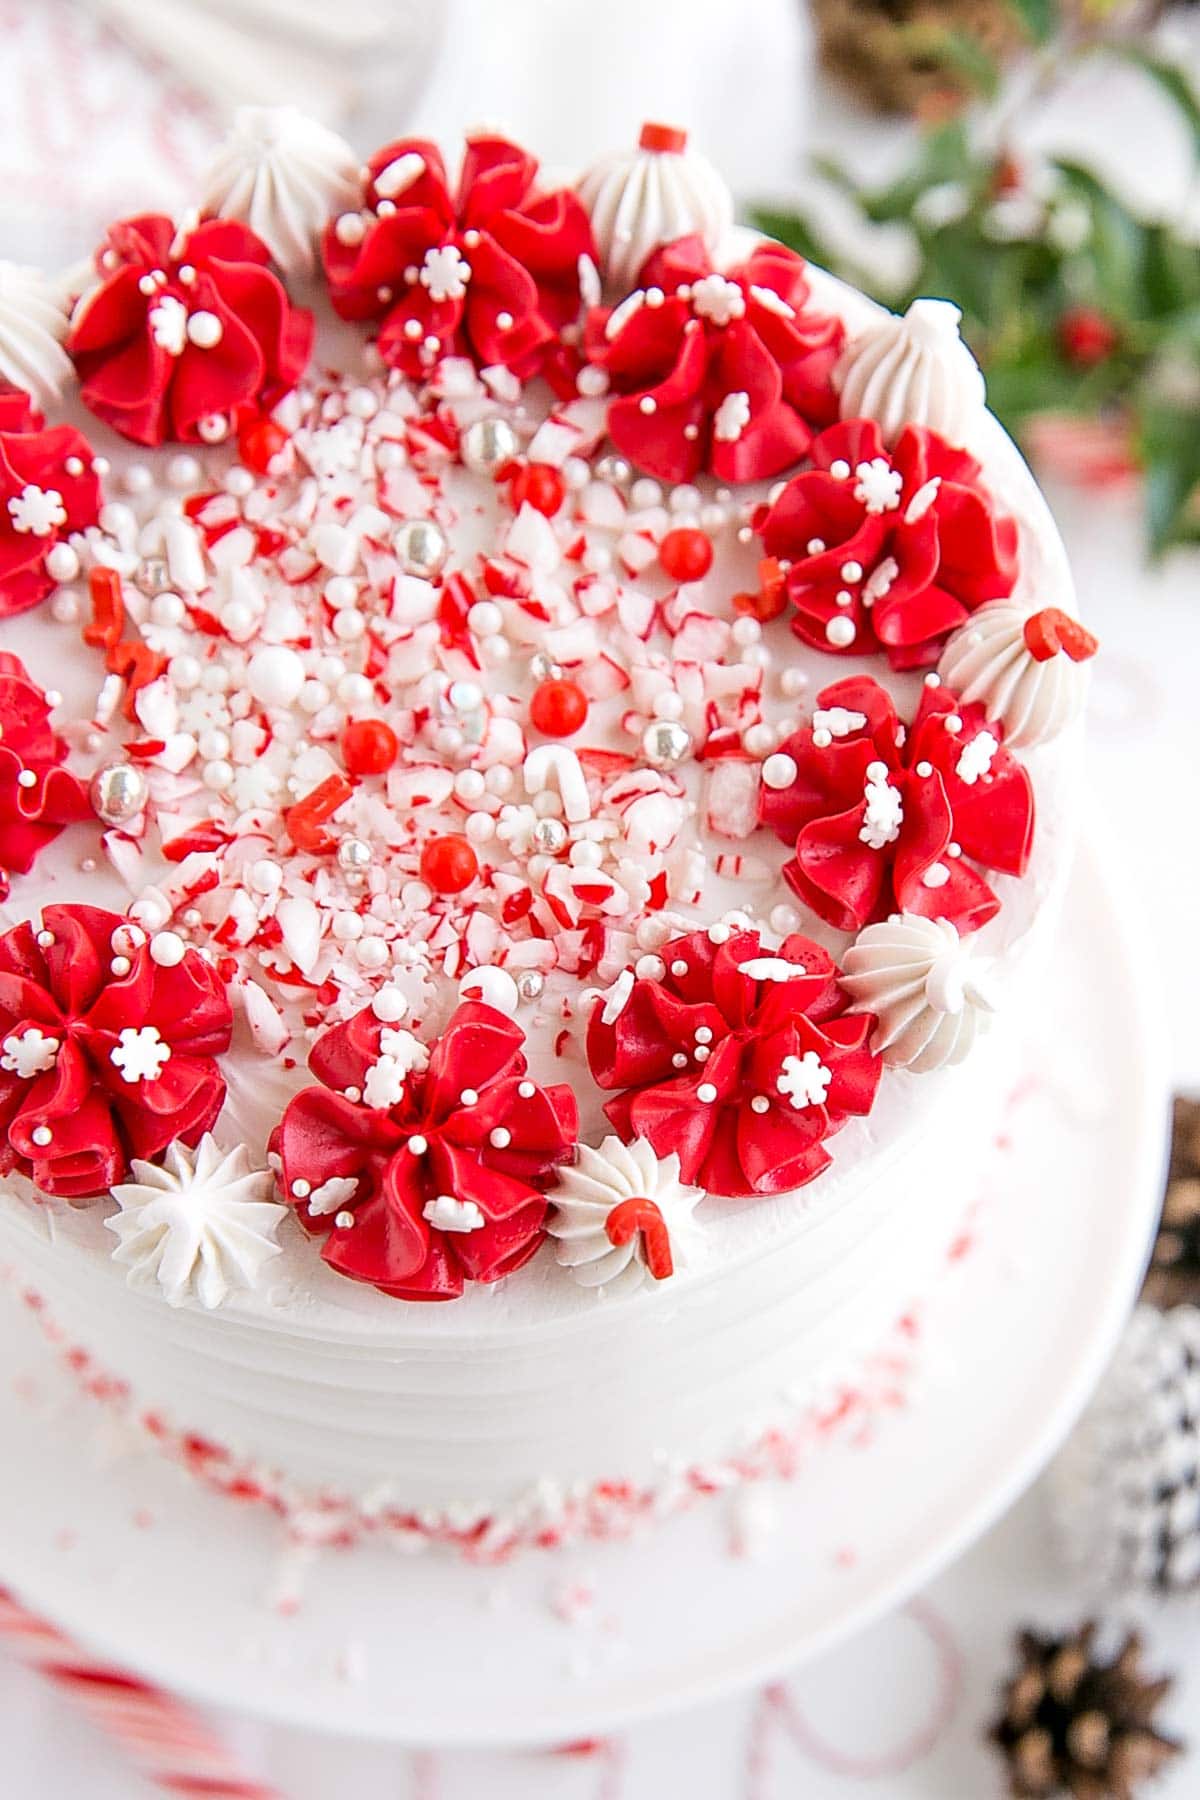
For the top of the cake, I spaced out the red dollops (made with a 1M tip) slightly so I could pipe smaller white dollops (with a 4B tip) between them and top each of those with a candy cane sprinkle. I think it looks super cute!
The rest of the sprinkles are a homemade mix of a variety of ones I had. The snowflakes are particularly cute too I think!
If you’re a chocolate mint fan, this cake will not disappoint! It’s the perfect dessert to have over the holidays.
Frequently Asked Questions
How can I convert this recipe?
- The recipe as-is will also work in two 8″ pans. For three 8″ pans, 1.5x the recipe. Baking time may need to be adjusted.
- To make cupcakes, all you need to do is reduce the baking time — start checking at 15mins or so. The recipe will make 18-24 cupcakes depending on size.
- For other conversions go here.
Can I make it in advance?
- The cooled cake layers can be baked ahead of time, double wrapped in plastic wrap, and frozen for up to 3 months. Take out 2-3 hours before assembly.
- The frosting can be placed in an airtight container and refrigerated for 1 week for frozen for 3 months. Bring to room temp and rewhip before using.
- The finished cake (whole or sliced, stored airtight) can be frozen for up to 3 months.
Can I get the measurements by weight/grams?
- There is a Metric option in the recipe card. If you click it it will convert everything to grams.
- This conversion is done automatically and I cannot guarantee the accuracy but many readers have had success using the metric option on my recipes.
Looking for more Holiday Cake Recipes?
- Chocolate Gingerbread Cake
- Eggnog Cake
- Sticky Toffee Pudding Cake
- Cranberry Orange Cake
- White Chocolate Cake
Tips this Chocolate Peppermint Cake
- I used a 1M tip for the red dollops and a 4B tip for the smaller white ones.
- I used candy cane sprinkles and snowflake sprinkles and a mix of some other nonpareils I had.
- If you add crushed candy canes between the cake layers, they will soften over time and get a little chewy.
- It takes a LOT of red color gel to get the Swiss meringue buttercream a deep red color. Add a bit of powdered sugar to help it along. See post for details.
- For the texture on the sides of the cake, I used the right side of the middle cake comb from this set.
- I like to prepare my cake pans using Homemade Cake Release then line with parchment.
- Be sure to check my Swiss Meringue Buttercream post for tips and troubleshooting.
- Learn how to keep your cakes moist using Simple Syrup.
- To help ensure your cake layers bake up nice and flat, check out my Flat Top Cakes post!

Chocolate Peppermint Cake
Ingredients
Chocolate Peppermint Cake:
- 1 1/2 cup all-purpose flour
- 1 1/2 cups granulated sugar
- 3/4 cup Dutch-processed cocoa powder sifted
- 1 1/2 tsp baking soda
- 1 tsp baking powder
- 1 tsp salt
- 1/4 cup vegetable oil
- 3/4 cup buttermilk room temperature
- 3/4 cup hot water or hot coffee
- 2 large eggs room temperature
- 2 tsp vanilla extract
- 1 tsp peppermint extract optional
Peppermint Swiss Meringue Buttercream:
- 6 large egg whites
- 2 cup granulated sugar lightly packed
- 2 cups unsalted butter cubed, room temperature
- 1 tsp vanilla extract
- 1 tsp peppermint extract or more to taste
- bright white color gel
- 2 Tbsp powdered sugar
- red color gel
Assembly:
- 1/2 cup crushed candy canes plus more for outside of cake
- candy cane sprinkles
Instructions
Chocolate Peppermint Cake:
- Preheat oven to 350F, grease three 6″ round baking pans and dust with cocoa powder. Line bottoms with parchment.
- Place all dry ingredients into the bowl of a stand mixer fitted with a paddle attachment. Stir to combine.
- In a medium bowl whisk all wet ingredients (pour water in slowly as not to cook the eggs if very hot).
- Add wet ingredients to dry and mix on medium for 2-3 mins. Batter will be very thin.
- Pour evenly into prepared pans. I used a kitchen scale to ensure the batter is evenly distributed.
- Bake until a cake tester comes out mostly clean. A total of 30-35mins.
- Cool 10 minutes in the pans then turn out onto a wire rack to cool completely.
Peppermint Swiss Meringue Buttercream:
- Place egg whites and sugar into the bowl of a stand mixer, whisk until combined.*
- Place bowl over a hot water bath on the stove and whisk constantly until the mixture is hot and no longer grainy to the touch (approx. 3mins). Or registers 160F on a candy thermometer.
- Place bowl on your stand mixer and whisk on med-high until the meringue is stiff and cooled (the bowl is no longer warm to the touch (approx. 5-10mins)).
- Switch to paddle attachment. Slowly add cubed butter and mix until smooth.**
- Add vanilla and peppermint extract (to taste) and whip until smooth.
- Remove 1 1/2 cups of buttercream (more if doing inside stripes). To that add 2-3 Tbsp of powdered sugar and enough color gel to achieve the red you want. Color will darken slightly over time.
- If desired, whiten the remaining frosting to remove the yellow tint by using bright white color gel or following these tips.
Assembly:
- Place one layer of cake on a cake stand or serving plate. Top with about 2/3 cup buttercream. Sprinkle with 1/4 cup crushed candy canes if desired. Repeat with remaining layers. Frost and smooth the outside with a thin crumb coat. Chill for 20mins.
- Frost and smooth the outside of the cake, generously frosting the sides specifically. Smooth with an icing smoother. Use a cake comb on the sides of the cake. Repeat, scraping off more frosting each time, until smooth.
- Pipe dollops of the red buttercream on top, slightly separated, using a 1M piping tip. Pipe smaller dollops of the white frosting in between the red ones using a 4B tip. Decorate the bottom with crushed candy canes and sprinkles if desired.


Alexis Swartz says
Excited to try this recipe. Wondering if it is recommended to add a soak to the cake layers?
Olivia says
Hi Alexis! The layers are quite moist but you definitely can if you want! You can use a simple syrup (https://livforcake.com/simple-syrup-recipe/) with added peppermint if you like.
Elma says
Your cakes are beautiful, and I love your stories. Thank you for bringing joy to so many people!
I recently made a cake for the holidays and needed RED and GREEN. I found a tip online to microwave your Swiss meringue buttercream which intensifies the color, and then stick it in the fridge and it recovers as if nothing ever happened. It’s something to do with getting the coloring into the butter molecules, and then the butter reforming. It’s pure magic 🙂
Olivia says
Thanks so much for the wonderful comment, Elma! I heard about the microwaving too – that’s a great tip! I’ll have to try it next time.
Lyn says
Hello, this cake is GORGEOUS. Can you please describe how you achieved the red Rosettes? They are super pretty! You stated you used a 1 M tip but would like to know the technique. Thank you 😊
Olivia says
Hi Lyn! I simply hold the piping tip perpendicular to the cake and slightly above and then press to squeeze out a frilly dollop. Test it out on some parchment first. I hope that helps!
Tarn says
Made this for the fam for Christmas and it was a huge hit! Definitely think this will become a holiday tradition! Thank you!
Decorating is not my forte, but i was very proud of myself for piping the red(-dish) rosettes around the top, only to realize after that the cake was a little too tall for the cake carrier! So i had to squish my pretty rosettes against the lid. So the presentation wasn’t as pretty as I’d hoped, but nobody cared once we tasted it!
Olivia says
Hi Tarn! So happy you loved it. Bummer about having to squish the rosettes! All that matters is that everyone loved it 🙂
Jen says
I have made this cake in December for the past two years (and I will make it again this year), I love it that much. If you want a stronger peppermint flavor, use food grade peppermint oil. You only need 1/4 tsp in the frosting and it really comes through. I use Lor-Ann Super Strength, but there are other brands, too. I use it in the chocolate peppermint cookie cups, too.
Olivia says
Hi Jen! Thanks for the wonderful feedback and tips!
Blissmygift says
Hi! This looks beautiful, Yummy and delicious! Really awasome blog i like your all blog
Olivia says
Thank you!
Zenaida says
Hi can you share the cake recipe in metric G measurements?
Olivia says
Hi Zenaida! There is a metric converter below the list of ingredients.
Michele says
Love all your recipes!
If I’m making this cake ahead of time should I assemble and refrigerate or refrigerate the meringue and assemble before serving? Thanks
Olivia says
Hi Michele! You can do either option. Here are my tips:
For the Cake: Cool the layers, double wrap in plastic wrap, freeze for up to 3 months. Take out 2-3 hours before assembly.
For the Buttercream: Place in an airtight container and refrigerate for 1 week for freeze for 3 months. Bring to room temperature and rewhip before using.
Otherwise, the fully frosted cake will be fine in the fridge for 2-3 days. Put the candy canes on once it comes to room temp as they will melt in the fridge.
Dustin says
I made this for a family party tonight and it was a hit. It’s a fairly dense cake and if I were to make it again I’d decrease the baking powder as it rose a bit too much and then fell, living here in high altitude. I also baked it for 40 minutes at 375 degrees. The flavor of the cake is delicious and deeply chocolatey!
Olivia says
Hi Dustin! I am so happy you loved this one! Baking at high altitudes is tricky and chocolate cakes seem to be more temperamental than others. It shouldn’t be super dense, but that could be due to the whole rising and collapsing thing. In case others see this comment too I want to refer you to this site for some high altitude baking tips: https://www.kingarthurflour.com/learn/high-altitude-baking.html It may require a bit of experimentation on your part depending on how high up you are.
Gem says
Easy, and delicious. Cake is moist and flavorful and easy to cut. Buttercream tastes amazing – very peppermint! I had a hard time getting the red, I was afraid the buttercream would get too liquified so I stopped at pepto bismal pink but it’s pretty. Love your cakes – keep ’em coming!
Olivia says
Hi Gem! So happy you loved it! Lol at pepto bismol pink. I was there too.
Jennifer says
I use Flo-Coat by AmeriColor to color my SMBC! You just mix the Flo-Coat with the gel color first and then put it into the buttercream and it mixes in flawlessly!!! Total game changer when I found that YouTube video 😁. PS I love and only use your recipes!
Olivia says
Hi Jennifer! Whaaat?? I had never heard of flo-coat before!! I just looked it up now. How much flo-coat do you mix with the color gel? What I read said a 5:1 ratio of flo-coat to color gel? Thanks for the tip!!
S says
Hi! This looks beautiful and delicious! Wonder if it could be made in 13×9?
Thank you!
Olivia says
Hi S! I think that would be fine, but the layer would be thinner. Converting pan sizes is always tricky. Here are some sites I use as a guideline:
http://www.joyofbaking.com/PanSizes.html
https://www.cookipedia.co.uk/recipes_wiki/Cake_tin_conversion_charts
Deborah Chapman says
My husband’s family always wanted chocolate cake with peppermint icing for birthdays and I know how much the peppermint extract varies. And then there’s peppermint oil, which is strong but which doesn’t last well in the pantry. It’s kind of hard to know how strong the finished product will be from a taste test from the bottle, so just be prepared with plenty of it and keep adding . The cake looks and sounds delicious (of course)! Unfortunately we have to have a gluten free Christmas dessert!
Olivia says
Hi Deborah! Thanks so much. I will definitely give the peppermint oil a go!
Lindsey says
I made basically this last year for Christmas and it went down a treat! To flavor the peppermint frosting I’d recommend using peppermint essential oil. A few drops was all I needed to get a true peppermint flavor, but be careful as it can be overwhelming if you add too much!
Olivia says
Hi Lindsey! Good call on the essential oil. I don’t know why but every time I think of those I think of aromatherapy and not baking. I’ll give it a try!