• Home
  • About
    • About Olivia
    • The Pastry Diaries
    • Privacy & Disclosure
  • eBooks
  • Recipes
    • Cakes
      • Birthday Cakes
      • Bundt Cakes
      • Chocolate Cakes
      • Christmas Cakes
      • Classic Cakes
      • Drip Cakes
      • Easter Cakes
      • Fruity Cakes
      • Halloween Cakes
      • Naked Cakes
      • Thanksgiving Cakes
      • Valentine’s Cakes
      • Vanilla Cakes
    • Cookie Cups
    • Cookies
    • Frostings & Fillings
    • Holiday Desserts
  • Shop
  • Tutorials

Subscribe for the latest recipes:

Liv for Cake

Classic Cake Recipes with a Modern Twist

  • Home
  • About
    • About Olivia
    • The Pastry Diaries
    • Privacy & Disclosure
  • eBooks
  • Recipes
    • Cakes
      • Birthday Cakes
      • Bundt Cakes
      • Chocolate Cakes
      • Christmas Cakes
      • Classic Cakes
      • Drip Cakes
      • Easter Cakes
      • Fruity Cakes
      • Halloween Cakes
      • Naked Cakes
      • Thanksgiving Cakes
      • Valentine’s Cakes
      • Vanilla Cakes
    • Cookie Cups
    • Cookies
    • Frostings & Fillings
    • Holiday Desserts
  • Shop
  • Tutorials

Home Β» Cookie Cups Β» S’mores Cookie Cups

S’mores Cookie Cups

By Olivia, 84 Comments

This post may contain affiliate links. Please see my full Disclosure Policy for details.
Jump to Recipe

No campfire needed for these S’mores Cookie Cups! Graham cracker cookie cups filled with a Hershey’s milk chocolate ganache, topped with toasted homemade marshmallow fluff.

close up of a cookie cup

You may have noticed the lack of a new post last weekend — that happened for two reasons:

  1. It was a holiday weekend for both the US and Canada, so I didn’t expect many people to be on their various devices.
  2. I took the entire long weekend (plus a day!) OFF from almost everything blog-wise to celebrate/recuperate because we finally found a place to live! AND managed to get it. Which is a feat unto itself these days.

We are no longer homeless. Wooohooo! We weren’t actually at risk of being completely homeless just yet, but it felt like it was touch and go there for a while. I am SO GLAD to be done with the house hunting, you have no idea. It was honestly one of the most stressful and time-consuming experiences of my life. In a normal housing market it would be fine… fun, even! But not these days, not here.

A close up of a cookie cup on a plate

PSA to any of my Vancouver readers, if you’re thinking of entering the housing market because of the no doubt ridiculous sum of money you can get for your current place, I strongly advise against it. If we didn’t already want to move (our neighbours SUCK), I think we would have waited.

Overhead shot of a cookie cup

The Ultimate Cake Collection

Over 50 of my very favorite cake recipes all in one place! From Classic Cakes to Holiday favorites and everything in between.

Get your copy today!

If you read my last post, you know about the ridiculous crowds of people at the open houses. It does not seem to be slowing down by any means. But somehow in all this insanity and craziness, after losing out on another place just the night before, we ended up finally getting a place that had 4 other offers on it. Stress. Life.

Anyway, it’s over, and for that I am glad. Now we have a couple of months to slowly pack up our stuff and move at the end of the summer. I am really looking forward to moving into the new place!

overhead photo of cookie cups

As a result of all of the self-imposed stress, I honestly hadn’t felt much like baking these past few weeks. My life was consumed with scouring MLS listings, planning out our open house schedules, dealing with banks, realtors, etc. It was the opposite of fun and I just had no motivation for anything else.

Thankfully, I did muster up the energy one day to make these S’mores Cookie Cups. They’re like a fancy version of a s’more (and more delicious in my opinion). I needed something to get me through the days!

Close up of a cookie cup with a swirl

I have a crapload of s’mores recipes. Honestly, I don’t know why I have so many! You’d think I have some sort of s’mores obsession or something. I don’t.

If you haven’t made cookie cups before, you need to try them. They are so easy and fun to make! These S’mores Cookie Cups are definitely more work than your traditional s’more, but they are well worth the effort. PLUS, you don’t always have a campfire nearby to make the real ones.
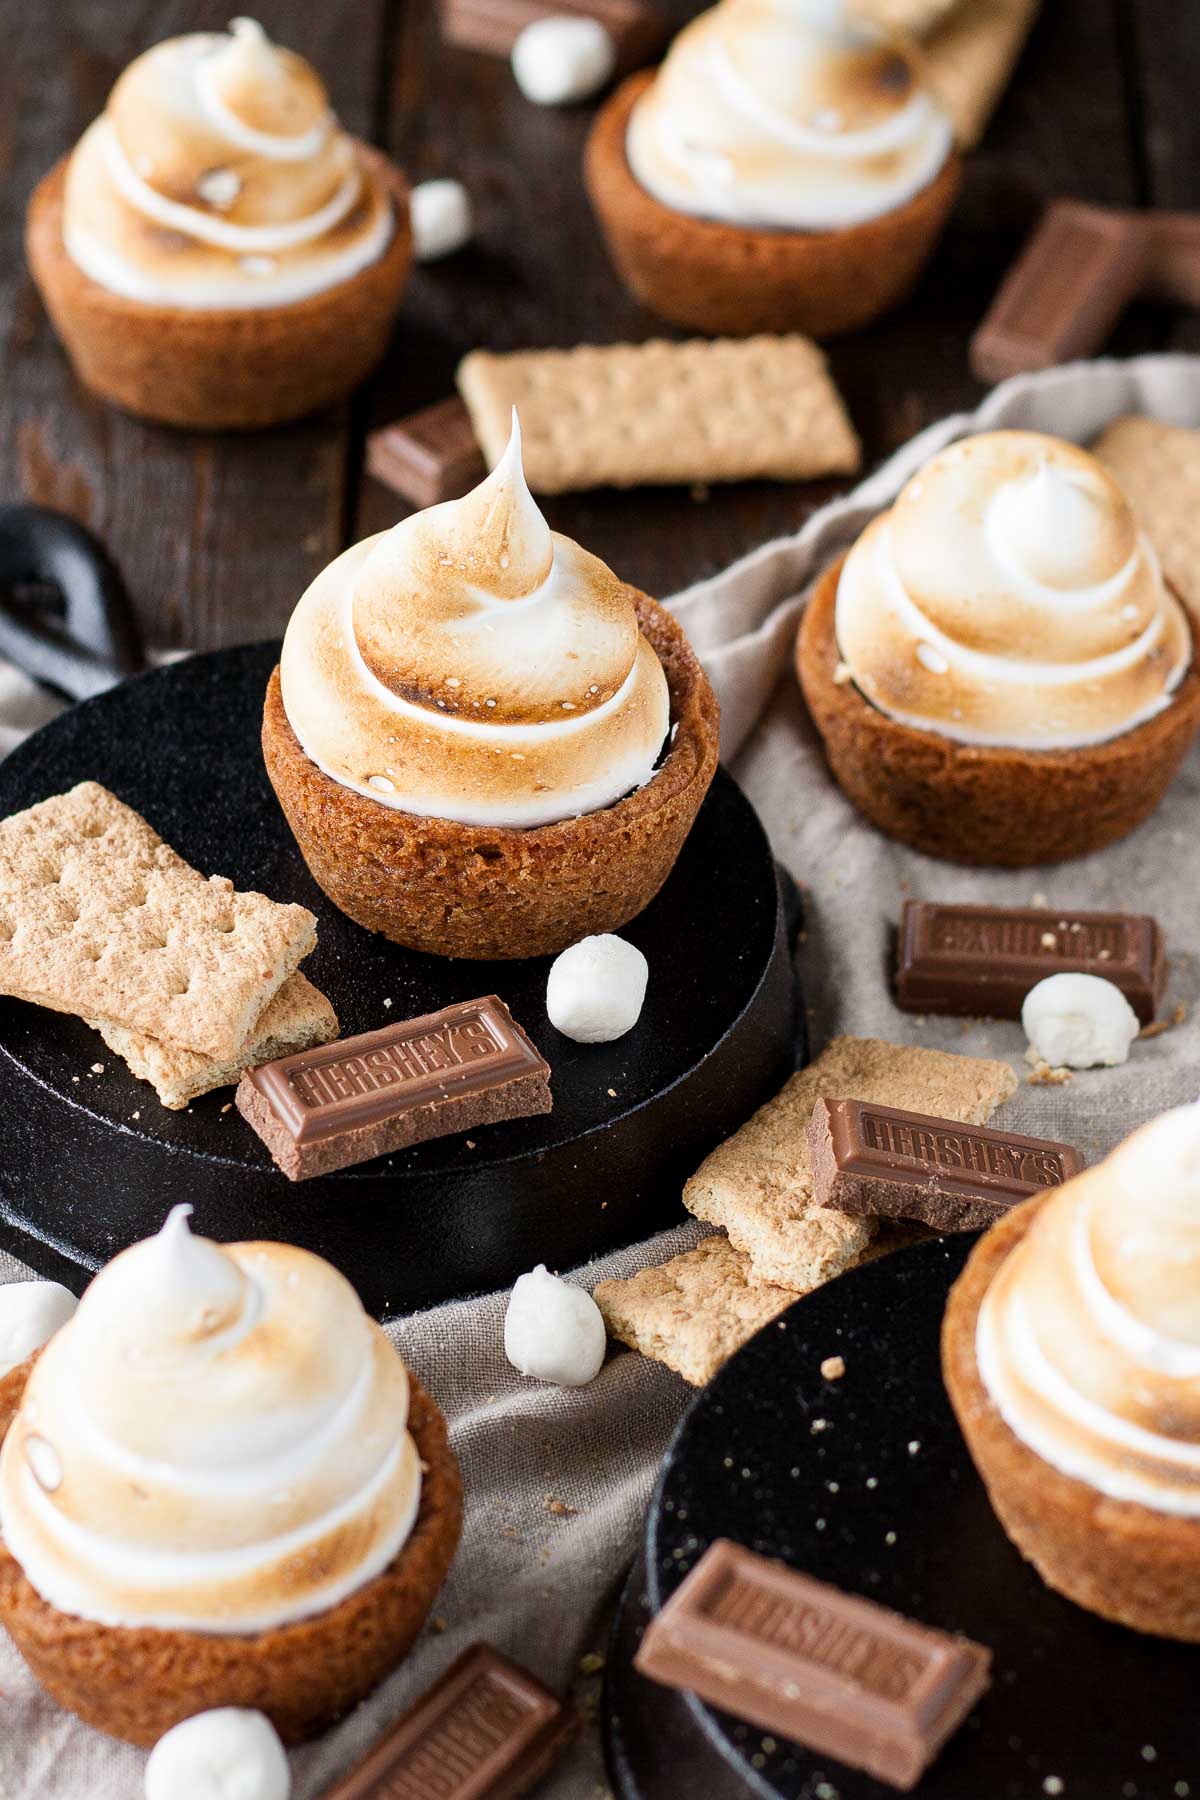
Multiple cookie cups on a table.

For the cookie cups, I used my favourite chocolate chip cookie recipe and swapped out some of the flour for graham cracker crumbs. The filling is a ganache made with Hershey’s Milk Chocolate and heavy cream. I opted to make my own marshmallow fluff for the topping, because it’s delicious. I haven’t had luck with the store-bought kind, so I don’t recommend it, but you could try it to see if it works. I’m not sure it would be pipeable, but you could probably smear it on the top and then torch it. Alternatively, for an uber easy (though less gooey) route, you can place a jumbo marshmallow on top and torch that.

A close up of a cookie cup with a bite taken out

These S’mores Cookie Cups are honestly amazing. I’m not the hugest fan of s’mores, but these things are GOOD. They are on the sweet side, but that works just fine for me. If you’d like to tone it down a bit you can use dark chocolate instead of milk chocolate.

These guys also store and freeze really well. I would keep them in the fridge if you’re not planning on eating them right away, but you could definitely pop them into the freezer in an air-tight container for a few weeks. You know, in case you want to double the batch but prevent yourself from eating them all in one sitting ;). Just let them come to room temperature before you dive in.

Enjoy!

Notes & tips for these S’mores Cookie Cups:

  • The cookie cups are very soft right out of the oven and chewy once cooled. If you’d prefer them to be firmer, swap out equal portions of the graham cookie crumbs for more flour.
  • For ease, you can try using store-bought marshmallow fluff, but it might not be as easy/pretty to pipe out.
  • These freeze very well! Store in fridge for up to 5 days or in freezer (in an airtight container) for 1-2 months.
  • Best served at room temperature.
Cross section of a cookie cup
Print Rate
4.43 from 14 votes

S'mores Cookie Cups

No campfire needed for these S'mores Cookie Cups! Graham cracker cookie cups filled with a Hershey's milk chocolate ganache, topped with toasted homemade marshmallow fluff.
Course Dessert
Cuisine Cookie, Tart
Prep Time 40 minutes
Cook Time 25 minutes
Total Time 1 hour 5 minutes
Servings 10
Calories 457kcal
Author Olivia

Ingredients

Cookie Cups:

  • 1/2 cup unsalted butter room temperature
  • 1/4 cup granulated sugar
  • 1/2 cup light-brown sugar packed
  • 1/2 cup + 2 Tbsp all-purpose flour
  • 1/2 cup graham cracker crumbs
  • 1/4 tsp baking soda
  • 1/2 tsp sea salt
  • 1 tsp vanilla extract
  • 1 large egg room temperature

Chocolate Filling:

  • 200 g Hershey's milk chocolate chopped
  • 100 ml heavy whipping cream

Marshmallow Fluff:

  • 1/3 cup water
  • 3/4 cup granulated sugar
  • 3/4 cup corn syrup or honey
  • 3 large egg whites room temperature
  • 1/2 tsp cream of tartar
  • 1 tsp clear vanilla extract
US Customary - Metric

Instructions

Cookie Cups:

  • Preheat oven to 350Β°F. Spray a regular sized muffin tin with cooking spray.
  • Whisk together flour, graham cracker crumbs, baking soda, and salt, set aside.
  • Beat butter and sugars on med-high until light and fluffy (approx. 2-3mins). Reduce speed and add egg and vanilla. Beat until combined. Add flour mixture and mix until just combined.
  • Using a large cookie scoop (3 Tbsp) scoop dough into muffin tins, press down to flatten.
  • Bake for approx. 13mins or until browned and mostly set.
  • Remove from oven and immediately use a small jar or container to press firmly down in the center to create a well. Cool in pans for 15mins, then place on wire rack to cool completely.

Chocolate Filling:

  • Place chopped chocolate and cream into a microwave safe bowl. Stir to combine. Microwave for 20 seconds, stir. Microwave in 10 second intervals, stirring in between, until smooth and silky. Set aside to cool completely before using.

Marshmallow Fluff:

  • Place water, sugar, and corn syrup (or honey) in a medium saucepan. Stir to combine.
  • Insert a candy thermometer into the pot and heat over medium-high. Do not stir from this point on as crystals will form.
  • Ensure mixer bowl and whisk are completely grease free.*
  • Place egg whites and cream of tartar in the bowl of a stand mixer.
  • When the sugar syrup reaches about 225Β°F, start whipping the egg whites to soft peaks. Approx 3-4mins.
  • When the whites are ready, the sugar syrup should be at 240Β°F. Remove from the heat, turn mixer to medium and very slowly and carefully pour the sugar syrup into the whites in a thin, steady stream.**
  • Once all of the syrup is in, set mixer to medium/high and continue whipping. The whites will deflate at first, but they will thicken and fluff up. Continue to whip for 7-8 minutes, or until the mixture is thick and glossy. Add in vanilla and whip until the fluff has cooled.

Assembly:

  • Pour chocolate onto a liquid measuring cup for ease. Pour a couple of teaspoons of chocolate into each cookie cup. Allow to set (you can speed this up in the fridge).
  • Prepare a large (16) piping bag fitted with a large round tip (I used Ateco 808). Fill with marshmallow fluff and pipe onto each cookie cup. Toast with a kitchen torch.

Recipes You May Like

  • Close up of a cookie cup with a bite taken out.
    Chocolate Peppermint Cookie Cups
  • Cookie cups topped with whipped cream on a grey plate.
    Chocolate Pumpkin Spice Cookie Cups
  • Close up of a cookie cup
    Eggnog Cheesecake Cookie Cups
  • Cookie cup with a bite taken out.
    Red Velvet Cookie Cups

Notes

*If there is even a speck of grease (or egg yolk) the meringue will not whip. I wipe everything down with lemon juice before adding the egg whites.
**The sweet spot for this is getting the stream right between the whisk and the sides of the bowl, so the syrup doesn't get splashed by the whisk. You will have some marshmallow fluff left over which you can store in an airtight container in the freezer and use it at a later date for S'mores Macarons, S'mores Baked Alaska, or good old Rice Krispie Treats.
Calories: 457kcalCarbohydrates: 70gProtein: 4gFat: 19gSaturated Fat: 11gCholesterol: 61mgSodium: 240mgPotassium: 84mgSugar: 62gVitamin A: 460IUCalcium: 66mgIron: 0.8mg
The nutritional information and metric conversions are calculated automatically. I cannot guarantee the accuracy of this data. If this important to you, please verify with your favourite nutrition calculator and/or metric conversion tool.

Originally published on July 10, 2016

Cookie cup photo collage

Learn How to Bake the Perfect Cake!

Tips, techniques, and troubleshooting to help ensure your cakes come out perfect every single time!

Get your copy today!

Hungry for more?

Join our Baking community on Facebook!
Follow Liv for Cake on Facebook, Instagram, Pinterest, and Twitter
Or sign up to get free recipes by email!

Subscribe for the latest recipes

February 22, 2019

Comments

    Leave a Reply Cancel reply

    Your email address will not be published. Required fields are marked *

    Recipe Rating


  1. Emma Dubois says

    December 22, 2020 at 5:48 PM

    If I plan on traveling with these, do you recommend torching before freezing or after before serving?

    Reply
    • Olivia says

      December 23, 2020 at 9:07 AM

      Hi Emma! I would torch before freezing as the meringue can dry out and I’m not sure how torching dry meringue would work.

      Reply
  2. brunella says

    June 17, 2020 at 9:02 PM

    the cookies cups didn’t turn out right (“: they were too liquid in the beginning and i tried adding some flour which make it more doughy. however it just didnt form the nice cup shape in the photos )-: it rose in the centre as well.

    Reply
    • Olivia says

      June 19, 2020 at 9:31 AM

      Hi Brunella! Sounds like something was maybe off in your measurements? The should have had the consistency of cookie dough. The centers do rise, which is why you need to press them down.

      Reply
  3. Ellie says

    March 18, 2019 at 1:39 PM

    Hi,

    How much is 100 ml heavy cream?

    Reply
    • Olivia says

      March 19, 2019 at 1:50 PM

      Hi Ellie! It’s almost half a cup, or 100g.

      Reply
  4. Stefanie says

    November 11, 2018 at 3:44 PM

    How many servings does this make if I use mini muffin tins?

    Reply
    • Olivia says

      November 13, 2018 at 2:01 PM

      Hi Stefanie! I’ve never tried it in a mini pan myself, but I would guess at least twice as many.

      Reply
  5. Emily says

    October 22, 2018 at 10:03 AM

    I have two questions: if I want the chocolate ganache to be firmer, do I just use less whipping cream? I made them and my chocolate turned out a bit pudding-like.

    Second: could I add a drop or two of liquid smoke to the marshmallow layer for a fresh from the campfire taste, or will it interfere with the consistency?

    Reply
    • Olivia says

      October 24, 2018 at 9:22 AM

      Hi Emily! Yes, use less cream for a firmer ganache. The ganache will firm up too though, the longer it sits. I’m not sure about the liquid smoke, but I would add it at the very end instead of or with the vanilla.

      Reply
  6. Stephanie, One Caring Mom says

    July 31, 2018 at 12:48 PM

    Your pictures are gorgeous! These S’mores cups look incredible and I can’t wait to try them!

    Reply
    • Olivia says

      August 3, 2018 at 2:35 PM

      Thanks so much!

      Reply
  7. Betsy says

    December 31, 2017 at 12:19 PM

    Hi I’m intending to make theses, but I’d like to make them Adult friendly, aka add liquor, I was planning on adding Godiva liquor to the chocolate and was thinking of adding the white chocolate liquor to the marshmallows, any suggestions, substitutions or changes you would suggest?! Thanks for your amazing recipes!

    Reply
    • Olivia says

      December 31, 2017 at 1:07 PM

      Hi Betsy! You can do that for sure and it would be totally delicious, just don’t add too much as it will affect the consistency! I would suggest 1 Tbsp at most to each the ganache and marshmallow fluff (leave the vanilla out of the fluff and replace it with liqueur). Let me know how they turn out!

      Reply
  8. Diana says

    October 27, 2017 at 10:14 AM

    2 stars
    The cookies did not turn out. Greasy, deflated messs. There is way too much butter.

    Reply
    • Olivia says

      October 29, 2017 at 7:19 AM

      Hi Diana! Sorry to hear you had trouble with these. They are definitely a chewier cookie due to the addition of graham cracker crumbs in the dough. It sounds like they maybe needed a bit more baking time.

      Reply
  9. Shari Trumbull says

    October 25, 2017 at 9:02 AM

    5 stars
    Hi There Olivia! I found your recipe on Pinterest and made these decadent smores cookie cups this past weekend πŸ™‚ They are wonderful and so very YUMMY πŸ™‚ This was my very first time making marshmallow fluff too, and it was so pretty in all its shiny, sweet wonderfulness πŸ™‚ Thank You for sharing!

    Reply
    • Olivia says

      October 29, 2017 at 6:57 AM

      Hi Shari! I’m so glad to hear that you liked these!

      Reply
  10. Pattie says

    August 12, 2017 at 1:40 PM

    5 stars
    Delicious.. I made mini ones and was a little concerned about the cups because of the comments.. I think the key for me was taking them out just when they turned brown find the right tool to make the indention in the cup… will totally make again. I have pictures just not sure how to post them to Olivia’s site

    Reply
    • Olivia says

      August 14, 2017 at 9:09 AM

      Hi Pattie! Thanks so much for your feedback. I’m so happy that you liked these! πŸ™‚ I would love to see the pics. You can email me at livforcakeblog [at] gmail [dot] com.

      Reply
  11. Rachel says

    August 3, 2017 at 12:38 PM

    5 stars
    Just made this recipe. They where a bit of work but nothing too difficult. I think they turned out really yummy and they look so cutie.

    Reply
    • Olivia says

      August 3, 2017 at 2:36 PM

      Hi Rachel! Awesome, I am so glad you liked it! πŸ™‚

      Reply
  12. Jackie says

    July 24, 2017 at 10:58 AM

    4 stars
    Made in mini muffin tins. Rave reviews from my kids. Stored in the freezer for camping next week. Now what in the heck am I going to do with the leftover fluff??? Other than eat it with a spoon that is???

    Reply
    • Olivia says

      July 24, 2017 at 2:42 PM

      Haha I knoooow! It makes a bit much. I store mine in the freezer for future use or else I will eat it all!! So glad the kids liked these πŸ™‚ xo

      Reply
  13. Lynn Alvarez says

    May 28, 2017 at 8:49 AM

    1 star
    I made these yesterday and ran into trouble on the cookie cups. In looking at your chocolate chip cookie recipe and some others for the cookie cups, I wonder if there is enough flour. Each of your recipes I looked at call for 2-1/4 cups of flour. Copied from above:

    1/2 cup + 2 Tbsp all-purpose flour
    1/2 cup graham cracker crumbs

    The butter, baking soda and salt are the same in your other recipes, but the flour is essentially cut in half. Should this have read 1 1/2 cups of flour and 1/2 cup of graham cracker crumbs?

    Reply
    • Olivia says

      May 30, 2017 at 8:39 AM

      Hi Lynn! What issues did you run into??

      Most of my other cookie cup recipes make double the amount of cookie cups, so that’s why the ingredient amounts are larger. The butter, baking soda, and salt in the other recipes are larger too.

      In this recipe, I used the graham cracker crumbs to replace some of the flour as I didn’t want them to be too dry. These ones are definitely on the chewy/gooey side. If you like you can use 1/4 cup graham cracker crumbs and 3/4 cup + 3 Tbsp of flour. I hope that helps!

      Reply
  14. Beverly says

    May 3, 2017 at 6:57 PM

    I have a question. Can you put another muffin tin (the bottom has been sprayed with pam) and place it onto top of the uncooked cookie cup and then bake, I believe that will give it the indentation we are looking for without having to use a jar to press down afterwards. What do you think?

    Reply
    • Olivia says

      May 4, 2017 at 8:34 AM

      Hi Beverly! I’ve never tried this method myself, but it could work. I do worry that there may not be enough room between the two pans for the cookie cups to spread out though. Let me know if you try it!

      Reply
  15. Ashley says

    March 23, 2017 at 6:30 PM

    5 stars
    Hi tried to make these last night….. is 1/2 cup and 2 tablespoons the right measurment? only was able to make about 6 cups! great recipe!

    Reply
    • Olivia says

      March 25, 2017 at 5:30 PM

      Hi Ashley! Yes 1/2 a cup is correct, the graham cracker crumbs act as “flour” as well. Strange that you could only make 6 though!! Maybe yours were bigger than mine :). I’m so glad you liked them!

      Reply
  16. Lulu says

    February 25, 2017 at 11:40 PM

    5 stars
    I just made these tonight with a friend and we had a lot of fun making it. We didn’t make the marshmallow fluff she nice we didnt have acandy thermometer handy, so we melted marshmallows with corn syrup and dolloped that on top before sliding it under the broiler . It didn’t look as beautiful and lofty, but it was quite tasty and the crackly top was perfect. We also used kosher salt instead of sea salt and loved the hint of salt in the cookie base that helped offset all the sugar. Thanks so much for the recipe! I love your blog and your beautiful cakes!

    Reply
    • Olivia says

      February 26, 2017 at 2:35 AM

      Thanks for your sweet comment Lulu! So glad to hear that you liked these πŸ™‚

      Reply
  17. Carmen says

    January 13, 2017 at 8:44 PM

    5 stars
    Thank you for helping me feel like the fanciest person ever in the kitchen!! These turned out so beautifully and amazingly delicious. Great directions and lovely pics–I will be coming back to your site to make all the things! πŸ™‚

    Reply
    • Olivia says

      January 14, 2017 at 11:42 AM

      Hi Carmen! Yay! I’m so happy these worked out for you and that you loved them :D.

      Reply
  18. Maggie says

    January 7, 2017 at 2:14 PM

    5 stars
    I made these today for the second time. So delicious! I made a couple of modifications and they still turned out awesome!

    I didn’t have any clear vanilla on hand, so I used my regular brown vanilla extract in the marshmallow fluff and I couldn’t tell a difference. I also don’t own piping bags, so I just used a large Ziploc bag with the corner cut off for the same effect. Lastly, I don’t have a kitchen torch and I tried using the broiler in my oven, but it really didn’t work so the marshmallow fluff didn’t get toasted…still delicious! My husband says this is the best dessert I’ve made. Thanks for sharing!

    Reply
    • Olivia says

      January 7, 2017 at 9:44 PM

      So glad you guys liked these Maggie! They’re a fave of mine 😊

      Reply
  19. Jenny says

    October 1, 2016 at 2:32 PM

    This is an one of my favourites. I know camping season is over but we can continue to eat s’mores right? Especially in cookie cups!! Definitely going to try these. Thanks for sharing.

    Reply
    • Olivia says

      October 2, 2016 at 11:04 AM

      Thanks Jenny! Totally agree. Love to have s’mores options all year round!

      Reply
  20. Emmy says

    September 29, 2016 at 11:01 AM

    I seem to have misplaced my kitchen torch, but I’m afraid if I put these under the broiler, disaster will strike. If I freeze the tarts with the marshmallow topping pre-broiler, do you think I’d be ok doing this to get the browning / charred look and taste?

    Reply
    • Olivia says

      September 30, 2016 at 8:26 AM

      Hi Emmy! Sorry for the delayed reply. I would definitely go with freezing them first if you try that. If you manage to cover the whole chocolate part with the marshmallow fluff it should help insulate them. Though there’s a chance the cookie part will brown more too :\. Let me know if you try it and how it works out!

      Reply
  21. Kristin H says

    September 17, 2016 at 12:26 PM

    The cups did not turn out well for me, so I didn’t bother finishing them with the chocolate or marshmallow layers. The cups seemed to need a lot more flour or graham cracker crumbs than what the recipe indicated, and they were quite greasy, too. I waited for them to cool completely before attempting to get them out of the pan, and more than half of them lost their bottoms, and I tried to be so gentle with them, too. I feel like this recipe has a lot of potential, but it needs tweaking. The marshmallow-y layer seemed like it would’ve been especially delicious. I think it would be helpful to have the measurements in grams, instead of cups.

    Reply
    • Olivia says

      September 17, 2016 at 4:40 PM

      Hi Kristin! I’m bummed that these didn’t work out for you. The base is more buttery and softer than usual cookies due to the graham crackers (but that’s how I like it – makes for a chewier cup). Sounds like perhaps they could have used a bit more time in the oven or maybe they were pressed down too hard and separated or stuck to the bottom? I’m not sure :\. Mine were delicate but came out of the pans no problem (except for one that I botched during the press-down process). Once cooled completely they were pretty firm. I hope you give this one a try again, it’s really delicious! If you like, you can add some more flour to make them a bit firmer — maybe 1/4 cup or so.

      Reply
      • A. says

        October 12, 2016 at 11:42 AM

        I guess it should be 1 and 1/2 cup of flour, not just 1/2 cup of it…

        Reply
        • Olivia says

          October 12, 2016 at 12:02 PM

          The recipe is correct as is. I used 1/2 cup flour and 1/2 cup graham crackers. If you prefer, you can add in more flour for a stiffer cookie, but 1 and 1/2 cups would be too much.

          Reply
  22. Sarah says

    September 5, 2016 at 3:48 PM

    5 stars
    I made these and LOVED them!!! They were a huge hit. But…my marshmallow fluff deflated…ALOT!! lol They tasted awesome but didn’t look as pretty. Any idea why? I made the fluff the day before I “piped” them onto the cups. Thanks!!

    Reply
    • Olivia says

      September 6, 2016 at 9:14 AM

      Hi Sarah! I’m so glad you liked these! So weird about the fluff! Typically a deflated/runny fluff is due to some grease or egg yolk getting into the whites before whipping them, but if it was stiff and then got soft, hmm. Did you stir it at all the next day before piping? What/where did you store it?

      Reply
      • Sarah says

        September 8, 2016 at 7:42 AM

        No it was never really “stiff” so I must have accidentally gotten some grease/yolk into them! I stored them in the refrigerator and them brought them to the party. Do I need to freeze them for a while, then refrigerate before bringing them somewhere?

        Thanks for your help!!!

        Reply
        • Olivia says

          September 8, 2016 at 3:26 PM

          You don’t need to freeze them, no. Just in the fridge is fine πŸ™‚ If you’re serving them same day, you don’t need to refrigerate at all!

          Reply
  23. Kelly says

    August 10, 2016 at 8:10 PM

    Hi, I’m in Brisbane and being winter here I can’t wait to make. What are Graham Crackers?? & would you use self raising flour or plain flour?? Many thanks, Kelly x

    Reply
    • Olivia says

      August 11, 2016 at 9:28 AM

      Hi Kelly! I don’t think Graham Crackers are available in Australia, but you can use crushed up Digestive biscuits as a substitute. I used all-purpose flour, which I *think* is just plain flour where you are. Let me know how you like these! πŸ™‚

      Reply
  24. Idriss says

    August 8, 2016 at 2:42 PM

    This looks phenomenal. I love your blog. I have also appreciated the two articles on how to grow your food blog. I have recently started my own food blog and it has been challenging to get good consistent traffic. Thank you for the motivation !

    Reply
    • Olivia says

      August 8, 2016 at 6:28 PM

      Hi Idriss! I’m glad you found those posts helpful. And thanks! πŸ™‚

      Reply
  25. Linda Bick says

    August 6, 2016 at 6:01 AM

    Mmmmmmmmm……………

    Reply
    • Olivia says

      August 6, 2016 at 11:57 AM

      These are SO good. I hope you try them πŸ™‚

      Reply
  26. Patsy says

    August 4, 2016 at 8:43 PM

    To make a pipe able marshmallow topping use egg whites. Whip 2 or 3 egg whites til frothy then add jar of marshmallow cream. Whip til peaks form.

    Reply
    • Olivia says

      August 5, 2016 at 8:55 AM

      Thanks for the tip Patsy! Do you cook the egg whites in any way?

      Reply
  27. Joanne Ochej says

    July 25, 2016 at 9:38 AM

    These look AMAZING! Really really love the cookie cup idea too!!

    Reply
    • Olivia says

      July 25, 2016 at 10:23 AM

      Thanks so much Joanne! πŸ™‚

      Reply
  28. O.G.F. says

    July 24, 2016 at 2:57 PM

    Conceptually these sound fantastic, however in execution, I have to say they fail. My belief is that there is too much butter in the recipe. The dough foams out of the cups of the muffin tin while cooking and then when you go to press them into form they squish everywhere and are soggy. I ended up throwing out three batches trying to get these to work… πŸ™

    Reply
    • Olivia says

      July 24, 2016 at 3:36 PM

      Hi!! I’m sorry you had trouble with these — that’s so frustrating! The butter amount is intentional — it makes them easy to squish and extra chewy, which I love. They do puff up quite a bit (but should not puff up out of the muffin tin, even when squishing). If you use a regular size muffin tin and the yield listed, then they should not overflow. If they are too squishy and soggy it means they are underbaked. Every oven is different, so 13mins in mine might equal 15 in another. I hope that helps.

      Reply
  29. Quin @ Butter Be Ready says

    July 16, 2016 at 10:00 AM

    Hi Liv! These smores cookie cups look and sound amazing! I recently bought a torch so I have to make these asap πŸ™‚

    Reply
    • Olivia says

      July 16, 2016 at 11:34 AM

      Hi Quin! Yay! I’m super excited that you’re going to try these. Let me know how they turn out :).

      Reply
  30. LuisaCA says

    July 15, 2016 at 4:55 PM

    Do you torch Before freezing?

    Reply
    • Olivia says

      July 15, 2016 at 5:14 PM

      I did, yes 😊

      Reply
  31. Anne says

    July 15, 2016 at 3:47 PM

    This looks absolutely amazing!! I love smores and you did the most logical GENIUS thing, I’m definitely gonna have to try this soon!

    Reply
    • Olivia says

      July 15, 2016 at 5:15 PM

      Thanks so much Anne!! These were seriously so good!! πŸ˜ŠπŸ’•

      Reply
  32. Vivian says

    July 12, 2016 at 6:48 PM

    Hi Olivia,
    This looks really yummy, but each time I make marshmallow it ends watery, impossible to eat, what am I doing wrong?

    Reply
    • Olivia says

      July 13, 2016 at 8:30 AM

      Hi Vivian! Do you mean that it’s runny or actually separated in some way? Runny marshmallow or meringue is usually caused by grease or oil. If there is any trace of egg yolk in your whites, or grease on your equipment, they whites won’t whip! I wipe my whisk, mixer bowl, etc all down with lemon juice to ensure they are grease free.

      Reply
  33. Jacquie says

    July 12, 2016 at 6:01 PM

    Hi Olivia, I know all about the moving thing, it’s pretty crazy out here in Toronto and surrounding area. We are about half hour from Toronto and we have multiple bidding wars here too.

    Anyway, these s’mores cookie cups look absolutely mouthwatering deelisshhh, I will definitely make them when it cools down a bit, too hot and humid to bake right now🌑 For sure storing this one in my recipe box. Thanks so much and happy packing πŸ˜‰

    Reply
    • Olivia says

      July 13, 2016 at 8:25 AM

      Thanks so much Jacquie! Sorry to hear the market is crazy over there too πŸ™ I thought it was just Van. Sigh.

      Reply
  34. Bill says

    July 12, 2016 at 9:06 AM

    5 stars
    These look so good. I am anxious to try them. I’m wondering however – are they made in a mini muffin tin or a regular cup cake tin?

    Reply
    • Olivia says

      July 12, 2016 at 9:21 AM

      Hi Bill! They are made in a regular cupcake tin. I hope you like them!! πŸ™‚

      Reply
  35. olga says

    July 11, 2016 at 11:12 PM

    You are a bad person!!!!!!!!!! it is impossible to turn on the oven in Spain!!!!!!!!!! I will have to wait more or less two months to do this awesome things!!!!!!!!!! I can not wait!!!!!!!!!

    You make me a sΒ΄more adicted

    A big kiss

    Reply
    • Olivia says

      July 12, 2016 at 9:22 AM

      Haha, I’m sorry!! We’re having a cold and rainy winter here in Vancouver so the oven temperature is not an issue. I hope you get to try these soon! πŸ™‚

      Reply
  36. Megan @ Meg is Well says

    July 11, 2016 at 2:57 PM

    5 stars
    Seriously, these look like heaven. You are the S’mores Queen!

    Reply
    • Olivia says

      July 11, 2016 at 4:43 PM

      Thanks so much Megan!! xo <3

      Reply
  37. Kathleen says

    July 11, 2016 at 10:33 AM

    5 stars
    These look amazing….could I make them a day or two in advance of serving?

    Reply
    • Olivia says

      July 11, 2016 at 10:34 AM

      Hi Kathleen! Totally. They refrigerate and freeze really well. Just take them out an hour or so before serving πŸ™‚

      Reply
      • Cindy says

        September 3, 2016 at 2:36 PM

        Do you freeze them with the marshmallow topping on and torched?

        Reply
        • Cindy says

          September 3, 2016 at 2:43 PM

          I just read the answer! Thanks. Looking forward to making these!

          Reply
          • Olivia says

            September 3, 2016 at 8:51 PM

            Hi Cindy! I hope you like them :D.

        • Olivia says

          September 3, 2016 at 8:51 PM

          Yep! Freeze the whole thing πŸ™‚

          Reply
  38. Renee says

    July 10, 2016 at 8:59 PM

    I’m a huge fan of S’mores and these look amazing!

    Reply
    • Olivia says

      July 11, 2016 at 10:34 AM

      Thanks so much Renee! <3

      Reply
How To Bake The Perfect Cake

Learn How to Bake the Perfect Cake!

Tips, techniques, and troubleshooting to help ensure your cakes come out perfect every single time!

Get your copy today!

Featured Posts

This Pecan Pie Cake is perfect for your holiday get-togethers! Brown sugar cake layers and buttercream filled with traditional pecan pie filling. | livforcake.com

Pecan Pie Cake

Edible cookie dough in a bowl.

How to Make Edible Cookie Dough

Mocha cake close up

Chocolate Mocha Cake

A close up of a stack of cookies

Oatmeal Chocolate Chip Cookies

Cake on a white cake stand with mint garnish.

Mint Chocolate Chip Cake

Cake on a cake stand.

Kahlua Cake With Mocha Buttercream

featured
olivia

Welcome to liv for cake!

I'm Olivia, a professionally trained pastry chef, recipe developer, and photographer from Vancouver, BC. Creating classic cake recipes with a modern twist.
Read More

sig

Subscribe for the latest recipes:

Copyright Β© 2010 - 2021, Liv for Cake. All Rights Reserved. Privacy & Disclosure
Design by Pixel Me Designs