• Home
  • About
    • About Olivia
    • The Pastry Diaries
    • Privacy & Disclosure
  • eBooks
  • Recipes
    • Cakes
      • Birthday Cakes
      • Bundt Cakes
      • Chocolate Cakes
      • Christmas Cakes
      • Classic Cakes
      • Drip Cakes
      • Easter Cakes
      • Fruity Cakes
      • Halloween Cakes
      • Naked Cakes
      • Thanksgiving Cakes
      • Valentine’s Cakes
      • Vanilla Cakes
    • Cookie Cups
    • Cookies
    • Frostings & Fillings
    • Holiday Desserts
  • Shop
  • Tutorials

Subscribe for the latest recipes:

Liv for Cake

Classic Cake Recipes with a Modern Twist

  • Home
  • About
    • About Olivia
    • The Pastry Diaries
    • Privacy & Disclosure
  • eBooks
  • Recipes
    • Cakes
      • Birthday Cakes
      • Bundt Cakes
      • Chocolate Cakes
      • Christmas Cakes
      • Classic Cakes
      • Drip Cakes
      • Easter Cakes
      • Fruity Cakes
      • Halloween Cakes
      • Naked Cakes
      • Thanksgiving Cakes
      • Valentine’s Cakes
      • Vanilla Cakes
    • Cookie Cups
    • Cookies
    • Frostings & Fillings
    • Holiday Desserts
  • Shop
  • Tutorials

Home » Cookie Cups » Chocolate Chip Cookie Cups

Chocolate Chip Cookie Cups

By Olivia, 101 Comments

This post may contain affiliate links. Please see my full Disclosure Policy for details.
Jump to Recipe

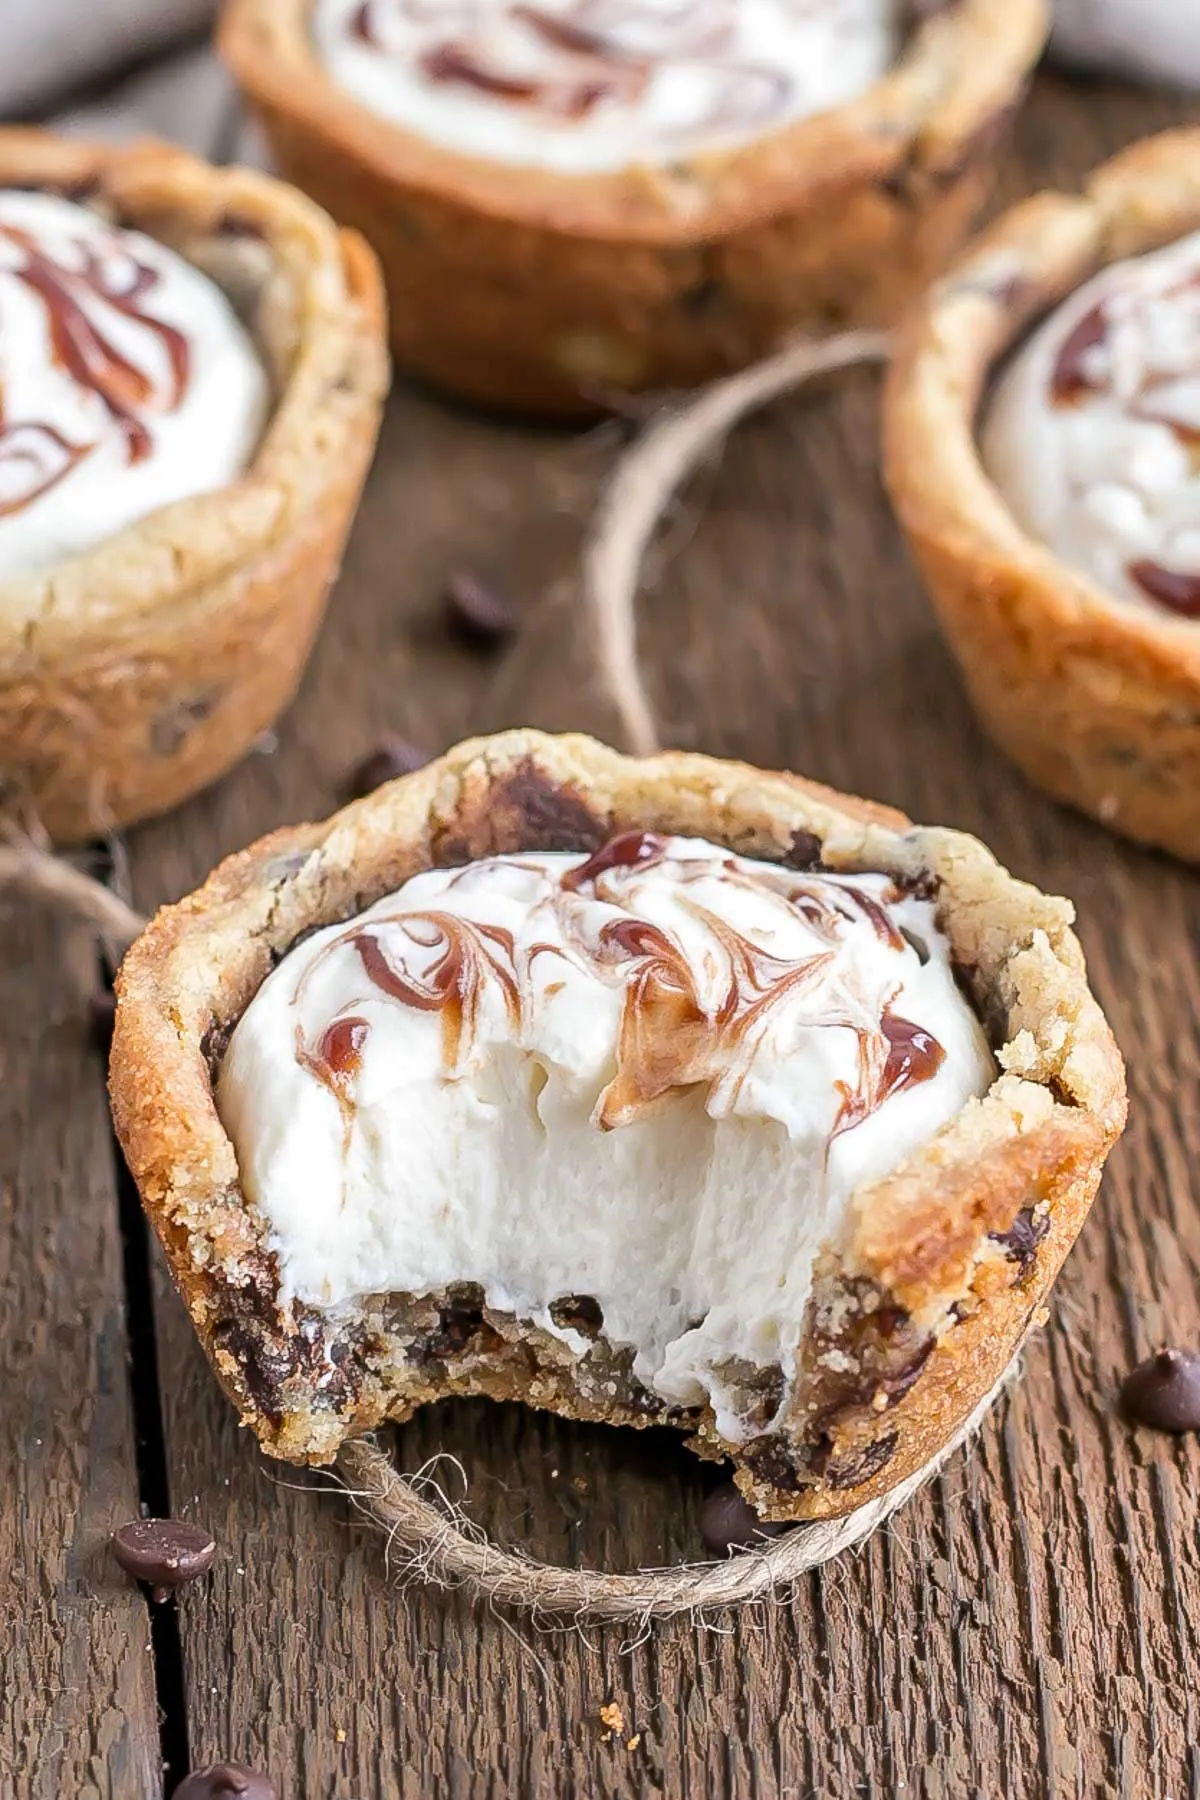
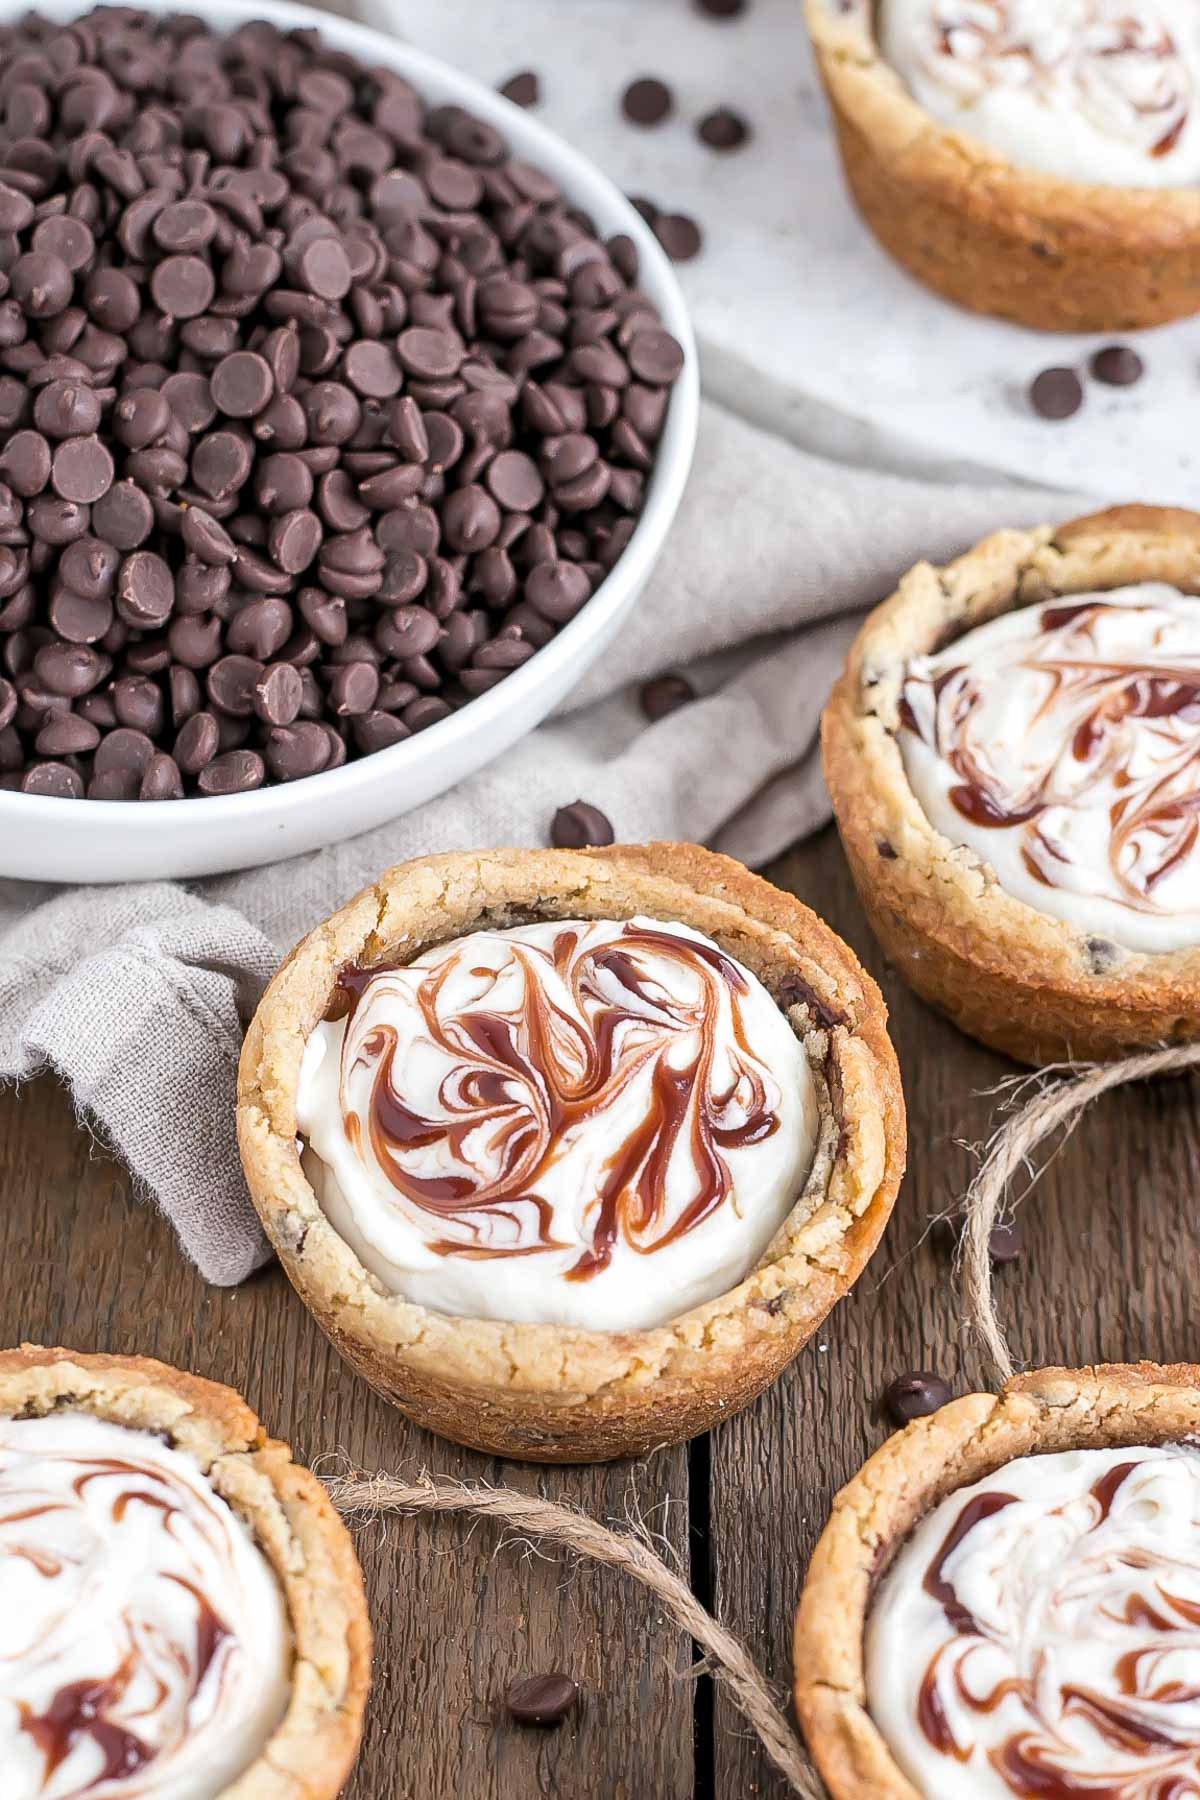
These chewy Chocolate Chip Cookie Cups are truly one of the easiest desserts you’ll ever make.  Filled with vanilla cream cheese mousse and a swirl of chocolate sauce.

Cookie cup with a bite taken out.

There are few things better and more comforting than good old chocolate chip cookies. Especially a batch that’s just come out of the oven and you grab a cookie as soon as it’s barely cool enough to hold and devour. One of life’s little pleasures, for sure.

These delicious Chocolate Chip Cookie Cups made their debut last weekend at a Food Bloggers of Canada potluck get-together hosted by my good friend Sam of My Kitchen Love (seriously, check out her stuff, it’s both stunning and delicious)!

Close up of a cookie up

I typically tend to shy away from social events, especially ones where I don’t know most of the people, but I promised my friend Sam I’d be there, so be there I was. Cookie Cups in hand! In hindsight, as always, I’m really glad I went and I got to meet a few new fellow food bloggers. Overall it was a super fun evening filled with delicious food. Why on earth would I have said no to that?!

The Ultimate Cake Collection

Over 50 of my very favorite cake recipes all in one place! From Classic Cakes to Holiday favorites and everything in between.

Get your copy today!

Overhead shot of cookie cups on a wooden table

Like my other cookie cup recipes, these ones are really simple to make. Like, SO simple. Whip up some cookie dough, bake it in a muffin tin, and press down on them as they come out of the oven to create the cups. The filling is just as simple. Whip up the cream cheese & sugar and fold it into some whipped cream. Fill the cooled cookie cups and you’re done!

Ideally you’d chill them in the fridge for an hour or two to thicken the filling, but this is totally optional and not at all necessary. It really just depends on how you like it. I prefer them out of the fridge, but I certainly won’t turn my nose up at them if they’re at room temperature.

Cookie cup with a chocolate swirl

The best thing about these Chocolate Chip Cookie Cups? They freeze really well. So you can make them in advance for a special occasion, or just have an easily accessible treat for yourself stashed away. We all need those from time to time, right?

A wooden table topped with cookie cups

I honestly did not think it was possible to make chocolate chip cookies even better, but these Chocolate Chip Cookie Cups have done it. Pairing the cookies with a fluffy cheesecake mousse gives them just the right balance of sweet and tangy. The cream cheese flavour isn’t strong, but it really helps intensify the flavour of the cookie cups.

Close up of a cookie cup with a bite taken out.

Notes & tips for these Chocolate Chip Cookie Cups:

  • Use sea salt in your cookies if possible. It really enhances the favour!
  • Ensure your heavy cream is cold (ideally the mixer bowl too) as this will make the cream whip up better.
  • The cookies will soften a bit the longer they sit with the filling.
  • These freeze very well! Store in fridge for up to 4 days or in freezer (in an airtight container) for 1-2 months.
  • Best served cold, but can be served at room temperature.
  • If you like these, check out some of my other other cookie cup recipes!
Cookie cup with a bite taken out.
Print Rate
4.78 from 22 votes

Chocolate Chip Cookie Cups

These chewy Chocolate Chip Cookie Cups are truly one of the easiest desserts you'll ever make. Filled with Vanilla Cream Cheese Mousse and a swirl of chocolate sauce. 
Course Dessert
Cuisine Cookie, Tart
Prep Time 2 hours 30 minutes
Cook Time 15 minutes
Total Time 2 hours 45 minutes
Servings 24
Calories 308kcal
Author Olivia

Ingredients

Chocolate Chip Cookie Cups:

  • 2 1/4 cups all-purpose flour
  • 1/2 tsp baking soda
  • 1 tsp sea salt
  • 1 cup unsalted butter room temperature
  • 1/2 cup granulated sugar
  • 1 cup light brown sugar packed
  • 2 large eggs room temperature
  • 2 tsp vanilla extract
  • 1 1/2 cups mini chocolate chips semi-sweet

Cheesecake Mousse Filling:

  • 1 cup heavy whipping cream cold
  • 8 oz cream cheese softened
  • 1/2 cup granulated sugar
  • 1 tsp vanilla
  • chocolate sauce optional
US Customary - Metric

Instructions

Chocolate Chip Cookie Cups:

  • Preheat oven to 350°F. Spray 2 regular sized muffin tins with cooking spray.
  • Whisk together flour, baking soda, and salt, set aside.
  • Beat butter and sugars on med-high until pale and fluffy (approx. 2-3mins). Reduce speed and add eggs (one at a time), and vanilla. Beat until combined.
  • Add flour mixture and mix until just combined. Fold in chocolate chips.
  • Using a large cookie scoop (3 Tbsp), scoop dough into muffin tins.
  • Bake for approximately 15 mins or until lightly browned and mostly set (but not completely).
  • Remove from oven and immediately use a small jar or container to press firmly down in the center to create a well. Cool in pans for 10 mins, then place on wire rack to cool completely.

Cheesecake Mousse Filling:

  • Whip heavy cream until stiff peaks (ideally with a cold whisk and in a cold bowl).
  • In a separate bowl, beat cream cheese and sugar until smooth, add vanilla and beat until smooth.
  • Fold cream cheese mixture into whipped cream. Pipe into cooled cookie cups. Top with chocolate sauce if desired and swirl with a toothpick. Refrigerate until set (approx. 2 hours).
  • Serve cold and eat within 2-3 days. Or freeze for up to 4 weeks.

Recipes You May Like

  • Close up of a cookie cup with a bite taken out.
    Chocolate Peppermint Cookie Cups
  • Cookie cups topped with whipped cream on a grey plate.
    Chocolate Pumpkin Spice Cookie Cups
  • A decorated cake on a cake stand
    Chocolate Chip Cookie Cake
  • Close up of a cookie cup
    Eggnog Cheesecake Cookie Cups
Calories: 308kcalCarbohydrates: 34gProtein: 3gFat: 17gSaturated Fat: 10gCholesterol: 61mgSodium: 174mgPotassium: 53mgSugar: 24gVitamin A: 555IUVitamin C: 0.2mgCalcium: 43mgIron: 0.9mg
The nutritional information and metric conversions are calculated automatically. I cannot guarantee the accuracy of this data. If this important to you, please verify with your favourite nutrition calculator and/or metric conversion tool.

Photo collage.

Learn How to Bake the Perfect Cake!

Tips, techniques, and troubleshooting to help ensure your cakes come out perfect every single time!

Get your copy today!

Hungry for more?

Join our Baking community on Facebook!
Follow Liv for Cake on Facebook, Instagram, Pinterest, and Twitter
Or sign up to get free recipes by email!

Subscribe for the latest recipes

April 9, 2017

Comments

    Leave a Reply Cancel reply

    Your email address will not be published. Required fields are marked *

    Recipe Rating


  1. Lauren says

    January 14, 2021 at 7:33 AM

    5 stars
    Will definitely make these again.

    Thanks for the recipe, Olivia!

    Reply
    • Olivia says

      January 14, 2021 at 3:04 PM

      Hi Lauren! So glad you loved them 🙂

      Reply
  2. dawne says

    December 24, 2020 at 9:22 AM

    5 stars
    AMAZING!! I’m now making my third batch because the first disappeared before they could go on our cookie trays. I’m also going to try the Baileys (awesome score of free bottles too, ha!) as well. Can’t wait to try more. Happy Holidays!

    Reply
    • Olivia says

      December 24, 2020 at 9:43 AM

      Hi Dawne! So happy you love these! The Baileys ones are SO good too. Happy Holidays!

      Reply
  3. Ann Sherman says

    December 23, 2020 at 7:27 AM

    The hit of my holiday baking. Making me second batch and several friends have already baked. Thanks a million for your genius. I am going to bake the Baileys cheesecake cookie next. Merry Christmas

    Reply
    • Olivia says

      December 23, 2020 at 9:14 AM

      Hi Ann! So happy you loved these. The Baileys ones are so delicious too!

      Reply
  4. Jean Marie Evans says

    September 28, 2020 at 11:53 AM

    How many is this supposed to make? Mine came out tasting delicious but also definitely think I had enough dough to make another dozen! The cups are too thick at the bottom, had to break most of them to get them out of the tin. Whoops!

    Reply
    • Olivia says

      September 30, 2020 at 10:41 AM

      Hi Jean Marie! The recipe makes 24 cookie cups.

      Reply
  5. Isabella says

    September 23, 2020 at 4:12 PM

    Hi Olivia,
    I have heard that refrigerating the cookie dough before baking it is a good idea. Can I do this for the cookie cups or would it somehow affect them?
    I was also wondering, is the cookie supposed to be gooey or dry?

    Thanks in advance 🙂 This recipe looks sooo good! I am eager to do it!!

    Reply
    • Olivia says

      September 23, 2020 at 5:22 PM

      Hi Isabella! If you’re making cookies then I definitely recommend chilling the dough so they don’t spread as much. For the cookie cups though, we do want the drought to puff up and spread so I don’t recommend chilling. The cookie should be very chewy and not dry at all! Let me know how you like it 🙂

      Reply
  6. Sarah W. says

    May 30, 2020 at 10:32 PM

    Hi Olivia! How do you make your chocolate sauce? I can’t find that recipe anywhere on the page.
    Thanks in advance!

    Reply
    • Olivia says

      June 1, 2020 at 9:19 AM

      Hi Sarah! I actually used store bought here because it was such a small amount, but if you want to make your own I would make a ganache! Follow the tutorial/recipe using 4oz chocolate and 2 oz cream.

      Reply
      • Sarah W. says

        June 8, 2020 at 11:58 AM

        5 stars
        Thanks so much for the tip! These were crazy delicious. I’m obsessed and my family is obsessed :).
        Before seeing your comment I found a recipe online for an “Easy Chocolate Sauce” which was so yummy with your recipe and then I had some leftover to use with other things.

        Reply
        • Olivia says

          June 8, 2020 at 2:42 PM

          Yay! I’m so glad you loved them 😀

          Reply
  7. Lacie says

    March 15, 2020 at 5:54 PM

    5 stars
    Oh my Yummness!!! I did everything exact on the cookies and turned out perfect! For the cheesecake I added just a little more vanilla and a little more sugar to make it more sweet and less cream cheesey and it turned out delicious. my husband is very picky with cheesecake because it’s his favorite and he even liked it. Two thumbs way up for this family!!!!!!! Thank you so much for the recipe, pairs great with I’ve cream to cut the sweetness beautifully 😍

    Reply
    • Lacie says

      March 15, 2020 at 5:55 PM

      Ice cream not I’ve cream lol

      Reply
    • Olivia says

      March 18, 2020 at 10:09 AM

      Hi Lacie! Thanks for the awesome feedback, I’m so happy you all loved it! 🙂

      Reply
  8. Elisheva Dadoun says

    February 18, 2020 at 10:42 AM

    Any tips for getting the cups out of the tin? I sprayed them Sooooo well but they seem to be too difficult to take out without spinning them and saying a prayer they don’t break apart. Any suggestions? They are deff fully baked.

    Reply
    • Olivia says

      February 18, 2020 at 9:50 PM

      Hi Elisheva! I find a dark colored tin to work best (for me personally). I do have to spin them too and sometimes nudge them out. I think what helps me is that I use a plastic cap thing to press into them and the cup often sticks to it a bit which helps me lift it out.

      Reply
  9. Heather says

    January 21, 2020 at 5:47 PM

    These came out amazing. I didn’t get 24 but 17 using the 3 TBS per cup. I used a pestel to make the well and it was a great size. I also used liners and had no problem. Great recipe, thank you!

    Reply
    • Olivia says

      January 22, 2020 at 4:26 PM

      Hi Heather! So happy you liked these and awesome that the liners worked! Thanks for that tip 😀

      Reply
  10. Susan Clark says

    November 27, 2019 at 4:45 PM

    I had problems at first using a glass…….the edges all crumbled and stuck to bottom of glass. This was with two test ones. I baked the next batch slightly less and used a wooden dowel with an end size of a nickel. This worked better although not as big to fill.

    Reply
    • Olivia says

      November 28, 2019 at 9:19 AM

      Hi Susan! Glad to hear it worked out. Thanks for your tips!

      Reply
  11. Karen says

    November 24, 2019 at 1:19 PM

    Can I use chocolate pudding instead???

    Reply
    • Olivia says

      November 25, 2019 at 10:05 AM

      Hi Karen! As a filling? For sure!

      Reply
  12. Celaena says

    November 20, 2019 at 6:06 PM

    can you shape the dough in the cup before baking, or would it puff up and lose it’s shape?

    Reply
    • Olivia says

      November 21, 2019 at 3:19 PM

      Hi Celaena! You could do it a bit for sure, but it will still puff up some and you’ll need to press it down a bit anyhow.

      Reply
  13. Melissa Carpenter says

    November 18, 2019 at 2:02 PM

    These are great, Love them

    Reply
    • Olivia says

      November 19, 2019 at 9:39 AM

      Hi Melissa! So glad you like them 🙂

      Reply
  14. Nancy E says

    November 7, 2019 at 9:52 AM

    5 stars
    Saw this recipe and thought it would be fun to bake with my grand daughter, seriously thinking I would not like them (too sweet) but she would. Boy was I wrong, we all loved them and everyone we shared them with felt the same!! We did end up baking them about 3 minutes longer than the recipe said(all ovens are different) and used a tart tamper to push down centers. Worked perfectly. I was worried the filling would soften up the cookie cup but I ate the last one 3 days after making them and it was still great. Thank you for sharing this recipe, its a keeper and appearing on my holiday dessert table.

    Reply
    • Olivia says

      November 7, 2019 at 5:16 PM

      Hi Nancy! I am thrilled to hear that you and everyone loved these 🙂 Thanks so much for your tips and feedback.

      Reply
    • Dylan says

      November 14, 2019 at 6:15 PM

      5 stars
      Hi Olivia, my girlfriend showed me this recipe to make for her and some friends and it was amazing. I am a baking and pastry graduate from UC but have never seen something like this, so I had gave it a go and it came out fantastic!!! Couldn’t be happier

      Reply
      • Olivia says

        November 15, 2019 at 5:17 PM

        Hi Dylan! Thanks so much for the great feedback, I’m so happy you loved them!

        Reply
  15. Nicole says

    November 2, 2019 at 12:30 PM

    The cookie cups came out terrible, unbaked dough squirting around the edges. Waste of ingredients

    Reply
    • Olivia says

      November 4, 2019 at 3:20 PM

      Hi Nicole! Sorry to hear you had trouble with these. It sounds like they needed a bit more time in the oven.

      Reply
  16. Hannah says

    October 14, 2019 at 5:24 PM

    Hi there! Was just wondering, is it possible to make the cheesecake mousse filling, put the mixture into piping bags to set and then fill the cups later? I’m wanting to give these ago for a birthday but the venue where the Birthday is going to be held has no refrigeration.

    Reply
    • Olivia says

      October 15, 2019 at 10:01 AM

      Hi Hannah! Yes that should work fine. The filling will have thickened a bit though but will still be pipeable.

      Reply
  17. Karen says

    June 11, 2019 at 7:08 AM

    5 stars
    Hi Olivia. I served these at a museum event last month and while I thought they were yummy, However, I received very few comments. Yesterday, I met with the museum board members and they cornered me to tell me these were the most delicious treats they had ever eaten! Phew, I thought maybe my taste buds were ‘off!’

    Thank you for making me look like a rockstar!

    Reply
    • Olivia says

      June 12, 2019 at 10:20 AM

      Hi Karen! So happy everyone loved them!!

      Reply
  18. Brittany says

    March 31, 2019 at 7:20 PM

    5 stars
    I finally got around to making cookie cups, but I made these as mini ones instead (I got 50 of them, but probably could have still gotten another couple out of the last scraps of dough). I did a heaping tablespoon of dough in each cup, baked them for 10-11 minutes (watch very closely, I think I wound up doing the second pan as 10:30) and used the back of a metal teaspoon to squish down a little well.

    I took them to a family gathering tonight and they devoured them! I had two people ask me for the recipe already. It’s the perfect balance. I thought the cookie on its own was a touch salty, but that wound up going very well with the chocolate and then the tangy sweetness (that’s not TOO sweet) from the filling.

    Can’t wait to try others!

    Reply
    • Olivia says

      April 1, 2019 at 4:50 PM

      Hi Brittany! Thanks so much for your tips on making the minis! So glad everyone loved these and can’t wait to hear which ones you try next 🙂

      Reply
  19. CupresFerrite says

    February 15, 2019 at 11:06 AM

    4 stars
    This recipe worked a treat! I tend to leave the vanilla out as I find it can easily overpower the other flavours but I think thats just a personal preference

    Reply
    • Olivia says

      February 15, 2019 at 2:10 PM

      So glad you liked it!

      Reply
  20. G-MA says

    December 8, 2018 at 5:36 AM

    Can these be frozen

    Reply
    • Olivia says

      December 10, 2018 at 4:41 PM

      Hi there! Yes, they freeze well.

      Reply
  21. Lauren says

    May 23, 2018 at 10:19 AM

    Can I use liners in the tin? I have tried different cake/cookie cup recipes before and I always have trouble getting the cups out of the tin.

    Reply
    • Olivia says

      May 25, 2018 at 3:47 PM

      Hi Lauren! I don’t see why not, definitely give it a try!

      Reply
  22. Donita says

    February 22, 2018 at 12:32 PM

    5 stars
    Olivia, I love caramel, so I did them in the mini muffin pans, after shaping with a shot glass I added a caramel to the bottom and then topped with your frosting! Really an extra treat!pwitha surprise!

    Reply
    • Olivia says

      February 25, 2018 at 4:00 PM

      Hi Donita! That sounds crazy delicious, I love that idea!!

      Reply
  23. Cindy says

    February 16, 2018 at 4:36 PM

    Can cool whip be substituted for real whip cream?

    Reply
    • Olivia says

      February 18, 2018 at 3:59 PM

      Hi Cindy! Yes, I think that would work fine 🙂

      Reply
  24. Janet says

    October 4, 2017 at 4:57 PM

    5 stars
    These. Are. Amazing. Took them to a tailgate at my son’s college. In making the cheesecake filling, vanilla is called for, but it doesn’t say where to add the vanilla–I added it to the cream cheese/sugar mixture before folding into whipped cream. The college kids devoured them!!! Thank you!

    Reply
    • Olivia says

      October 5, 2017 at 4:58 PM

      Hi Janet! Oops, good catch on the vanilla, I’ve updated the recipe. So glad everyone liked these!!

      Reply
  25. Suzy says

    September 26, 2017 at 12:54 PM

    Can the muffin pan be turned upside down and form the dough on the outside of each cup? Thanks!

    Reply
    • Olivia says

      September 28, 2017 at 1:42 PM

      Hi Suzy! I’ve never tried this myself but you can give it a go. Let me know how it turns out!

      Reply
  26. Murjan says

    September 18, 2017 at 2:38 AM

    Hi. When you say these can.be frozen for up to 4 weeks do you mean with the filling or the empty cups. You didn’t specify.

    Thank you

    Reply
    • Olivia says

      September 18, 2017 at 12:15 PM

      Hi Murjan! They can be frozen with the filling.

      Reply
  27. Patty says

    September 4, 2017 at 5:26 PM

    5 stars
    These look great, can’t wait to bake them for church fellowship ! I was wondering if you could take another muffin tin and press down on the one with the cookie dough in it to make the cups? Would they be too thin maybe? What are your thoughts on that? Thanks

    Reply
    • Olivia says

      September 5, 2017 at 2:47 PM

      Hi Patty! You could give that a try, but I wonder the same thing — if they’d be too thin. Also, it may be harder to judge if you’re pressing down in the center of the cups rather than off to the side. Let me know if you try it! 🙂

      Reply
  28. Michele says

    August 3, 2017 at 8:17 AM

    Do you have the nutritional information? If so can you please provide-thanks so much
    I haven’t tried recipe but might depending on the info, look yummy

    Reply
    • Olivia says

      August 3, 2017 at 2:34 PM

      Hi Michele! Adding Nutritional Info to my recipes is on my list of things to do. Stay tuned!

      Reply
  29. Connie says

    July 27, 2017 at 7:06 PM

    Have you ever made a cookie cup using a mini muffin tin? I like to make mini cupcakes, etc., so people can try my dessert and other desserts and not feel so guilty. I think these would make great mini cups, but wonder if you have tried it. If so, how long did you cook them, etc.?

    Reply
    • Olivia says

      July 28, 2017 at 1:00 PM

      Hi Connie! I’ve never made them in mini muffin pans myself, but it should work fine. I’m not 100% sure on timing. Start checking at 5-7mins and bake them until lightly browned on the edges. Let me know how they turn out!

      Reply
    • Michele says

      December 1, 2017 at 12:10 PM

      5 stars
      I just made them in my mini tin pans. I got 51 out of the cookie mix. I baked them for 11 mins. Turned out perfect!! I also use my wooden press from Pampered Chef that I bought over 20 yrs. ago to press down the cookie. Came out clean. Great recipe. Very Easy! Will definitely make again.

      Reply
      • Olivia says

        December 1, 2017 at 8:46 PM

        Thanks so much for the input Michele! So glad you liked them 🙂 That wooden press is perfect! I’m totally going to look for that. Thank you!

        Reply
  30. Emily says

    July 13, 2017 at 11:55 AM

    2 stars
    Yeah, this recipe didn’t really work for me. I cooked them for fifteen minutes as recommended, but when I tried to press the cookies down with a glass jar they fell apart. The dough in the center hadn’t cooked at all, even though the outside looked perfect, if not slightly overdone. I wound up pressing the rest down with a spoon and putting them back in the oven. Even then, they were pretty raw and had a sort of eggy flavor that I didn’t really like. The whipped cream was really good though. Thanks for the recipe anyway.

    Reply
    • Olivia says

      July 13, 2017 at 4:16 PM

      Hi Emily! So sorry to hear these didn’t work out for you 🙁 I find I get different results depending on the color of my cupcake pan. Darker pans can cause the outside to brown rather quickly! Another culprit could be oven temperature. Some ovens run hotter than others and can cause things to bake/brown quicker.

      The center should be somewhat gooey, but not raw, when you press down. If it’s raw I usually pop them back in the oven for a couple mins. I would say that I do like mine somewhat underdone and chewy, but it’s a preference thing. Glad you liked the filling!

      Reply
      • ELLEN MILLER says

        October 31, 2019 at 12:59 AM

        I cannot eat cream cheese so could I just use heavy cream or something different for the filling ??
        thanks so much

        Reply
        • Olivia says

          October 31, 2019 at 9:20 AM

          Hi Ellen! You could try it with mascarpone instead? Or something like pudding?

          Reply
  31. Tina says

    June 20, 2017 at 1:37 PM

    5 stars
    They taste even better than they look. They were so easy to make. I took them over to a family party and everyone was crazy about them! This was the first time trying your recipes and I can’t wait to try them all! Thank you!

    Reply
    • Olivia says

      June 22, 2017 at 1:54 PM

      Hi Tina! So happy to hear you guys liked these 🙂 Thanks for the feedback!

      Reply
  32. Oyu says

    June 20, 2017 at 2:08 AM

    5 stars
    Hello Olivia! I was wondering if your muffin tins are the same size as just a normal cupcake tin? I’m planning on making these for a class party, so I would really like to know urgently! Thank you

    Reply
    • Olivia says

      June 20, 2017 at 11:10 AM

      Hi Oyu! Yes, just a normal sized cupcake tin. 12 per pan. I hope you like them!

      Reply
  33. Katie says

    June 17, 2017 at 9:31 AM

    Hi Olivia! with the extra dough can we make cookies with it?

    Reply
    • Olivia says

      June 18, 2017 at 10:53 AM

      Hi Katie! I didn’t have any extra dough, but if you choose to make less cups then you can totally make cookies instead!

      Reply
  34. Lillyanne says

    June 15, 2017 at 6:49 AM

    Can I use caster sugar instead of granulated sugar. Because I don’t have any. I really want to make them they look amazing!

    Reply
    • Olivia says

      June 15, 2017 at 11:52 AM

      Hi Lillyanne! I’ve never tried making these with caster sugar myself. I think that *should* work ok. Caster sugar is a bit finer than granulated, so ideally you’d go by weight if substituting.

      Reply
  35. Connie says

    June 11, 2017 at 7:01 PM

    The cookie cups didn’t turn out for me-the glass I used after baking to form the cups pulled out the cookie dough so I thought they must have been undercooked. However had another tin that baked longer and then didn’t accept any shaping. Salvaged the dessert by crumbling half the cookie crumbles in a 9×13 cake pan, topping with filling and the remaining cookie crumbles. It was a major hit anyway- my granddaughter requested this as her birthday dessert. 😎 Anyway, please pass along any suggestions if anything comes to mind. Thanks!!

    Reply
    • Olivia says

      June 12, 2017 at 10:16 AM

      Hi Connie! Sorry to hear about the troubles with sticking 🙁 I use a plastic cap from my Pan for Baking to press into the cookies. It sticks a bit at times so I try to spin it in the cookie cup or sometimes hold onto the edge of the cookie (through a tea towel since it will be hot) while pulling it back up. You could try spraying the glass with some cooking spray to see if that will prevent it from sticking. Or try something metal if you have it handy — like a cookie scoop or even the back of a spoon maybe. Let me know if any of those work!!

      Reply
  36. Adina says

    May 24, 2017 at 11:37 AM

    Can the butter be replaced with oil

    Reply
    • Olivia says

      May 24, 2017 at 4:48 PM

      Hi Adina! No, you should use butter in the cookie cups.

      Reply
  37. Linda says

    April 14, 2017 at 12:07 PM

    The recipe isn’t listed at all on mine

    Reply
    • Olivia says

      April 14, 2017 at 1:11 PM

      Bizarre! Are you on mobile or tablet? If so, look for a Read More button. I hope that helps!

      Reply
  38. Sylvia Atwell says

    April 13, 2017 at 3:35 PM

    4 stars
    I used premade cookie dough for times sake. You have to use the ones that are 12 in a pack. You also have to make sure they’re cooked really well before you try to shake them and then leave them in the tin to cool completely to keep their shape.

    Reply
    • Olivia says

      April 13, 2017 at 4:20 PM

      Awesome! Thanks for the tips Sylvia 🙂

      Reply
  39. Kim @ The Baking ChocolaTess says

    April 10, 2017 at 8:39 PM

    I am so drooling over these! Gorgeous desserts!

    Reply
    • Olivia says

      April 11, 2017 at 9:23 AM

      Thanks so much Kim! 🙂

      Reply
  40. Meg | Meg is Well says

    April 10, 2017 at 5:43 PM

    5 stars
    These look so good! I wish I had been at the potluck just so I could have snagged some of these! I’m exactly the same with social events. I’ve yet to meet any of my fellow food bloggers and I can’t wait for the opportunity!

    Reply
    • Olivia says

      April 11, 2017 at 9:25 AM

      Thanks Meg! It’s always fun getting together with other bloggers — there’s always something to talk about! I hope we can meet someday 😀

      Reply
  41. Karly says

    April 10, 2017 at 3:59 PM

    Oh sweet lord. I cannot BELIEVE how stinking good these look. I mean the cookie is one thing, but then you add that filling? Swoon.

    Reply
    • Olivia says

      April 11, 2017 at 9:25 AM

      They are amazing!! I promise 🙂 I hope you try them!

      Reply
  42. Peggy says

    April 10, 2017 at 2:21 PM

    Chocolate chips aren’t listed in the ingredients

    Reply
    • Olivia says

      April 10, 2017 at 2:31 PM

      Oh crap, what the heck?! Thanks for catching that, Peggy. I’ve updated the recipe!

      Reply
  43. Arlene Werenich says

    April 10, 2017 at 9:34 AM

    5 stars
    In a million years I could never attempt this, but I very much enjoy reading about your creations. I wish you lived next door to me, not 4000 kms away !

    Reply
    • Olivia says

      April 10, 2017 at 11:22 AM

      You are so sweet Arlene! You could totally make these! I swear they are easy 🙂

      Reply
  44. Beth @ bethcakes says

    April 10, 2017 at 9:27 AM

    Goodness! These look amazing, love the swirls on top! 🙂

    Reply
    • Olivia says

      April 10, 2017 at 11:22 AM

      Thanks so much Beth!! 😀

      Reply
  45. Rebeccq says

    April 10, 2017 at 8:59 AM

    Do you press the cookie dough down into and up the sides of the tin?

    Reply
    • Olivia says

      April 10, 2017 at 9:10 AM

      Hi Rebecca! I don’t because I prefer the way they look after they bake up when I leave them in a mound. You can certainly do that though! They likely wouldn’t need as long to bake if you did.

      Reply
  46. Linda king says

    April 9, 2017 at 12:24 PM

    5 stars
    We’re can I get the recipe?

    Reply
    • Olivia says

      April 9, 2017 at 12:33 PM

      Hi Linda! The recipe is in the post. Are you not seeing it?

      Reply
How To Bake The Perfect Cake

Learn How to Bake the Perfect Cake!

Tips, techniques, and troubleshooting to help ensure your cakes come out perfect every single time!

Get your copy today!

Featured Posts

Cake on a rustic wood cake stand.

S’mores Cake

A cake sitting on a mint green cake stand and a black background.

Cinnamon Toast Crunch Cake

A decorated cake on a cake stand

Chai Cake with Cream Cheese Frosting

Cookie cup with a bite taken out.

Peanut Butter & Jelly Cookie Cups

A cake sitting on top of a wooden table

French Silk Pie Cake (Copycat Deep’n Delicious Chocolate Cake)

Cake on a cake stand.

Pumpkin Spice Latte Cake

featured
olivia

Welcome to liv for cake!

I'm Olivia, a professionally trained pastry chef, recipe developer, and photographer from Vancouver, BC. Creating classic cake recipes with a modern twist.
Read More

sig

Subscribe for the latest recipes:

Copyright © 2010 - 2021, Liv for Cake. All Rights Reserved. Privacy & Disclosure
Design by Pixel Me Designs