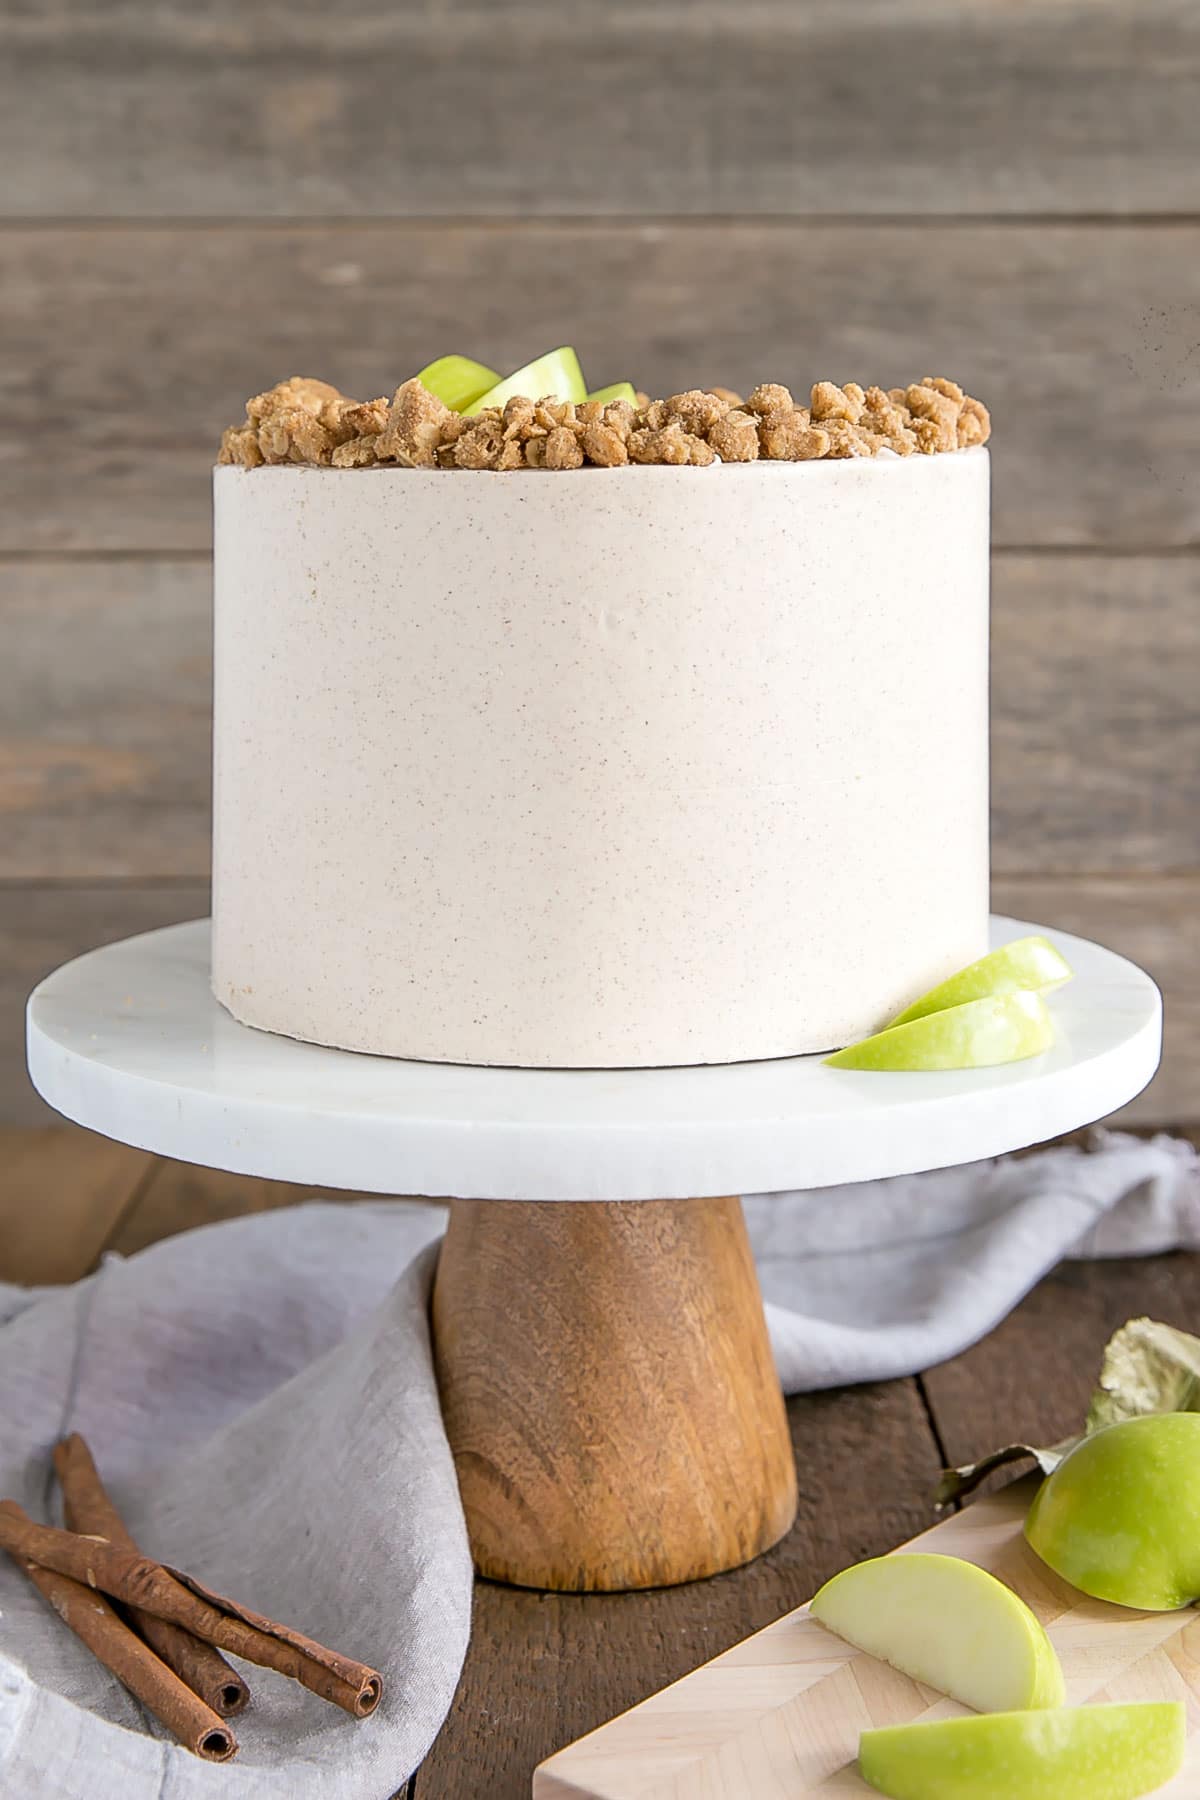
Make the most of apple season! This Apple Crisp Cake pairs spice cake layers with a delicious homemade apple pie filling and apple crisp crumble.
My first ever Apple Crisp (or Apple Crumble) was in Home Ec class in Jr. High. It was (and still is) one of the best apple desserts I’ve ever had — and so easy to make!!
It’s a favourite for sure, and I don’t make it often enough. But we’re in the midst of apple season here, and what better way to make the most of it than with this Apple Crisp Cake!
How to Make this Apple Cake
There’s something so comforting about apple desserts in the Fall. Those fragrant spices and sweet-tartness of the apples — it’s perfect.
To make this Apple Cake, I modified my Spice Cake recipe for the cake layers. I didn’t put apples into the actual cake, as I wanted to separate it out as a filling, but if you’d like to put apples into the cake layers, you can check out the recipe for my Caramel Apple Cake (you can 1.5x the recipe, or adjust the Servings slider to 18).
For the apple pie filling, I used the same recipe that I used for my Apple Pie Cake and Apple Crisp Cookie Cups. It’s an easy and delicious way to make it at home, but you could totally use store-bought instead if you like. I prefer the taste of homemade, so that’s what I do.
How Do You Make Apple Pie Filling?
I like to use Granny Smith Apples for my filling due to their tartness and firmness, but you can use any kind you like, provided it’s not too soft (like Macintosh). You want it to retain some of its structure in the filling. Here are some other good options for apples to use:
- Braeburn
- Golden Delicious
- Pink Lady
- Honeycrisp (a personal fave to eat)
Or you can go crazy and do a mix of all of them! That’s probably what I’d do next time, if I actually remember!
To make the apple pie filling, you literally just toss everything except the apples into a pot, boil, cook for 2mins, toss in chopped apples, and cook for 10-15mins until tender. That’s it!
I do this the day before, and keep it in the fridge once it cools. I give it a good stir before using in the cake though, as it sets a bit when cold.
The biggest pain, honestly, is peeling and chopping the apples. But it’s not that bad, and as a bonus for making the filling, your house will smell amazing for hours!
Apple Crumble
For the apple crisp crumble, I literally took the topping recipe from my Apple Crisp and used that. The only difference is that I melted the butter instead of using it cold, and I love the large chunks of crumble that I was able to get out of it!
The crumble is another super easy thing to do: throw everything into a bowl, mix, spread on baking sheet, bake for 10mins. I also do this in advance and store in an airtight container once cooled. Not unlike my Maple Cake from a few weeks ago, this recipe makes more crumble than you’ll need.
I like to have extra so I can pick out the larger chunks (for the top specifically), but you can halve the recipe if you prefer.
Cinnamon Swiss Meringue Buttercream
The cinnamon Swiss meringue buttercream is your standard SMBC with cinnamon thrown in. I was going to leave it plain vanilla, but adding the cinnamon gives it an additional hit of flavour that goes perfectly with the rest of the cake. Plus it looks super pretty!
I actually made the buttercream in advance too. Come to think of it, every element of this cake was made in advance. Since we got Zelda, I’ve had to portion out my baking even more than before.
Can I make this apple cake in Advance?
I almost always bake the cakes in advance, but I make the buttercream the day I’m assembling the cake even though it adds a bit of chaos to an already hectic day.
Here’s what I did for each component in order to make them in advance:
- Cake Layers – Cool completely, double wrap in plastic wrap, freeze. Thaw for 1-2hours (wrapped) before assembling. Will keep for months.
- Apple Pie Filling – Transfer to glass tupperware, cool completely, refrigerate. Bring to room temp and give a good stir before using. Will keep for 2 weeks.
- Apple Crisp Crumble – Cool completely and transfer to an airtight container. Will keep for 2-3 weeks.
- Cinnamon Buttercream – Refrigerate. Bring to room temperature and rewhip before use. Will keep for 1 week. Or freeze for up to 3 months in an airtight container.
Doing these in advance made it so much easier to assemble on the day of. I didn’t have to worry about making the buttercream or crumble. All I had to do was put it together. Honestly, I’ll probably keep doing it this way from now on!
I have a recipe for traditional Apple Crisp here, but if you’re looking for something outside the box and equally delicious, this Apple Crisp Cake is for you!
Looking for more Fall desserts?
Tips for this Apple Cake with Cinnamon Buttercream
- To make a three layer 6″ cake change the Servings to 12 and use those amounts. Baking time may differ slightly.
- To make cupcakes, all you need to do is reduce the baking time — start checking at 15mins or so.
- You can prepare everything in advance and assemble on a separate day. See post above for details of how I split it up.
- If you prefer, you can use store-bought apple pie filling instead of making your own.
- You will have crumble left over. I like to make more than I need so I have the option to pick out the larger chunks. Feel free to halve the recipe if you prefer, or use the extra as a yogurt topping!
- Be sure to check my Swiss Meringue Buttercream post for tips and troubleshooting.
- Learn how to keep your cakes moist using Simple Syrup.
- To help ensure your cake layers bake up nice and flat, check out my How to Bake Flat Cake Layers post!
Apple Crisp Cake
Ingredients
Cinnamon Spice Cake:
- 3 cups all-purpose flour
- 1 Tbsp baking powder
- 2 1/2 tsp ground cinnamon
- 1 1/2 tsp ground nutmeg
- 3/4 tsp salt
- 1 cup unsalted butter room temperature
- 1 cup granulated sugar
- 1 cup light brown sugar packed
- 4 large eggs room temperature
- 2 tsp vanilla
- 1 cup milk room temperature
Apple Pie Filling:
- 2-3 Granny Smith apples chopped (3 cups chopped, 340g)
- 2 tsp lemon juice
- 1/4 cup light brown sugar packed
- 1/4 cup granulated sugar
- 2 Tbsp cornstarch
- 1/2 tsp ground cinnamon
- pinch ground nutmeg
- pinch salt
- 1 cup water
Apple Crisp Crumble:
- 1 cup all-purpose flour
- 1 cup rolled oats
- 1 cup light brown sugar packed
- 1 tsp ground cinnamon
- 2/3 cup unsalted butter melted
Cinnamon Swiss Meringue Buttercream:
- 6 large egg whites
- 2 cups granulated sugar
- 3 cups unsalted butter room temperature
- 2 tsp vanilla
- 2 tsp ground cinnamon
Instructions
Cinnamon Spice Cake:
- Preheat oven to 350F. Grease and flour three 8" cake rounds and line with parchment.
- In a medium bowl, whisk flour, spices, baking powder, and salt until well combined. Set aside.
- Using a stand mixer fitted with a paddle attachment, cream butter and until smooth. Add sugars and beat on med-high until pale and fluffy (approx 3mins).
- Reduce speed and add eggs one at a time fully incorporating after each addition. Add vanilla.
- Alternate adding flour mixture with milk, beginning and ending with flour (3 additions of flour and 2 of milk). Fully incorporating after each addition.
- Spread batter evenly between the prepared pans and smooth the tops.
- Bake for approx. 40 mins or until a toothpick inserted into the center comes out mostly clean.
- Place cakes on wire rack to cool for 10mins then turn out onto wire rack to cool completely.
Apple Pie Filling:
- Toss chopped apples and lemon juice in a large bowl, set aside.
- In a large saucepan, combine sugars, cornstarch, and spices. Pour in water and whisk. Cook over medium heat until boiling. Cook for 2 minutes, stirring occasionally. Add apples, bring back to a boil. Simmer, stirring occasionally, until tender (10-15mins). Cool completely.
Apple Crisp Crumble:
- Preheat oven to 350F. Whisk flour, oats, cinnamon, and brown sugar in a medium bowl. Add enough melted butter so that the mixture starts to clump. Spread on a parchment lined baking sheet and bake for approx. 10 mins. Cool completely. Break crumble apart if needed.
Cinnamon Swiss Meringue Buttercream:
- Place egg whites and sugar into the bowl of a stand mixer, whisk until combined.*
- Place bowl over a double boiler on the stove and whisk constantly until the mixture is hot and no longer grainy to the touch (approx. 3mins). Or registers 160F on a candy thermometer.
- Place bowl on your stand mixer and whisk on med-high until the meringue is stiff and cooled (the bowl is no longer warm to the touch (approx. 5-10mins)).
- Switch to paddle attachment. Slowly add cubed butter and mix until smooth.**
- Add vanilla and cinnamon and whip until smooth and fluffy.
Assembly:
- Place one layer of cake on a cake stand or serving plate. Top with approx. 1 cup of buttercream and spread evenly. Pipe a border of buttercream around the outside to hold in the apple pie filling. Fill with approx. 2/3 cup apple pie filling, spread evenly. Sprinkle with approx. 1/2 cup crumble (smaller pieces). Press gently into apple pie filling. Repeat with next layer.
- Place final layer on top and do a thin crumb coat on the cake. Chill for 20mins.
- Frost and smooth the top and sides of the cake with remaining frosting. Place larger chunks of the crumble around the top of the cake.
Notes
** The buttercream may look like it's curdled at some point. Keep mixing until it is completely smooth. If it looks soupy, place it in the fridge for 20mins and rewhip.
Bonnie says
I made the cake, filling and frosted with a cinnamon cream cheese icing and it was wonderful. I love your web site and want to make so many of your cakes. The baking time on this cake needs to be adjusted. The recipe suggests 40 min, but my cakes were in the oven for 20 mins and they are a little dry.
Olivia says
Hi Bonnie! So happy you loved it! Baking times in recipes are just a guideline as every oven bakes differently (some run hot, some cold). Plus I use baking strips on my cake pans which makes them take a little longer. I’m surprised they are done and a little dry at 20mins though! Did you use 8″ pans? You can always save dry cakes by adding some simple syrup π https://livforcake.com/simple-syrup-recipe/
Katie Koehler says
I love your recipes! I made this cake for Thanksgiving and it was a showstopper! I made it the night before, and all the components tasted really delicious. After assembling and decorating, I put it in the fridge overnight. The next day when I cut into it, the layers came out beautifully and everything tasted yummy. The cake was a little dry though. I’m wondering if the refrigerator dried it out (even with the swiss meringue buttercream on the outside). Do you put your cakes in the fridge if you make them the night before? Or do you store your cakes at room temperature?
Olivia says
Hi Katie! Thanks so much! I’m so happy you liked it! The refrigerator does eventually dry cakes out, but only after more than 3 days or so. Was the cake eaten cold? That can make it feel dry as well. Otherwise, is it possible it was overbaked a bit? Every oven is different and some run hotter than others.
Katie says
Thanks for your reply. I took the cake out of the refrigerator about 3-4 hours before we ate it, so it wasn’t cold.
I took the cakes out early when I was baking them. I did 33 minutes rather than the 40 minutes in the recipe because they were already done. I leveled the cakes when they were cool, and the scraps tasted moist. Not sure exactly when it got dry. I made a simple syrup and brushed it on some of the cut pieces of cake and that seemed to help.
How do you store your cake when finished decorating? I have a plastic cake carrying container that I use, but don’t know if it should be kept at room temperature or refrigerated.
Thanks for helping me troubleshoot this issue!
Olivia says
Hi Katie! I tend to store my cakes in the fridge for a couple days and any longer I slice them up and put the slices in the freezer. I don’t use a cake container but that would be a great way to help ensure it’s airtight.
Samantha Garcia says
Do you think that a simple vanilla cake with both Apple pie filling and buttercream would be a weird mix
Olivia says
Hi Samantha! I think that would be totally delicious!
julia says
hi! for this cake do i need to do a simple syrup soak? the family prefers more moist cakes and i want to make sure its not too dense! thanks!
Olivia says
Hi Julia! There is no harm in using a simple syrup on this cake. I would do that if your family likes moist cakes! You could also use cake flour instead of AP for a lighter crumb.
Krista says
How would you adjust for 2 8β pans?
Olivia says
Hi Krista! Change the Servings to 12 and use those amounts.
Carmen says
Does the crisp part stay crunchy the next day?
Olivia says
Hi Carmen! It does! It will soften a bit over time, but it won’t get mushy.
Long says
I love a simple apple cake, too! This is beautiful! Looks so tender and tasty!! The perfect autumn dessert!!
Olivia says
Thank you Long!
Bri says
Hi Liv! Made this cake the other day and added a salted caramel drip, and everyone absolutely loved it…even a family member who isn’t a huge fan of cake.
Just wondering if you’ve ever attempted this as cupcakes? I love a denser cake like this but for cupcakes tend to enjoy a lighter fluffier cake, so not sure how this recipe would translate?
Olivia says
Hi Bri! So glad you loved it. I think it would work great as cupcakes! Bake them at the same temp but start checking them at 15mins. I would core them and use the filling inside, then frost and sprinkle the crumble on top π
Nicole says
Do you think this cake would taste just as good with a vanilla buttercream?
Olivia says
Hi Nicole! Yes, I think it would be delicious.
Katie says
Tastes great! Looks Amazing! Perfect solution for my husbandβs birthday cake. He isnβt a big fan of cake, but loves apple pie. Very detailed recipe and was great for teaching my girls how to make a dessert for their dad! Canβt wait for his reaction when he sees and tastes it! Thanks for sharing!
Olivia says
Hi Katie! Thanks so much for the great feedback. I’m so happy you found the recipe easy to follow. I hope you all love this one as much as I do!
Sue says
Hi Liv,
I love your website and cakes!! I made your Apple Crisp cake for Thanksgiving and it was perfection. Every element worked. Probably the best and most beautiful cake I’ve made yet (looked exactly like yours!). Here’s the except…. The cake layers rose beautifully and baked perfectly. But eating it my daughter described it more like bread. I’d say it was just a teeny tiny bit dry and maybe not quite sweet enough. Considering I seemingly did everything right, what do you think I need to tweak just a bit?
Thanks,
Sue
Olivia says
Hi Sue! Thank you! I am so happy you loved the cake π Do you mean more like a cake/loaf type bread? My cake recipes tend to be on the denser side but that’s how I prefer them. I would probably bake it less next time so that it’s not dry and/or use a simple syrup on the cake layers. Also, how do you measure your flour? I recommend spoon and leveling it into the measuring up vs scooping it since it can add extra flour and make the cake denser too. I hope that helps!
Sue says
Thanks, Liv. It wasn’t dense but still pretty light and airy. I weigh my dry ingredients rather than measure. Do you have an opinion about weighing vs. measuring? But, I too decided I might add a simple syrup or soak next time. I’m planning on making your Gingerbread Latte cake next week for a party and then your Eggnog cake for our Christmas dinner. π
Sue
Olivia says
Hi Sue! Weighing ingredients is ideal for the best accuracy and results, but measuring should work just fine. The biggest thing about measuring is how you measure flour as this can make a big difference in the cake consistency. It’s important to spoon and level your flour into the measuring cup instead of using it as a scoop. That being said, I almost always measure as it’s easiest for me. I hope you love the gingerbread and eggnog cakes! The Eggnog is one of my all time faves π
Caitlin says
I halved this recipe and baked the cake layers in 3, 6-inch pans. Absolutely delicious!! So perfect for fall.
Olivia says
Hi Caitlin! So happy you liked it, thanks for the feedback π
Juliane McDavid says
I am having a terrible go of making the Swiss meringue buttercream. My mixing bowl is developing a sugar crust. It doesnβt inhibit the stiff peaks, but makes it a grainy mess. Any ideas? I made the recipe with the dark brown sugar dulce de leche and did not experience this problem.
Olivia says
Hi Juliane! The sugar needs to be completely dissolved over the hot water bath before you start whipping. See this post for tips and troubleshooting: https://livforcake.com/swiss-meringue-buttercream-recipe/
Shannon says
Not sure about the baking time. I 5ook mine out at 25 and they were almost over. Great recipe otherwise. I got tons of compliments.
Olivia says
Hi Shannon! Every oven runs a bit differently so I’m glad you checked yours early! I also use baking strips on mine which increases the baking time a bit.
Heather Callister says
Has anyone tried this at high altitude? Olivia, any suggestions? Iβm at 4,301 feet in Salt Lake City, UT. Is the texture of the cake dense or light & fluffy?
Olivia says
Hi Heather! I can’t help you with the altitude question, but the texture of this cake is more on the dense side (but not overly dense) vs light and fluffy. I prefer denser cakes overall.
Heather says
I do too! Thanks!
Heather Callister says
So, this has been a journey of experiments for high altitude. The first attempt the cakes sank. I did 4 (6β) cake rounds. The ones in the back of the oven baked better.
2nd attempt: came out the best. I substituted buttermilk, used dark brown sugar, subtracted 1 Tbsp of granulated sugar, added 1 Tbsp of water, increased the oven temperature to 375 degrees F. They baked faster (28 minutes). I meant to add 1 Tbsp of flour but accidentally subtracted 1 Tbsp of flour.
3rd attempt: I decided to use whole milk rather than buttermilk. Doesnβt buttermilk really only help with rising cakes if there is baking soda with it??? I subtracted 1 Tbsp of granulated sugar, I used, light brown sugar like it calls for, I still added 1 Tbsp of water, I baked them at 375 degrees F. All but one cake sank. They were still underbaked. The buttermilk in the 2nd attempt made the cakes bake faster.
So biggest question-is buttermilk really helping if there is no baking soda to react with?
Olivia says
Hi Heather! Awesome analysis and experimenting! I find that buttermilk w/o baking soda is mostly for a flavour thing — I don’t think it would really help with rising exactly, but maybe that’s diff at high altitude. Are your cakes sinking in the oven or only once you take them out? If they sink after you take them out, they need more time in the oven. If they sink while still baking, and the oven door hasn’t been opened to cause a drop in temperature, then it’s due to improper leavening.
I’m not sure if this is the resource you’re using to experiment with, but I often refer people here: https://www.kingarthurflour.com/learn/resources/high-altitude-baking
Heather Callister says
Thanks Olivia! I use the resource from a culinary chef who is at high altitude in Lake Tahoe. He geeks it up with chemistry theory and thatβs why I like him.
1st attempt: they sank in the oven. 2nd attempt: did not sink in the oven. 3rd attempt: they sank after I opened the oven and they were still underbaked. The oven door was left open too long because I thought I had another oven mit but I didnβt. My goof. Your response is helpful. Here is the YouTube link of the chef at high altitude. BTW, even the underbaked version once I cut out the raw parts were absolutely delicious!
Enjoy!
https://youtu.be/ypiSP-dyBpI
Olivia says
Thanks for sharing the link and so glad you liked the flavour of the cake! Keep me posted on your experiments π
Heather Callister says
Hi Olivia! I’m back! I did a total of 5 attempts to this cake to tweak it for high altitude. My 4th attempt failed: I added an extra tbsp of flour, reduced the white sugar by 1 tbsp and used buttermilk instead of whole milk. I added 1 tbsp of water. All but one cake pan sank. I did use bleached AP flour for this batch.
Attempt #5 is the WINNER for high altitude: I used unbleached organic AP flour. I used Dark brown sugar instead of light brown. I reduced the white sugar by 1 Tbsp. I used 1 cup of buttermilk (not whole milk) and added 1 Tbsp of water. I baked (4) 6″ cake rounds for 27.5 minutes at 375 degrees F. The cakes rose, they were level, and moist!! This one is the winner!!!! Are you cool if I post this recipe on my blog?? I will give you credit for the original recipe and share your website link. All of us high altitude bakers need all of the help we can get!!! I did also do my own tweak for the SMBC-I used 3 cups of sugar and 2 cups of butter for my own personal preference to cut down the buttery taste.
Olivia says
Hi Heather! Wow! Thanks for the detailed report. I am so glad you finally found a combo that worked for you! And absolutely, you’ve tweaked the recipe more than enough to make it your own and specifically for high altitude. Let me know when you post it!
Heather Callister says
I will let you know! My website needs a serious makeover. I do want to try one more attempt at 350 degrees trying something else. That way itβs more transferable to those near sea level. I just tweaked your brown butter cake for high altitude. I post a comment on that recipe link. Itβs to die for!
Beth says
Hi Liv! I love your cakes and I am very excited to make this one on Sunday. Does the crumble stay crunchy or does it get soggy between the layers of cake and frosting? Thanks for all you do to share the sweet goodness of cake with us!
Olivia says
Hi Beth! Thanks so much! The crumble can soften a tad, but I found it to stay quite crunchy. It will not get soggy at any rate. I hope you love it!
Nicola says
This cake looks delicious and I cant wait to make it. I’ve made your chocolate and honeycomb one before and its my go to chocolate cake recipe. Can I just ask where you bought the cake stand from please?
Olivia says
Hi Nicola! I actually got it at Homesense. It’s where I get all my cake stands. Here is a similar one though.
Giya says
This cake is absolutely delicious. This is my second time making it. First time i used three 6inch pans and the batter was perfect for it and final height was very close to the picture here. I just made two separate batches again, but in three 8 inch pans per the recipe and the height of my layers are barely 1/2 inch tall π itβs still super good and Iβm planning to assmble it later for Thanksgiving instead of the traditional apple pie ππ β€οΈ
Olivia says
Hi Giya! I’m so glad you like this recipe! I’m sorry to hear it didn’t rise much though! My layers are on the shorter side because I split it between three pans, but they should be about 1″ tall. Be sure to not overmix your cake batter as this can cause layers that are short and dense. The only other thing I can think of is that maybe your baking powder is expired? Anyhow, I’m sure it will still be delicious π
Colleen says
Hi Giya,
I like making 6″cakes as well. Did you bake the same amount of time?
Olivia says
Hi Colleen! If you make this in three 6″ pans just make sure they are 3″ tall or the batter might overflow. Baking time would be longer since the layers would be thicker. Alternatively, you could reduce the recipe (change the servings to 12) and bake them in three 6″ pans that are 2″ tall and the baking time would be fairly similar. I suggest starting to check them at 30mins just in case and working from there.
LT Wong says
I just came across this recipe and now I have to go try it. The combination sounds lethally delicious. I love how your cake looks. How did you create that gorgeous sleek side for the cake? It’s absolutely stunning!
Olivia says
Thank you!! It takes a lot of practice, honestly, but having a cake turntable and an icing smoother helps a LOT.
Amanda says
Hello!! How sweet is the finished cake? I am worried about having a sweet buttercream, a sweet filling and a sweet cake would be tooo sweet? LOL!
Olivia says
Hi Amanda! It’s a matter of taste I suppose. I don’t find the cake or filling too sweet, but the crumble is. I think its a good balance!
Jennifer says
I used the recipes for the Apple Crisp Crumble and Apple Pie Filling and they were both excellent! Thank you, Liv!
Olivia says
So glad you liked them Jennifer! Thanks for the feedback π
Jennifer says
Hi! I love your cakes! I made the maple pumpkin cake a few weeks ago and it was a huge hit! I’m thinking of making this one for Thanksgiving, but I would probably need to make it the Saturday before Thanksgiving. What’s the best way of making sure it still tastes fresh on Thursday? Should I freeze it and then give it a day to thaw? Or will it keep in the fridge for a few days? Thanks!
Olivia says
Hi Jennifer! I would freeze it as the fridge tends to dry cakes out. Alternatively you can make each component in advance (freeze the cake layers; refrigerate the buttercream, bring to room temp and rewhip before using; refrigerate apple filling; store crumble in an airtight container) and assemble the day before and store in fridge overnight. Let me know how you like it!
Jennifer Bonetti says
Thanks! Next question: I only have 9β cake pans. Would doubling be enough to make three layers or only two?
Olivia says
Converting pan sizes is always tricky. Here’s a site I use as a guideline: http://www.joyofbaking.com/PanSizes.html Doubling the recipe should make three 9″ pans worth.
Heather says
Do you have high altitude instructions? Iβm at 4500 feet
Olivia says
Hi Heather! I haven’t baked in high altitude myself, but refer people to this link for adjustments: https://www.kingarthurflour.com/learn/high-altitude-baking.html
Anne says
OMG! Love this recipe. My sonβs favourite dessert is apple crisp and I just made this cake for his birthday. I was so worried and stressed when making the icing as it was so usual and different from any type of icing that I have made before. Followed your recipe and it turned out amazing!!! Thanks
Olivia says
Hi Anne! So glad you loved this one as much as I do! And that you tried a new icing method – Yay!
Cindy Rodriguez says
It’s like the best of both worlds – an apple crisp + cake. I love this concept plus making portions of it in advance is something I’d prefer as well.
Olivia says
It saves a whole lotta time and stress! Thanks Cindy! π
CakeY says
Nice Design simple and looking beautiful.
Olivia says
Thank you!
Danielle says
Hey! How thick do your cake layers usually end up? I just want to make sure I didn’t over mix!
Olivia says
Hi Danielle! These ones were probably 1.25-1.5″ or so.
Heather says
For the Buttercream, once you add your butter, approx. how long do you mix?
Olivia says
Hi Heather! It depends, but anywhere from 3-5 mins or so depending on if it has curdled or not.
Jade says
Hi Liv, I love your blog. Just one question, how deep are your cake tins? 2 inches?
Olivia says
Hi Jade! They’re all 2″ tall π
Becky says
Do you use 2-inch or 3-inch high cake pans? The cake layers look nice and thick and I’m wondering if my 2-inch pans will hold the batter without overflowing. Can’t wait to try this one – the perfect fall dessert!
Olivia says
Hi Becky! Mine are all 2″ tall, but 3″ tall pans would work just fine! The layers are actually about 1 – 1.5″ tall. I hope you like it!!
Jennifer says
Hi, do you think this would be just as good with a buttercream frosting?
Olivia says
Hi Jennifer! I think it would be great with an American Buttercream!
Nancy says
I love Fall and all the flavors that go with it! I can my own apple pie filling so this would be a great way to use it! I am adding this cake to my βto doβ list!!!
Olivia says
Homemade apple pie filling is the best!! Let me know how you like the cake π
Lil says
I would LOVE to make this cake, however I cannot eat any dairy (milk, eggs, cheese, butter, etc), and would need to use gluten-free ingredients. Would there be a way for you to post a conversion recipe?
Olivia says
Hi Lil! I haven’t experimented with alternative baking much so I don’t think I could advise on proper substitutions π