

Learn how to bake flat cakes every single time! A simple tutorial on how to make sure your cakes come out nice and flat straight out of the oven.

Leveling cakes is my least favorite thing to do ever. I think I’ve done it a total of ONE time and quickly looked for alternatives.
Leveling a cake is something you should do if it bakes up domed. Which, let’s be honest here, almost every single cake does.
A domed cake looks something like this:


Delicious as it may be, it could be more aesthetically pleasing. Not to mention the uneven distribution of frosting! Those poor middle sections.
Why Do Cakes Dome?
When cakes go into the oven, the pans start to heat up quickly. This will make the sides and bottom of the cake cook faster and set which causes the uncooked middle to rise and dome because it has nowhere else to go.
It’s not easy to stack and frost a domed cake, so it should be leveled out prior to doing so.
To level a cake, you either get a huge frikken cake knife (which I bought specifically for this job and used ONCE) and go at it hoping you can cut off the dome evenly.
Or you can buy a cake leveler which does the job marginally better (I do use this to torte my cakes though – aka cut them in half horizontally).
Either option leaves you with a crap ton of cake crumbs all over everything. This also means wasted cake, and boo to that. Ok, I know you can always eat the scraps, but STILL.
A much better alternative is to not have to level the cake at all by having it come out perfectly flat and stackable. I have a couple of tricks I use to ensure I get flat cakes. They work for me every time!
Now, before we even get to level cakes, you want to make sure that your layers are the same height. You can eyeball this in your pans, or you can be anal (like me) and actually weigh the pans to ensure an even distribution of batter.

I fully embrace my craziness. I use this kitchen scale and I LOVE it.
Now… onto Flat Cakes!
HOW TO BAKE FLAT CAKES

Baking flat cakes comes down to one simple thing: using cake strips around your pans.
This is my go-to method. All you have to do is dampen them and wrap them around the bottom of your cake pans. Perfectly flat cakes every time!
How do cake strips work?
The cake strips insulate the outside of the pan and the moisture in the strips keeps the sides of the pan cooler so your cake bakes up more evenly. Without the strips, the outsides of the cakes cook and set faster causing the middle of the cake to dome.
I soak my strips in a bowl while I’m prepping my cake batter and then gently squeeze out the excess water before I wrap them around the pans. It’s important that they’re not sopping wet or they could cause the cake to become soggy.
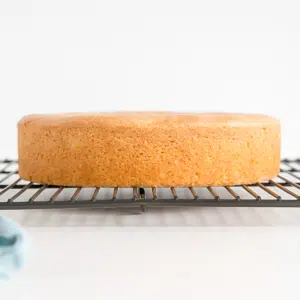
Here’s a side-by-side shot of the cakes right out of the oven, only one using a cake strip.

You can see how nice and flat the cake on the right is. Not only is the one in the left domed it’s also a bit darker on the sides.

The one on the right is cooked more evenly throughout. I use these cake strips on all of my cakes and they help a LOT.
It’s important to note that using these strips will cause the cake to bake a bit slower and you’ll likely need to increase the baking time on a recipe. The baking times for my recipes all assume that baking strips are used.
Baking times vary as it is because every oven is different, so it’s important to use them only as a guideline and to know your oven.
If you only do one thing, use these strips!
I have the older model Wilton brand strips that I got at Michael’s 10+ years ago. These are ok, but pinning them on is a bit of a pain.
I found these Regency ones online that have velcro which seems like a much better option so if you’re in the market for some, I would get those!

DIY Cake Strips
If you don’t want to shell out the money for these you can easily make your own at home!
Hot Tip!
If you’re using tea towels, make sure they are fully dampened and do not use them at oven temps over 350F. You can wrap them in tin foil to prevent browning/burning.
All you need to do is cut up and old tea towel into strips and pin them onto the cake pans. If you’re really crafty you can stitch some velcro into the strips and have your own easy-to-use version.
Tea Towel Trick

If the cakes are still a tiny bit domed after using the bake even strips, there’s another thing you can do as soon as they come out of the oven. Grab a (clean) tea towel and lightly press down on any domes.
Be careful, as the pans will be hot and there will be steam coming out as you press down on the cakes. Don’t press too hard or your cake will cave in!
Please Note
The method above only works on small domes and only straight out of the oven.
Since I always use the cake strips, my domes are never really that high to begin with, but the tea towel technique helps with that last little bit.
I don’t know how well it would work on a cake with a large dome. By the time I was done taking pictures, the domed cake was starting to cool, so pressing down on it didn’t help too much.

I hope you found these tips helpful. Cake strips really are one of my very favorite tools/hacks in the baking kitchen. They make my life easier so I hope you give them a try!
Quick links to help you bake Flat Cake Layers:
- The secret to getting flat cake layers: Evenbake Strips
- My very favorite kitchen scale: Jennings Kitchen Scale
- The best aluminum cake pans: Fat Daddios
- If you need to level your cakes or cut them in half: Cake Leveler
How to Bake Flat Cakes
Ingredients
Vanilla Cake:
- 2 1/4 cups all-purpose flour
- 2 1/4 tsp baking powder
- 3/4 tsp salt
- 3/4 cup unsalted butter room temperature
- 1 1/2 cup granulated sugar
- 3 large eggs room temperature
- 1 1/2 tsp vanilla extract
- 1 cup buttermilk or whole milk, room temperature
Vanilla Buttercream:
- 6 cups powdered sugar sifted
- 2 cups unsalted butter room temperature
- 2 tsp vanilla extract or flavoring of your choice
- 4 Tbsp heavy whipping cream
Instructions
Vanilla Cake:
- Preheat oven to 350F. Grease and flour two 8" cake rounds and line with parchment.
- In a medium bowl, whisk flour, baking powder, and salt until well combined. Set aside.
- Using a stand mixer fitted with a paddle attachment, cream butter and sugar on med-high until pale and fluffy (approx 3mins). Reduce speed and add eggs one at a time fully incorporating after each addition. Add vanilla.
- Alternate adding flour mixture and buttermilk, beginning and ending with flour (3 additions of flour and 2 of milk). Fully incorporating after each addition.
- Distribute batter evenly between the two pans. Place damp baking strips around the bottoms of the cake pans.
- Bake for 30-35mins or until a toothpick inserted into the center comes out mostly clean.
- Place cakes on a wire rack to cool for 10mins then turn out onto wire rack to cool completely.
Vanilla Buttercream:
- Prepare a stand mixer with a whisk attachment. Whip butter until creamy.
- Reduce speed to low and add in icing sugar 1 cup at a time until well blended. Increase speed to med and beat for 3 minutes.
- Add vanilla and 2 Tbsp cream and continue to whip on medium for 1 minute. Add more cream as needed until desired consistency is reached.
- Whip until the frosting is smooth and silky.
Assembly:
- Place one layer of cake on a cake stand or serving plate. Top with approximately 1 cup of buttercream. Repeat with remaining layer and crumb coat the cake. Chill for 20mins.
- Frost the top and sides of the cake and smooth with a bench scraper.
- Decorate as desired.
Notes

Originally published Aug 2014. Updated with new content April 2020.


Sam says
Hi is there any other way to bake a flat cake other than these strips or towel stirps
Olivia says
Hi Sam! The strips are the most surefire way, but you can also try reducing the baking time to 325F.
Amanda says
I have been using homemade cake strips for a few years now. Mine however, are strips of an old towel that I cut up.
I soak them in water then secure them with a safety pin.
Viola…perfect flat cakes!
I was speechless when I first tried this. It’s my little secret in my circle. I love this ❤️
Olivia says
Hi Amanda! It is honestly my favourite baking hack! Such a time saver.
Karen K says
A little tip to getting the same amount of batter in each pan. After I’ve poured the batter into my pans and smoothed it out and before I bake, I stick a toothpick in the middle of each then compare the levels side by side. Then I adjust as needed. Works pretty good for me!
Olivia says
Hi Karen! That is a great tip, thank you for sharing!
H says
Hello Olivia,
Have been following your blog for sometime now inspite of being a baker who doesnt eat egg due to dietary restrictions of the family… This post is very informative and we’ll explained…
Knowing how much of a difference the cake strips make I’m forced to think about these layer pans from Wilton, these r a set of 5 layer pans, really small (I want to say 6inch or less in diameter), and thin. They seem to be so convenient but now that I learnt the use of these cake strips, I’m not sure how to make sure my layers don’t dome when I use these Wilton 5 layer pan set. specifically I’ve been looking at ur chocolate truffle cake, and I dont really have more than 1 round pans and these layers would be very helpful.
Have you tried using them, or can
u provide some guidance there? As I mentioned, all my cake recipes r without egg and not sure how to make sure that these very thin layers dont dome.
Speaking of… Can you also look into making eggless/egg free cakes, and frosting (especially something very mild sweet just like ur Swiss meringue? Would be soooo delighted to start seeing recipes that I can use as-is…
Olivia says
Hi H! I know the pans you are talking about. I don’t think the layers would really dome in those because they are so thin and there won’t be much batter and it will cook quickly. The strips help for cakes that are baked longer where the sides cook faster, set, and then the middle has nowhere to go but up.
I don’t have any eggless cakes at the moment, but here’s a delicious eggless frosting recipe! https://livforcake.com/ermine-frosting/
H says
Hello Olivia,
Thanks for the quick reply… Helps to know abt the layer pans.
I will give it a shot…
Thanks for the ermine frosting link, I looked at it, and will try it out for sure (the last that I tried a similar one was where sugar and butter were beat up together). Will try ur recipe this time around. Will post questions if I have any after I try it.Thanks again so much, look forward to following all your beautiful creations…
Colleen says
Hi, tried this and it came out great! Quick question, is it normal for it to effect baking time? I found that I had to cook the cakes an additional 10-15 minutes… Is that to be expected or am I doing something wrong?
For reference, these are the strips I bought: https://www.amazon.com/gp/product/B07QCTB5LW/ref=ppx_yo_dt_b_asin_title_o09_s00?ie=UTF8&psc=1
Olivia says
Hi Colleen! Yes, it is, and I should mention that in my post actually. I find it to take about 5-10mins longer with the strips, though it depends on the oven, type of strips, and how damp they are.
Edy says
Well, it shouldn’t take any longer if you use them right. The recipe on the cake should cook the center of a domed cake, which means it should cook the rest too. If it takes longer, that means you have too much water in the cake strips.
Carolyn says
Thanks for the flat cake advise. How can I achieve the same with cupcakes?
Carolyn
Olivia says
Hi Carolyn! That’s a good question. I’m not an expert on cupcake baking but I would say a lower temp (325F) and not filling the liners too high would help. Are you on Facebook? You should join my baking group. This is a great question to ask them! https://www.facebook.com/groups/livforcakebakers/
Ambar Khan says
Hello,
Thanks for the info and your great recipes! I have a few questions I was hoping you might be able to answer:
I am sure it will depend on cake pan size, but wondering what is the estimate of the time a person should extend bake time by when using strips?
Any suggestions on avoiding cracks on top of the cake?
I have an electric oven with covered coils on the bottom, is there a specific position in the oven to place a cake while baking?
Thank you so much!!!!!
Olivia says
Hi Ambar! I find that cakes take about 5mins longer to bake with the strips +/-. It does depend on the oven too though. Cracks on top are usually caused by too high a baking temperature, but the strips should help with that too! My oven is electric too, I always recommend baking in the center of the oven.
Hannah says
Hey, quick question.
In order for the baking belt to work do you have to make your own cake from scratch, or can you use it for box cakes?
Olivia says
Hi Hannah! It would great on a box mix. The cake layers in the photos are using a modified box mix.
Trish says
Hi, I’m new to your page. I was wondering with the DIY cake strips, can you wrap the tea towel strips in foil?
Olivia says
Hi Trish! Yes, that would be fine.
Carolina says
Hi, Liv! I baked the Black Forest cake a few weeks ago. I greased the pan, lined some parchment paper, and put the wraps around the cake pan. When I went to check on the cake, the parchment had went INSIDE the cake, wrapping all around in different motions. I had to cut the cake in half and eat the other half which was all messed up due to the parchment paper.
Is it because the wraps allowed the air to circulate, which made the parchment stick away from the sides and into the cake batter itself? I’ve used the wraps many times, but this has never happened before.
Becky says
Your only supposed to put the parchment paper on the bottom of the pan . Set your pan on the parchment paper and trace your pan to get the correct size. Grease the inside bottom of your pan and insert your parchment paper. The grease holds it in place.
Olivia says
Hi Carolina! What Becky said. Did you put parchment on the sides too or only the bottom? If only the bottom then I think it happened because the batter is so thin that maybe it got under your parchment paper? Make sure the parchment paper sticks to the bottom of the pan so there is no way the cake batter can go under it.
Carolina says
Hi, Becky and Liv. Thanks for the tips! Yes, I had a momentary lapse of judgment and put the parchment on the sides and bottom. I will definitely remember next time to forgo the parchment on the sides! Again, thank you for your help, Becky and Liv!
Pam says
I love your cake recipes and your detailed directions. I have just read through all of the above comments. I think I have found some answers to my questions but not all. They are:
1. I baked a 6″ chocolate cake recipe and used the Wilton strips that I soaked and squeezed out.
When checking to see if they were done I used the toothpick and it came out clean. I usually also
like to press the middle and see if it springs back but the top of the cake surface was a bit like a
brownie texture so couldn’t press down on it. The toothpick came out clean and the cakes were
starting to get too dark so pulled them out. After cooling and removing from pans I discovered the
bottoms of each 4 layers were unbaked and gummy. I have a thermometer that I can monitor from
my counter outside the oven so I know my temperature was correct. The top and middle of the cakes
were a very good texture. The recipe did call for 5 eggs but not sure that would have anything to do
with what happened. I’ve only used the strips twice before. I didn’t want to bake much longer as the
cakes were turning too dark at that point. Do you have any idea what happened before I retry this
recipe?
2. When making a cake recipe that calls for 6″ pans but want to use my 7″ pans instead would I need to
bake them a shorter time or lower the temperature?
Thanks for any help!
Olivia says
Hi Pam! The baking strips should not cause the bottoms of the cakes to be gummy. I’d have to take a look at the recipe you used to see if anything stands out there – 5 eggs seems like a lot, but it depends on the other ingredients. Chocolate cakes are usually a very think liquidy batter but they should bake up totally fine. Did you bake it for around the recommended time? Also, how long did you cool the cakes in the pans? I cool for 10mins and then turn them out.
And for your second question, all you need to do is reduce the baking time 🙂 By how much will depend on the specific recipe and some trial and error. I hope that helps!
Dez says
Hello! I came on here to read comments to see if this had happened to anyone else because it happened to me as well. I made a 4 layer cake and ended up throwing most of it away. I tried the strips again and this time I made sure to wring out the excess water and instead of 325, I baked my cakes at 350. It did still take a few extra minutes to bake but they cooked perfectly! I baked four 6 inch round strawberry cakes at 350 for apx. 27 minutes and they turned out beautifully after I made these adjustments. Hopefully this helps someone!
Olivia says
Thanks so much for your input, Dez!
Jen says
Hi Liv!
I saw on a different website that you can wrap damp paper towels in aluminum foil and wrap that around a cake pan as a DIY cake strip. Can I use this method on a silicone cake pan? Can I use regular cake strips on a silicone cake pan?
Olivia says
Hi Jen! I haven’t tried the strips on silicone pans and not sure if they’ll have the same effect as they do on metal but it can’t hurt to give it a try!
Monique Escudier says
Hi thanks for the tip I have the wilton cake strips and my cakes are cracking on the top…Do you know how I can prevent this from happening please? Thanks
Olivia says
Hi Monique! Cracking on top is usually due to too high heat. I would buy an inexpensive oven thermometer and see if your oven runs a bit on the hotter side.
Daisy Shabat says
Hi, I used the Michael strips and for some reason my cake didn’t bake right. I made this cake earlier on in the week without the strips and it tasted delicious. When I used the strips the cake took about 40 min to bake and it still looked little undercooked when I took it out. Do you know why this happened? does the cake need more baking time when using the strips?
Olivia says
Hi Daisy! With the strips sometimes it takes a little bit longer to bake the cakes. The sides will not be as brown or brown at all since the strips keep the temperature of the sides down.
Ami says
Hi,
This has helped me a lot. I baked your caramel cake and white chocolate cake for my daughter’s bday. Planning to have a three layer cake with two caramel layers and white chocolate layer in the middle. The tip on pressing the cake after taking from oven helped to get a flat caramel cake. The white chocolate one didn’t dome at all though. If not for this tip, i would have to go through the painstaking step of trimming it.
Olivia says
Hi Ami! So glad you found this helpful! Thanks for the feedback 🙂
Marni Greenspoon says
I have started using those baking strips after seeing them recommended elsewhere. But all the ones I’ve seen are for 8 and 9 inch pans. What about 4 and 6 in pans?
Olivia says
Hi Marni! It’s a shame the velcro isn’t a bit longer on the Regency ones. For smaller pans I use my old Wilton ones that I had to pin on. You can try these newer ones from Wilton that look like they are adjustable: https://amzn.to/2TITyxW
Brenda says
Thank you so much! I did not know these cake strips existed! Huge help!!
Olivia says
So glad you found them useful Brenda!
Deborah says
Mine still dome but I found a great alternative. Take the dome, crumble it and bake in low temp oven to dry, use as texture in cake layer or put on ice cream. Mmmmmmmm.
Olivia says
Hi Deborah! I love this idea! Thanks for the tip 🙂
Brittany says
I also save it to make cake pops my kids love it
Candis says
This is a great idea. I’ve done it many times. I mix it into the frosting and use it to add another texture when layering cakes.
Bhartley says
It worked, it really worked. I made my own strips using a row grain 2” ribbons and sewed a piece of towel to it. I attached a Velcro end and it worked just great on a 9” cake pan.. Great Projest today and made a Eggnog cake with left over Christmas eggnog. Snowed in today so it was fun day in the kitchen.
Olivia says
So glad to hear it worked out for you!
Elena says
What is the brand of the Velcro you used? I am afraid that it will melt in the oven if I use the Velcro I find in Ac Moore or Michaels. Thanks
Ebony says
Would the regency cake strips work on a 6″ pan as well? On Amazon it says for 9 and 8″ pans only…
Olivia says
Hi Ebony! Unfortunately, the velcro isn’t long enough to work for 6″ pans. I wish it was. You could still use them and pin them on, or get these ones from Wilton: https://amzn.to/2QMSIC6
Karen says
If you need to make the strip shorter, you can always sew on more velcro or use the the velcro strap comes in the box from Witon. Hope this helps
Karen.
Olivia says
Thanks so much for the tip Karen!
Shauna says
Hello Ladies, a quick and easy way to shorten any baking strip without velcro or pinning is to use a small binder clip. They work like a charm and hold the strips in place. When I bake multiple cakes, I take a few old wash clothes, cut them in half but leaving the two piece attached at the very end. Just wet it and wring it out and wrap it around the cake pan. It works just as good at the baking strips.
Olivia says
Thanks for the tip, Shauna!
Amanda says
I bought two cake levelers after viewing this post. They worked great for leveling, but I had an odd result with 1/2 of the layers I made. I’m wondering if you can tell me if this was an inadvertent result of using them…
My cake cooked and was level, but it baked away from the pan. Like somehow it decreased in circumference when baking. Do you know why this would happen? It didn’t happen with all, just a couple of the layers I used. Any advice would be appreciated.
Olivia says
Hi Amanda! Were all the cake layers from the same batch of batter? That can sometimes happen with overmixing.