

Learn how to bake flat cakes every single time! A simple tutorial on how to make sure your cakes come out nice and flat straight out of the oven.

Leveling cakes is my least favorite thing to do ever. I think I’ve done it a total of ONE time and quickly looked for alternatives.
Leveling a cake is something you should do if it bakes up domed. Which, let’s be honest here, almost every single cake does.
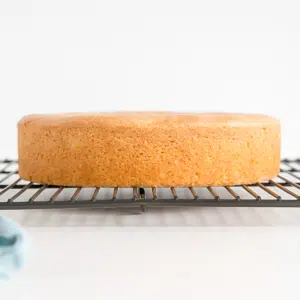
A domed cake looks something like this:


Delicious as it may be, it could be more aesthetically pleasing. Not to mention the uneven distribution of frosting! Those poor middle sections.
Why Do Cakes Dome?
When cakes go into the oven, the pans start to heat up quickly. This will make the sides and bottom of the cake cook faster and set which causes the uncooked middle to rise and dome because it has nowhere else to go.
It’s not easy to stack and frost a domed cake, so it should be leveled out prior to doing so.
To level a cake, you either get a huge frikken cake knife (which I bought specifically for this job and used ONCE) and go at it hoping you can cut off the dome evenly.
Or you can buy a cake leveler which does the job marginally better (I do use this to torte my cakes though – aka cut them in half horizontally).
Either option leaves you with a crap ton of cake crumbs all over everything. This also means wasted cake, and boo to that. Ok, I know you can always eat the scraps, but STILL.
A much better alternative is to not have to level the cake at all by having it come out perfectly flat and stackable. I have a couple of tricks I use to ensure I get flat cakes. They work for me every time!
Now, before we even get to level cakes, you want to make sure that your layers are the same height. You can eyeball this in your pans, or you can be anal (like me) and actually weigh the pans to ensure an even distribution of batter.

I fully embrace my craziness. I use this kitchen scale and I LOVE it.
Now… onto Flat Cakes!
HOW TO BAKE FLAT CAKES

Baking flat cakes comes down to one simple thing: using cake strips around your pans.
This is my go-to method. All you have to do is dampen them and wrap them around the bottom of your cake pans. Perfectly flat cakes every time!
How do cake strips work?
The cake strips insulate the outside of the pan and the moisture in the strips keeps the sides of the pan cooler so your cake bakes up more evenly. Without the strips, the outsides of the cakes cook and set faster causing the middle of the cake to dome.
I soak my strips in a bowl while I’m prepping my cake batter and then gently squeeze out the excess water before I wrap them around the pans. It’s important that they’re not sopping wet or they could cause the cake to become soggy.
Here’s a side-by-side shot of the cakes right out of the oven, only one using a cake strip.

You can see how nice and flat the cake on the right is. Not only is the one in the left domed it’s also a bit darker on the sides.

The one on the right is cooked more evenly throughout. I use these cake strips on all of my cakes and they help a LOT.
It’s important to note that using these strips will cause the cake to bake a bit slower and you’ll likely need to increase the baking time on a recipe. The baking times for my recipes all assume that baking strips are used.
Baking times vary as it is because every oven is different, so it’s important to use them only as a guideline and to know your oven.
If you only do one thing, use these strips!
I have the older model Wilton brand strips that I got at Michael’s 10+ years ago. These are ok, but pinning them on is a bit of a pain.
I found these Regency ones online that have velcro which seems like a much better option so if you’re in the market for some, I would get those!

DIY Cake Strips
If you don’t want to shell out the money for these you can easily make your own at home!
Hot Tip!
If you’re using tea towels, make sure they are fully dampened and do not use them at oven temps over 350F. You can wrap them in tin foil to prevent browning/burning.
All you need to do is cut up and old tea towel into strips and pin them onto the cake pans. If you’re really crafty you can stitch some velcro into the strips and have your own easy-to-use version.
Tea Towel Trick

If the cakes are still a tiny bit domed after using the bake even strips, there’s another thing you can do as soon as they come out of the oven. Grab a (clean) tea towel and lightly press down on any domes.
Be careful, as the pans will be hot and there will be steam coming out as you press down on the cakes. Don’t press too hard or your cake will cave in!
Please Note
The method above only works on small domes and only straight out of the oven.
Since I always use the cake strips, my domes are never really that high to begin with, but the tea towel technique helps with that last little bit.
I don’t know how well it would work on a cake with a large dome. By the time I was done taking pictures, the domed cake was starting to cool, so pressing down on it didn’t help too much.

I hope you found these tips helpful. Cake strips really are one of my very favorite tools/hacks in the baking kitchen. They make my life easier so I hope you give them a try!
Quick links to help you bake Flat Cake Layers:
- The secret to getting flat cake layers: Evenbake Strips
- My very favorite kitchen scale: Jennings Kitchen Scale
- The best aluminum cake pans: Fat Daddios
- If you need to level your cakes or cut them in half: Cake Leveler
How to Bake Flat Cakes
Ingredients
Vanilla Cake:
- 2 1/4 cups all-purpose flour
- 2 1/4 tsp baking powder
- 3/4 tsp salt
- 3/4 cup unsalted butter room temperature
- 1 1/2 cup granulated sugar
- 3 large eggs room temperature
- 1 1/2 tsp vanilla extract
- 1 cup buttermilk or whole milk, room temperature
Vanilla Buttercream:
- 6 cups powdered sugar sifted
- 2 cups unsalted butter room temperature
- 2 tsp vanilla extract or flavoring of your choice
- 4 Tbsp heavy whipping cream
Instructions
Vanilla Cake:
- Preheat oven to 350F. Grease and flour two 8" cake rounds and line with parchment.
- In a medium bowl, whisk flour, baking powder, and salt until well combined. Set aside.
- Using a stand mixer fitted with a paddle attachment, cream butter and sugar on med-high until pale and fluffy (approx 3mins). Reduce speed and add eggs one at a time fully incorporating after each addition. Add vanilla.
- Alternate adding flour mixture and buttermilk, beginning and ending with flour (3 additions of flour and 2 of milk). Fully incorporating after each addition.
- Distribute batter evenly between the two pans. Place damp baking strips around the bottoms of the cake pans.
- Bake for 30-35mins or until a toothpick inserted into the center comes out mostly clean.
- Place cakes on a wire rack to cool for 10mins then turn out onto wire rack to cool completely.
Vanilla Buttercream:
- Prepare a stand mixer with a whisk attachment. Whip butter until creamy.
- Reduce speed to low and add in icing sugar 1 cup at a time until well blended. Increase speed to med and beat for 3 minutes.
- Add vanilla and 2 Tbsp cream and continue to whip on medium for 1 minute. Add more cream as needed until desired consistency is reached.
- Whip until the frosting is smooth and silky.
Assembly:
- Place one layer of cake on a cake stand or serving plate. Top with approximately 1 cup of buttercream. Repeat with remaining layer and crumb coat the cake. Chill for 20mins.
- Frost the top and sides of the cake and smooth with a bench scraper.
- Decorate as desired.
Notes

Originally published Aug 2014. Updated with new content April 2020.


Monica DeBiase says
I also have the older Wilton Bake-even Strips and as you say, pinning them is a pain. Instead of pinning, I tie the damp strip with a damp length of baker’s twine, wrapping the twine all the way around. Works like a charm and I no longer prick my thumbs with the pins.
Olivia says
Great idea, thanks Monica!
VHG says
Hi! Thank you for the advice I will definitely give it a try. How do you take the bread out from the mold so perfect?
Olivia says
Hi there! I’m not sure what you mean exactly. I grease and flour the sides and line with parchment, then cool in the pans for only 10mins and turn the cakes out onto a cooling rack. I hope that helps!
nancy says
hi Olivia, thank you so much, i’m going to try all of this, it looks promising 🙂
when you are using a deep pan, one strip is enough?
Olivia says
Hi Nancy! I only ever use one strip and place it along the bottom of the pan where the cake batter is.
Erica Marie says
I’m wondering the same. My cake pans are 4” tall, so when I tried my strips (I have the old ones,too) they still domed. I believe it’s because the strips are not coving the entire pan.
Donna says
Simpler solution is to flip the layer onto parchment paper (upside down) as it comes out of the oven and allow to cool. My dad was a baker for over 50 years and that is what he always did and what he taught me to do.
Olivia says
A lot of cakes are too fragile to flip out of the pans right away and need to cool in the pans for 10mins. Once they cool for that long I don’t think this method would work. Though it’s similar to my other tip about gently pressing down on amy domes!
Marilyn says
So, after you flip the cakes upside down on parchment paper and cool, then what?
Thanks for your response 😀
Sarah Grech says
Do you mean flipping the cake over while it is still in the pan and leaving it to cool upside down?
Neil Morris says
The problem with inverting the layers immediately upon removal is that what you are actually doing is compressing the dome, which results in a more dense cake.
By using the strips, you are allowing the edges to rise more, which results in higher sides, and a lower middle, i.e. flat, which means lighter, taller, AND level layers, especially beneficial if you’re planning to cut the layers in half horizontally, for a four layer cake.
Kerry says
I set a metal flower nail in the center of pan before pouring in the batter (point side up). It acts like a core that bakes from the center and the cakes comes out almost completely level
Olivia says
Great tip Kerry! I’ve tried this way too.
Stacy Randell says
Can you show me what a flower nail looks like?
Olivia says
Hi Stacy! Here you go: https://amzn.to/2NArDza
Kristi says
Hi Olivia. I too was taught to use the strips on the outside of my pans (my teacher taught us to make our own out of towels, and I still use them today..26 years later!) My question to use is along with using the strips, I was taught to lower the temperature to 325° and bake it longer. What do you think of that??
Olivia says
Hi Kristi! I find that by adding the strips I already have to bake them longer, so I wouldn’t also lower the temp. The lower temp might help with flat tops though if you don’t have strips to begin with 🙂
Margie says
I also turn oven to 350. Makes flat, more moist cake.
Olivia says
Hi Margie! Do you mean 325? I’ve heard that turning the oven temp down a bit can help too.
Selina says
Hi Olivia,
I am using a non-wilton version of the cake strips that I got off Amazon. They work fairly well, but as you show in your pictures, the outside of the cake doesnt form a golden ‘crust’ when using the strips, meaning that they don’t look as good if they’re not being iced (for a naked wedding cake for example). I also find it more difficult to put buttercream on as it’s not as ‘solid’! I was wondering if you know any way of still getting that a golden edge with the strips? like taking them off 5-10 mins before the end of cooking for example?
Thank you for your help!
Olivia says
Hi Selina! You could try baking the cakes a little bit longer, but also make sure the strips aren’t sopping wet — squeeze out any excess water. I worry that if you try to take the strips off while the cakes are baking, you might cause them to collapse from either temp changes or jostling.
Meliisa says
I wonder if putting cake pans in freezer or fridge before pouring batter in would help at all, even just a little bit. Also I guess your best bet is to just bake at a lower temperature like 325 degrees for a bit longer.
Alean says
Did you ever try putting the cake pans in the freezer before pouring batter in and baking?
Eloisa Reyes says
Hi Olivia! I absolutely adore your cakes. Im starting my own baking at home business. I really need your help regarding recipes for all cake sizes. How can i make a 2-6 inch batch into a 2-8 or 2-10 inch batch? How does that work? Can you help me out please?
Olivia says
Hi Eloisa! You can check this site for pan size conversions: http://www.joyofbaking.com/PanSizes.html
Joleisa says
Such a genius idea! I’ve always heard of it but never really practised it. Must get me some. Your photographs convinced me that this trick really does work. I’m in the Uk so would love to check if Amazon here sell them. Thanks so much for sharing and all the best with your blog.
Olivia says
I hope you do try these Joleisa! They are a lifesaver 🙂
Liz says
Lakeland has them in the UK.
Georgia says
How deep are the tins that you use to bake your 6″cakes? I’m looking to buy some new tins and have heard that you achieve a more even bake when using deeper tins that are less full. Thanks
Olivia says
Hi Georgia! My cake pans are 2″ deep but I wish they were 3″ as some of my recipes bake right to the top!
Shannon Craig says
If my pans are 3” deep and the cake strips are only 1-1/2”, will tat affect the cake rise at all?.
Olivia says
Hi Shannon! I’m not sure actually, I would place them near the bottom of the pan where the cake batter is. Maybe closer to the middle if the cake batter goes more than half way up the pan.
Shannon C says
Thank you! I made your milk and cookies cake today. Didn’t have the strips so my edge are a lot more golden than the tops however I used your press down method and it worked great!
Marie says
Use 2 one above the other they fit perfectly on the 3″ pans
Anuja Khemka says
Which strips do you use for 6″ cake pans? The ones you mentioned here are for 8-9″ cake pans
Olivia says
Hi Anuja! I have super old ones from Wilton that you had to pin on. You can try their newer version here (I haven’t tried them myself): http://amzn.to/2FLU4oa
Patricia says
These are the MOST genius things ever! I advise anyone who is contemplating the purchase of these to buy them now, rather than wait. You won’t be disappointed as they are so easy to use and you’ll get amazing results every time! Thank you so much for suggesting them, Olivia!
Olivia says
Hi Patricia!! They are amazing, right?? Thank you so much, I’m so glad you found them as helpful as I do 🙂 xo
shirleyShirley boyer says
Wi want to say I was years ago to cut a strip of cloth ( I uses whit flsnnel) and wet it and put around cake always have a level cake that way . Like the idea of Velcro to fasten 👨👦👦👨👦👦👨👦hate the pinning also thanks5
2
Olivia says
Hi Shirley! The velcro makes it SO easy.
Norelle says
I have 2 Wilton strips (purple ones) but every time I use them, the cakes were underbaked. The instructions on the strips says to just follow the baking instructions on the recipe.
I do get beautiful, levelled cakes, but the insides were still underbaked even though toothpick came out clean.
Olivia says
Hi Norelle! How do you mean the insides are still underbaked? Does the cake collapse or is it soggy? The strips help to promote even baking. You could try leaving them in for a few mins longer!
Barbara says
I learned this trick as a Wilton decorating instructor. I cook my cakes at 325 instead of the recommended 350 on cake mix boxes and I end up cooking the cake about 10 minutes longer. I check for doneness every five minutes until a toothpick comes out clean. This cooks the cake slower and I never have a hump on my cakes. The hump comes from the cake cooking from the outside in thereby creating a hump. If you cook it slower it will cook more evenly and will be super moist .
Olivia says
Hi Barbara! Thanks for the tip — I have noticed that if I cook my cakes on a lower temp, they rise more evenly too 🙂
Jacquelyn Harris says
HI! I am about to make a 16″ Round cake… Where can I buy cake strips large enough for this? Or do you recommend something else? I’ve read some people use wet tea towels or inverted flower pin.
Thank you for your help!
Olivia says
Hi Jacquelyn! Hmm, I’m not sure I’ve seen ones that large, but you can totally make your own from an old kitchen towel and just safety pin it on 🙂 The flower pin would be a good idea too for such a large size. I would use both.
Jennifer King says
The way the strips are made, you could at two together quite easily!
Jennifer King says
*attach, not at! Lol
Olivia says
Good tip Jennifer!!
Denyse says
The wilton purple one are the best. You can add as many as needed to get a larger size. They do not use pins or velcro. They have like belt loops to hold strips in place.
Anna Templeton says
Hello,
I have made many, many cakes and used the towel strip method. It works.
The thing I have a problem with is getting the icing even between the layers. Yours are so perfect. How do you do that?
Thank you.
Olivia says
Hi Anna! You mean having the same amount of icing in each layer? Honestly, I eyeball it and then stick a clean offset spatula into each iced layer to see how deep the frosting goes and try to match that height for all layers (not sure if that makes sense). An easier way to do it though would be to use a cookie scoop to scoop the frosting so you know exactly how much is on each layer. I hope that helps!
Melanie says
I cannot wait to purchase these strips and try them out. Thank you for sharing!
Olivia says
I hope you love them as much as I do!!
Marion says
Simply fantastic advice! Triedt he strip of damp towel pnned aroun pan and was amazed at how well it worked.
Olivia says
Yay! So happy to hear that. I love this trick!
Christina Mouyal says
Hi Olivia
I am from Copenhagen Denmark, I have seen your blog and would very much like to try it 🙂
But do you know, where to buy them elsewhere than the US?
Kind regards
Christina
Olivia says
Hi Christina! You can get them on Amazon UK (http://amzn.to/2xe1C24) but they are a bit pricey. The Wilton brand ones are also available and maybe at a slightly better price (http://amzn.to/2wbMDkB). Otherwise you can check some specialty cooking/baking shops if you have any nearby, or just make a DIY version using old tea towels 🙂
Kristin says
First off, weighing out cake pans may seem anal to some, but it’s just common sense to me, if one wants the layers to be an even height. I have the Wilton bake strips and agree that they help create even layers. Unfortunately I only have 2 strips, so today, when I was making a triple layer carrot cake, I tried out your towel pressing technique. It was amazing how well it evened the cake out. Thanks for the tip!
Olivia says
Hi Kristin! Haha, I’m so happy to know that I’m not the only one that thinks weighing cake batter makes sense! Glad the towel trick worked for you!
JC says
I weigh out the batter too. If someone doesn’t like it then they don’t have to eat my evenly layered cake. 😉
Candice says
I’ve literally never thought to weigh, and I’m always so irritated when my layers aren’t even! Definitely going to weigh them from now on!