

Learn how to bake flat cakes every single time! A simple tutorial on how to make sure your cakes come out nice and flat straight out of the oven.

Leveling cakes is my least favorite thing to do ever. I think I’ve done it a total of ONE time and quickly looked for alternatives.
Leveling a cake is something you should do if it bakes up domed. Which, let’s be honest here, almost every single cake does.
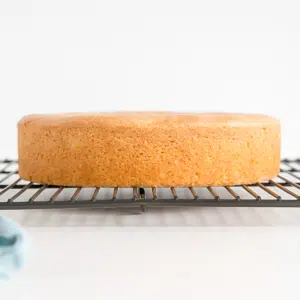
A domed cake looks something like this:


Delicious as it may be, it could be more aesthetically pleasing. Not to mention the uneven distribution of frosting! Those poor middle sections.
Why Do Cakes Dome?
When cakes go into the oven, the pans start to heat up quickly. This will make the sides and bottom of the cake cook faster and set which causes the uncooked middle to rise and dome because it has nowhere else to go.
It’s not easy to stack and frost a domed cake, so it should be leveled out prior to doing so.
To level a cake, you either get a huge frikken cake knife (which I bought specifically for this job and used ONCE) and go at it hoping you can cut off the dome evenly.
Or you can buy a cake leveler which does the job marginally better (I do use this to torte my cakes though – aka cut them in half horizontally).
Either option leaves you with a crap ton of cake crumbs all over everything. This also means wasted cake, and boo to that. Ok, I know you can always eat the scraps, but STILL.
A much better alternative is to not have to level the cake at all by having it come out perfectly flat and stackable. I have a couple of tricks I use to ensure I get flat cakes. They work for me every time!
Now, before we even get to level cakes, you want to make sure that your layers are the same height. You can eyeball this in your pans, or you can be anal (like me) and actually weigh the pans to ensure an even distribution of batter.

I fully embrace my craziness. I use this kitchen scale and I LOVE it.
Now… onto Flat Cakes!
HOW TO BAKE FLAT CAKES

Baking flat cakes comes down to one simple thing: using cake strips around your pans.
This is my go-to method. All you have to do is dampen them and wrap them around the bottom of your cake pans. Perfectly flat cakes every time!
How do cake strips work?
The cake strips insulate the outside of the pan and the moisture in the strips keeps the sides of the pan cooler so your cake bakes up more evenly. Without the strips, the outsides of the cakes cook and set faster causing the middle of the cake to dome.
I soak my strips in a bowl while I’m prepping my cake batter and then gently squeeze out the excess water before I wrap them around the pans. It’s important that they’re not sopping wet or they could cause the cake to become soggy.
Here’s a side-by-side shot of the cakes right out of the oven, only one using a cake strip.

You can see how nice and flat the cake on the right is. Not only is the one in the left domed it’s also a bit darker on the sides.

The one on the right is cooked more evenly throughout. I use these cake strips on all of my cakes and they help a LOT.
It’s important to note that using these strips will cause the cake to bake a bit slower and you’ll likely need to increase the baking time on a recipe. The baking times for my recipes all assume that baking strips are used.
Baking times vary as it is because every oven is different, so it’s important to use them only as a guideline and to know your oven.
If you only do one thing, use these strips!
I have the older model Wilton brand strips that I got at Michael’s 10+ years ago. These are ok, but pinning them on is a bit of a pain.
I found these Regency ones online that have velcro which seems like a much better option so if you’re in the market for some, I would get those!

DIY Cake Strips
If you don’t want to shell out the money for these you can easily make your own at home!
Hot Tip!
If you’re using tea towels, make sure they are fully dampened and do not use them at oven temps over 350F. You can wrap them in tin foil to prevent browning/burning.
All you need to do is cut up and old tea towel into strips and pin them onto the cake pans. If you’re really crafty you can stitch some velcro into the strips and have your own easy-to-use version.
Tea Towel Trick

If the cakes are still a tiny bit domed after using the bake even strips, there’s another thing you can do as soon as they come out of the oven. Grab a (clean) tea towel and lightly press down on any domes.
Be careful, as the pans will be hot and there will be steam coming out as you press down on the cakes. Don’t press too hard or your cake will cave in!
Please Note
The method above only works on small domes and only straight out of the oven.
Since I always use the cake strips, my domes are never really that high to begin with, but the tea towel technique helps with that last little bit.
I don’t know how well it would work on a cake with a large dome. By the time I was done taking pictures, the domed cake was starting to cool, so pressing down on it didn’t help too much.

I hope you found these tips helpful. Cake strips really are one of my very favorite tools/hacks in the baking kitchen. They make my life easier so I hope you give them a try!
Quick links to help you bake Flat Cake Layers:
- The secret to getting flat cake layers: Evenbake Strips
- My very favorite kitchen scale: Jennings Kitchen Scale
- The best aluminum cake pans: Fat Daddios
- If you need to level your cakes or cut them in half: Cake Leveler
How to Bake Flat Cakes
Ingredients
Vanilla Cake:
- 2 1/4 cups all-purpose flour
- 2 1/4 tsp baking powder
- 3/4 tsp salt
- 3/4 cup unsalted butter room temperature
- 1 1/2 cup granulated sugar
- 3 large eggs room temperature
- 1 1/2 tsp vanilla extract
- 1 cup buttermilk or whole milk, room temperature
Vanilla Buttercream:
- 6 cups powdered sugar sifted
- 2 cups unsalted butter room temperature
- 2 tsp vanilla extract or flavoring of your choice
- 4 Tbsp heavy whipping cream
Instructions
Vanilla Cake:
- Preheat oven to 350F. Grease and flour two 8" cake rounds and line with parchment.
- In a medium bowl, whisk flour, baking powder, and salt until well combined. Set aside.
- Using a stand mixer fitted with a paddle attachment, cream butter and sugar on med-high until pale and fluffy (approx 3mins). Reduce speed and add eggs one at a time fully incorporating after each addition. Add vanilla.
- Alternate adding flour mixture and buttermilk, beginning and ending with flour (3 additions of flour and 2 of milk). Fully incorporating after each addition.
- Distribute batter evenly between the two pans. Place damp baking strips around the bottoms of the cake pans.
- Bake for 30-35mins or until a toothpick inserted into the center comes out mostly clean.
- Place cakes on a wire rack to cool for 10mins then turn out onto wire rack to cool completely.
Vanilla Buttercream:
- Prepare a stand mixer with a whisk attachment. Whip butter until creamy.
- Reduce speed to low and add in icing sugar 1 cup at a time until well blended. Increase speed to med and beat for 3 minutes.
- Add vanilla and 2 Tbsp cream and continue to whip on medium for 1 minute. Add more cream as needed until desired consistency is reached.
- Whip until the frosting is smooth and silky.
Assembly:
- Place one layer of cake on a cake stand or serving plate. Top with approximately 1 cup of buttercream. Repeat with remaining layer and crumb coat the cake. Chill for 20mins.
- Frost the top and sides of the cake and smooth with a bench scraper.
- Decorate as desired.
Notes

Originally published Aug 2014. Updated with new content April 2020.


Caroline says
Hi!
Any suggestions for a mini Bundt or muffin pan? 😅
No worries, if not lol.
Olivia says
Hi Caroline! It’s definitely harder to bake up flat Bundt cakes! You could try baking at a lower temperature for longer to see if that helps.
Emily Bean says
I was wondering how to bake a flat sheet cake?
Olivia says
Hi Emily! That is trickier for sure. Do your sheet cakes usually dome a lot? You can try lowering the temperature slightly to see if that helps.
Lori says
I’ve used strips when making a few vanilla cakes and they never seem to cook in the middle. I’m afraid of cooking too long and drying out the entire cske. I cooked them for at least 15 minutes longer. And thoughts?
Olivia says
Hi Lori! Using the strips will make the cakes take longer to bake. If they are uncooked in the middle then they need more time in the oven. The strips help prevent the sides from baking too quickly and drying out. I would bake them longer. I would also get an oven thermometer to test the temperature of your oven.
AC says
I was excited to use the strips you recommended, but my cake layers came out very lopsided. Did I do something wrong??
Olivia says
Hi AC! Do you use a fan oven? That’s the only thing I can think of that would cause the cakes to be lopsided.
Sarah says
Just a question…wouldn’t regular Velcro melt in the oven? I’d love to sew some up, as I’m a seamstress, but I’d imagine the commercially available options use a special type of high-heat velcro…anyone know?
Olivia says
Hi Sarah! I’m not sure, but I think you’re right. I would make sure the velcro you use is heat resistant.
Denise says
If I’m decorating a cake, I use the bake even strips & then use a leveler if it’s needed. Most of the time, it isn’t. The strips work great! I bought some new ones recently just to be able to use the Velcro closures instead of having to pin them. I have regular cake pans of various brands that I use for quick cakes that I do for myself, & they work fine. However, I use all Wilton cake pans when I’m decorating cakes. They work really well, and are easy to clean. Just out of curiosity, if you’re greasing & flouring the pan, we are you lining them with parchment? I usually use Baker’s Joy, & never have a problem with the bottoms burning or with the cakes sticking. I’ve read the recipe for Cake Goop and may try that next! Otherwise, I’ll stick with Baker’s Joy. I don’t need it often enough to worry about the cost very much, & it works great! If I’m out of it or somewhere where there isn’t any, I go old-school and grease & flour. It still works!
Olivia says
Hi Denise! So glad you find the baking strips as handy as I do. For the parchment on the bottom — I just do that as an extra step to ensure the cakes pop out of the pans. They usually will with the cake goop or baking spray like you use but the parchment makes it all that much easier.
Renante Tapat says
How about using a silicone mould instead of pan?
Olivia says
Hi Renante! I haven’t tried using these with a silicone mould so I can’t say for sure if the effect would be the same.
Maureen says
I’m wondering if your buttercream recipe will give me a really smooth decorating icing for a child’s birthday cake or should I use royal icing with the French vanilla slab cake. I don’t want touse fondant.
Olivia says
Hi Maureen! My Swiss meringue buttercream is super smooth! https://livforcake.com/swiss-meringue-buttercream-recipe/
Jolunda says
Thank you for the information. What brand cake pans are those?
Olivia says
Hi Jolunda! All my cake pans are from Fat Daddios.
DeAnn S Caylor says
I use ONLY Fat Daddio cake pans. Been baking cakes for more than half a century and they are my favorites!
Donna says
Hi. My round cake pans are 3” high but my cake strips are only 2” high. Is that problematic? Could/Should I place them at the very bottom of the side of the pan?
Or would I be better off making 3” high strips?
Thanks.
Olivia says
Hi Donna! Do you typically bake to the top of the 3″ pans? If so then I would use 3″ wide strips for best results. I wouldn’t say it’s a huge problem to use 2″ ones though, they just might not be 100% effective. I would place them near the bottom of the pans.
MiTmite( says
Due to my attempts to cut back on sugar consumption, I haven’t baked any cakes in quite some time. I don’t remember having problems with domes on my cakes, but this article sure was interesting, nonetheless.
It’s terrific how you write everything so it’s easily understood. There’s a real art to that.
Next time I bake a cake, it will be German Chocolate Cake. I always double the coconut-pecan (etc) frosting. You can hide a lot of “defects” as you slather on that delicious frosting. Bon appétite.
Naomi says
Lovely.💕i cant wait to bake all by my self 🙏thanks soo much
Olivia says
I hope you love this tip as much as I do!