

Learn how to bake flat cakes every single time! A simple tutorial on how to make sure your cakes come out nice and flat straight out of the oven.

Leveling cakes is my least favorite thing to do ever. I think I’ve done it a total of ONE time and quickly looked for alternatives.
Leveling a cake is something you should do if it bakes up domed. Which, let’s be honest here, almost every single cake does.
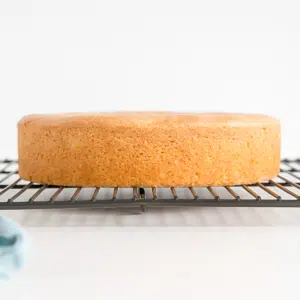
A domed cake looks something like this:


Delicious as it may be, it could be more aesthetically pleasing. Not to mention the uneven distribution of frosting! Those poor middle sections.
Why Do Cakes Dome?
When cakes go into the oven, the pans start to heat up quickly. This will make the sides and bottom of the cake cook faster and set which causes the uncooked middle to rise and dome because it has nowhere else to go.
It’s not easy to stack and frost a domed cake, so it should be leveled out prior to doing so.
To level a cake, you either get a huge frikken cake knife (which I bought specifically for this job and used ONCE) and go at it hoping you can cut off the dome evenly.
Or you can buy a cake leveler which does the job marginally better (I do use this to torte my cakes though – aka cut them in half horizontally).
Either option leaves you with a crap ton of cake crumbs all over everything. This also means wasted cake, and boo to that. Ok, I know you can always eat the scraps, but STILL.
A much better alternative is to not have to level the cake at all by having it come out perfectly flat and stackable. I have a couple of tricks I use to ensure I get flat cakes. They work for me every time!
Now, before we even get to level cakes, you want to make sure that your layers are the same height. You can eyeball this in your pans, or you can be anal (like me) and actually weigh the pans to ensure an even distribution of batter.

I fully embrace my craziness. I use this kitchen scale and I LOVE it.
Now… onto Flat Cakes!
HOW TO BAKE FLAT CAKES

Baking flat cakes comes down to one simple thing: using cake strips around your pans.
This is my go-to method. All you have to do is dampen them and wrap them around the bottom of your cake pans. Perfectly flat cakes every time!
How do cake strips work?
The cake strips insulate the outside of the pan and the moisture in the strips keeps the sides of the pan cooler so your cake bakes up more evenly. Without the strips, the outsides of the cakes cook and set faster causing the middle of the cake to dome.
I soak my strips in a bowl while I’m prepping my cake batter and then gently squeeze out the excess water before I wrap them around the pans. It’s important that they’re not sopping wet or they could cause the cake to become soggy.
Here’s a side-by-side shot of the cakes right out of the oven, only one using a cake strip.

You can see how nice and flat the cake on the right is. Not only is the one in the left domed it’s also a bit darker on the sides.

The one on the right is cooked more evenly throughout. I use these cake strips on all of my cakes and they help a LOT.
It’s important to note that using these strips will cause the cake to bake a bit slower and you’ll likely need to increase the baking time on a recipe. The baking times for my recipes all assume that baking strips are used.
Baking times vary as it is because every oven is different, so it’s important to use them only as a guideline and to know your oven.
If you only do one thing, use these strips!
I have the older model Wilton brand strips that I got at Michael’s 10+ years ago. These are ok, but pinning them on is a bit of a pain.
I found these Regency ones online that have velcro which seems like a much better option so if you’re in the market for some, I would get those!

DIY Cake Strips
If you don’t want to shell out the money for these you can easily make your own at home!
Hot Tip!
If you’re using tea towels, make sure they are fully dampened and do not use them at oven temps over 350F. You can wrap them in tin foil to prevent browning/burning.
All you need to do is cut up and old tea towel into strips and pin them onto the cake pans. If you’re really crafty you can stitch some velcro into the strips and have your own easy-to-use version.
Tea Towel Trick

If the cakes are still a tiny bit domed after using the bake even strips, there’s another thing you can do as soon as they come out of the oven. Grab a (clean) tea towel and lightly press down on any domes.
Be careful, as the pans will be hot and there will be steam coming out as you press down on the cakes. Don’t press too hard or your cake will cave in!
Please Note
The method above only works on small domes and only straight out of the oven.
Since I always use the cake strips, my domes are never really that high to begin with, but the tea towel technique helps with that last little bit.
I don’t know how well it would work on a cake with a large dome. By the time I was done taking pictures, the domed cake was starting to cool, so pressing down on it didn’t help too much.

I hope you found these tips helpful. Cake strips really are one of my very favorite tools/hacks in the baking kitchen. They make my life easier so I hope you give them a try!
Quick links to help you bake Flat Cake Layers:
- The secret to getting flat cake layers: Evenbake Strips
- My very favorite kitchen scale: Jennings Kitchen Scale
- The best aluminum cake pans: Fat Daddios
- If you need to level your cakes or cut them in half: Cake Leveler
How to Bake Flat Cakes
Ingredients
Vanilla Cake:
- 2 1/4 cups all-purpose flour
- 2 1/4 tsp baking powder
- 3/4 tsp salt
- 3/4 cup unsalted butter room temperature
- 1 1/2 cup granulated sugar
- 3 large eggs room temperature
- 1 1/2 tsp vanilla extract
- 1 cup buttermilk or whole milk, room temperature
Vanilla Buttercream:
- 6 cups powdered sugar sifted
- 2 cups unsalted butter room temperature
- 2 tsp vanilla extract or flavoring of your choice
- 4 Tbsp heavy whipping cream
Instructions
Vanilla Cake:
- Preheat oven to 350F. Grease and flour two 8" cake rounds and line with parchment.
- In a medium bowl, whisk flour, baking powder, and salt until well combined. Set aside.
- Using a stand mixer fitted with a paddle attachment, cream butter and sugar on med-high until pale and fluffy (approx 3mins). Reduce speed and add eggs one at a time fully incorporating after each addition. Add vanilla.
- Alternate adding flour mixture and buttermilk, beginning and ending with flour (3 additions of flour and 2 of milk). Fully incorporating after each addition.
- Distribute batter evenly between the two pans. Place damp baking strips around the bottoms of the cake pans.
- Bake for 30-35mins or until a toothpick inserted into the center comes out mostly clean.
- Place cakes on a wire rack to cool for 10mins then turn out onto wire rack to cool completely.
Vanilla Buttercream:
- Prepare a stand mixer with a whisk attachment. Whip butter until creamy.
- Reduce speed to low and add in icing sugar 1 cup at a time until well blended. Increase speed to med and beat for 3 minutes.
- Add vanilla and 2 Tbsp cream and continue to whip on medium for 1 minute. Add more cream as needed until desired consistency is reached.
- Whip until the frosting is smooth and silky.
Assembly:
- Place one layer of cake on a cake stand or serving plate. Top with approximately 1 cup of buttercream. Repeat with remaining layer and crumb coat the cake. Chill for 20mins.
- Frost the top and sides of the cake and smooth with a bench scraper.
- Decorate as desired.
Notes

Originally published Aug 2014. Updated with new content April 2020.


Vilya says
I have 10 inch layer tins, but the strips I have are for 9 ” pans. Can I cut up the extra pair I have, put some Velcro on them and use them for the 10″ tins??
Olivia says
Hi Yilya, yes, that should work fine as long as the strip is touching the cake pan all around.
Cindy B says
I grab enough paper towels to wrap around the cake pans. Fold them until they are about 1″ wide. Wet them then press against the outside of the pan. Paper burns at 451 F, so baking cakes at 350 F is safe. The results are the same. No pins or Velcro needed
Olivia says
Awesome, great tip Cindy! Thanks! 😀
Jessica says
Where can you buy the cake pan strips and what are they called?
Olivia says
Hi Jessica, you can get them here.
Kirsten says
i do the strips (old towel) but I also throw a handful or two of ice cubes into the bottom of the oven. Similar to a water bath but a fraction of the effort. The combo works great! I will try you tip of pushing down with a clean towel the next time I end up with a small dome. Thanks!
Olivia says
Interesting tip about the ice cubes! I may have to try that. Thanks Kristen!
Cindy says
Put the ice cubes into a container first. They can warp the metal of oven bottom.
Karen says
Will this work on 13″ a 9″ cake pans too? My 13 a 9 cakes always seem to hump up in the middle too 🙁
Olivia says
It should! As long as your strips can go all the way around… Another tip with sheet cakes is to use a flower nail or heating core type thing. Before pouring the cake batter into the pan, place these “nails” pointy end up in a couple of places (evenly spaced) in the pan. This will help draw heat around these nails and even out the baking. Hope that helps! Let me know how it turns out :).
Sharon @ What The Fork Food Blog says
Wow, great tips! I also hate leveling cakes, I always seem to make them uneven haha. Now time to get my hands on some of those strips!
Olivia says
Thanks Sharon! I hope you try them, they are so helpful!
Alice says
as long as I have kids at home, I’m going to use a cake leveler 🙂 Its an easy to use tool and they love the crumbs and bits of cake to munch on. But it was really neat that you weigh your cakes! That is a crazy that I can embrace! 🙂 What a fun idea for getting evenly baked cakes!
Olivia says
I totally support eating cake scraps whenever possible :)!
Sue says
My friend freezes her cake scraps and uses them instead of bread in bread pudding. Delicious!
Olivia says
That is a great way to use up the scraps for sure!! Thanks Sue 🙂
Kathryn says
Whenever I have them they are frozen, giving me a quick Go-To for cake pops
Geoffrey says
I’ve always suffered from domed-cake-syndrome until I tried your method. Those even bake strips were the best 20 bucks I ever spent on supplies hehe. Thank you for this article — you’re pretty much my new hero!
Olivia says
I’m so happy to hear this!! Thank you Geoffrey!
allie @ Through Her Looking Glass says
Dear Olivia, your flat top cakes are gorgeous. I have those very strips. But know what my problem is? I forget to use them. Like all the time. I am going to have to tie a string around my finger next time I am mixing up cake batter. Thanks for all the great and delicious tips!
Olivia says
You know, sometimes I take the strips out, soak them, then forget to put them on the pans!! My new method is to place them on the stove top so that I can see them before putting the pans in the oven :).
Laura @MotherWouldKnow says
I have been known to use toothpicks to shave off the bump, but the strips are so much easier.Great tutorial.
Olivia says
Thanks Laura! Hopefully this saves some time too :).
Lorena says
This is absolutely brilliant!! I’ve never heard of those or seen any of those strips before and truly wondered if the professionals really use levellers to cut their pieces because as you say there are soooo many crumbles left and it never looks as beautiful as your flat cake. Absolutely love, love, love this post. Thanks for sharing!
Olivia says
Thank you so much Lorena! xo
lindsay says
one day we will meet and you will teach all your tricks! i’ve made a wedding cake once and it took like 3 days to perfect. UN REAL you are
Olivia says
You are TOO sweet. How fun would that day be?? Cooking, baking, eating. Perfect.
Lara says
I have the bake even strips and the pins bend and are really annoying and pretty useless after a few times. . I’m wondering if attaching some Velcro would work or whether the water would eventually stop them sticking together? Great idea and worth trying. Never heard of Regency strips here in the UK.
Olivia says
I know! My pins bend too, it’s so annoying. But I have 4 strips like that and they *do* work so I can’t justify spending the money on new ones. I think attaching velcro would be a great idea! I don’t think the water would stop them from sticking :).
It looks like Wilton maybe has a velcro version now? I can’t totally tell with these but they are available in the UK :).
http://www.amazon.co.uk/Bake-Even-Strip-Set-6-Piece/dp/B00C1LU8SA/ref=sr_1_1?ie=UTF8&qid=1439052931&sr=8-1&keywords=bake+even+strips
Cindy says
I found the pins bend also. Then tried metal clips like those used for paper, the ones that bend up and down It works but i have to remember they are hot coming out of the oven
Olivia says
Ohh good tip! Thanks Cindy!
Baytown Cakes says
Both of your ideas are great. My trick is to invert the cake onto my cooling rack immediately out of the oven…leave the pan over the cake. Place a pot holder on top of the pan and press down. Because the cake is still warm it flattens perfectly and always to the height of the pan which is what I want. And it works for all cake/pan sizes.
Olivia says
Great tip! Thank you!
Marilyn says
I find also lowering the temp to 325 bakes the cake evenly too. Have to bake a little longer but worth it!
Olivia says
Thanks for the tip Marilyn! Will try that.
Amanda says
I’ve always wondered about those bake even stripes. I think I might try them now. Thanks for sharing!
Olivia says
They are awesome!!
Misti says
Can you please give Me the recipe you used to produce these cakes and what size pan the recipe will fit so I can Alter to different sizes thank you
Olivia says
Hi Misti, for this post I used my Almost Scratch Cake recipe here: http://livforcake.com/2014/10/almost-scratch-cake.html It will work in 8″ or 9″ pans.
Misti says
Thankyou, would you reccommend this type of recipe for a topsy turvy cake ? Is it good to carve with and for staking would I need to use towels, could u also advise on how to change to different flavours eg, chocolate many thanks
Olivia says
Hi Misti! This cake should do well with stacking as it bakes up pretty dense. It was my go-to recipe back in my cake decorating days and I had no issues. You should use dowels when stacking for sure as it will need some support. I didn’t ever try carving it though, so can’t comment on that.
As for different flavours, just use a different cake mix and you’re set :).
linda says
I’ve been using this method for over 35 years & it works everytime! Only, I have never bought those strips, I use paper towels instead. All you have to do is take a length of towels to fit around the pan, roll them up, dampen them & wrap around pans. The wet towels stick to the pans.
Olivia says
Great tip Linda! I never thought of using paper towels, I’d be too worried they would burn. Hah.
mimi says
Thanks for the info! My first time hearing about these strips. I wonder if putting the cake in a water bath will yeild similar results?
Livforcake says
These strips are amazing! I’m not sure how a water bath would work… I’ve used it for cheesecakes before, but not regular cake. I might experiment one day! 🙂
Tammy says
YES! A water bath works just as well. I have and use the strips on my round cakes, but i use the watr bath method on my rectangular shaped cakes and my shaped cakes by putting them in a larger pan. It works great!
Olivia says
Thanks for the tip Tammy!! Will have to try this out :D.
Nancy M says
What is a water bath? I have the strips, but they don’t work around oddly-shaped pans 🙁
Olivia says
Hi Nancy, I’ve never tried a water bath on regular cakes (just cheesecakes), but it looks something like this:
http://i2.wp.com/erincooks.com/images/dscake/dscake8.jpg
Jean says
can u explain what a water bath is
Thanks
Olivia says
Hi Jean! Please see comment above with link to a picture of what it looks like.
Nissa says
So brilliant! I love that you baked a cake with the strip and without to show the difference. Very neat!
livforcake says
Thanks Nissa! I thought it would be good to show the difference. But now I have a domed cake in the freezer! 🙂
TAMMI says
You can also place a flower nail, pointed side towards the ceiling, into your pan prior to putting your batter in and bake as normal.
Olivia says
Hi Tammi! Good tip, I’ve tried the flower nail too, but find the strips work best overall. The flower nails are super handy especially if you’re doing a sheet cake since the surface area is larger.
Linda says
Flower nail???
Olivia says
Hi Linda! This (http://amzn.to/2BBgrgF) is a flower nail. You place it upside-down in the middle of your cake pan and pour the batter around it. It acts as a central heating core to help even out the baking of the cake.
margaret says
A metal cookie cutter works too – you just cover up any marks with frosting!