


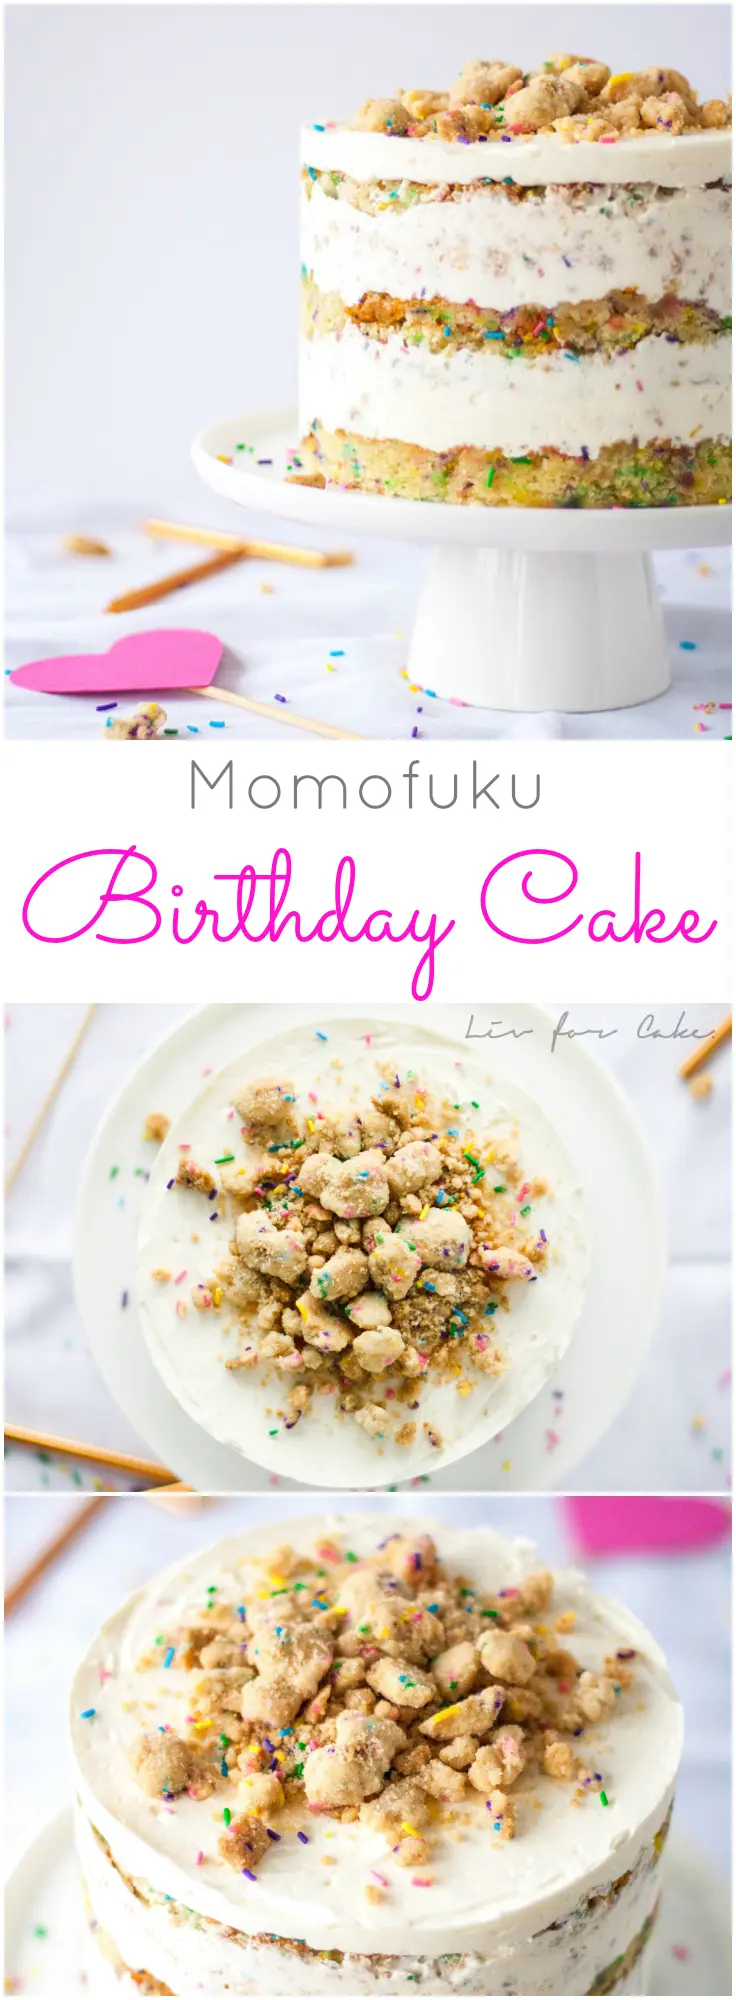
The Ultimate Birthday Cake. A sweet funfetti cake, topped with a cream cheese buttercream, and delicious cookie crumble.
To say that this cake was involved is an understatement. Not only did I have to purchase specific ingredients (cake flour, glucose, grapeseed oil, clear vanilla extract), I also had to buy new tools and equipment (quarter-sheet pan, 6″ cake ring, acetate). This was a project and I was totally up for it, especially since it was going to be for my husband’s birthday. I wanted it to be over the top and special.


If you know anything about Momofuku recipes, you know they are kind of ridiculous and there are multiple separate components that need to be created for the final product. Many people fail at making them for one reason or another. I’d made their cookies before as a sort of first easy (lol) stab at a Momofuku recipe. I didn’t fail on those, but they were definitely not easy. This cake on the other hand, even though it looks almost perfect, had some pretty epic fails.
After I’d finished making it, I vented over email to my friend Nancy @ Gotta Get Baked, so she’s already heard a (less censored) version of this story, but here goes…
Ok seriously, this god damn cake. It was all going to perfectly fine. I paced myself, measured EVERYthing in advance for each component, and organized myself like never before. I was on point. The crumble was super easy, as was the frosting, both worked out perfectly. No issues.
Then I got to baking. The cake was a frikken disaster. I had cake all over the bottom of my oven and what was left in the pan sank like a ton of bricks after I took it out. Epic fail.
Round 2, I figure I must have messed something up in the mixing so I try again, with the same sheet pan. In hindsight I don’t know what I was thinking, but she said quarter-sheet and I had a quarter-sheet! Basically a repeat of the first cake, except this time I put another sheet pan under it to catch the drippings. There were a lot of drippings. Sigh.
BOTH cakes were a total fail. And why? Pan size. Again, I got totally screwed over by pan size. I’d been screwed over by it before here and here and I’d learned my lesson, so I wasn’t going to mess with changing up the pan size again. So, I specifically purchased a quarter-sheet pan as Christina Tosi’s recipe calls for. Well, did you know not all quarter sheet pans are the same size? Apparently. Even though mine specifically says “quarter-sheet pan” on the back of it, it is evidently not even close to the quarter-sheet pan they use at Momofuku. I finally discovered (post cake completion) that hers are 10×15″ where the one I bought is actually 9.5×12″. That is a HUGE difference! You think they’d specify pan size specifically in their recipes. That’s a pretty standard thing to do!
That was only part of the problem. The cake took forever to set, and I like to rotate my pans part way because my oven sucks. Well when I went to check this one after 30mins, I must have nudged it a bit too much, because it literally deflated in front of my eyes. Many expletives were thrown. To top it off, the second cake wasn’t baked enough because I relied on Christina Tosi’s cake testing instructions of “poke it” and “looks like the centre is set” instead of my trusted method of a wooden skewer. I ended up using mostly the first cake with one layer from the second. All the layers were much thinner than they should have been, but I was done at that point.
Assembly was a bit of a pain as well, but I won’t bother you with the boring details there. Mostly stupid mistakes on my part, and rushing things, and having a disaster of a kitchen. As soon as I stuck it into the freezer, I swore I’d never make another Momofuku recipe again. Ever. But then I tasted it and o.m.g. It’s honestly the BEST cake I have EVER had. No joke. The cake is sweet, but the frosting isn’t, and the cookie crumble with it all basically makes the cake. I’ll definitely make the frosting again, and different versions of the crumble for cakes in the future. I’m for sure taking a Momofuku break for a while though…

So there you have it. Another baker taken down by a Momofuku recipe. Ok maybe I’m exaggerating. Overall, I am happy with how it turned out and it IS delicious, but I could have done without the fails.

Here are a few key things about this recipe, should you attempt it on your own, along with some insider tips now that I’ve gone through it once:
- Clear Vanilla Extract – Use it! Initially I wasn’t going to bother with this and just use my regular stuff, but I’m so glad I did. Christina Tosi says to use it for flavor, but the biggest factor for me was color. I’d seen some pics of other bakers who didn’t use the clear stuff, and their frosting turned out kinda beige. Not the pretty stark white. So, use the clear stuff!
- Citric Acid – I couldn’t find this at my local grocer and didn’t want to hunt it down for just a “pinch” in a recipe so I used a bit of lemon juice instead. Worked perfectly fine.
- Frosting – I used 1.5x the recipe for frosting. In my research, some bloggers were saying to double the recipe, but I opted to do 1.5x and it was perfect. I had a tiny bit left over, but otherwise I think it was a great ratio, even with my super thin cake layers.
- Timing – I wouldn’t recommend trying to do this all in one day. It’s certainly doable, but for sanity’s sake, make the crumble and cake one day, then do the frosting and assembly the next day.
- Pan Size – For the love of all things baked and delicious, make sure your “quarter-sheet pan” is 10×15″ before you attempt this!! I’ve also thought about using three 6″ cake rounds and seeing how that would turn out. The layers might be a bit thicker and have more of a finished look on the outsides, but I’m sure it would taste just as delicious, and would likely be a lot easier to manage.
This cake is not for the faint of heart. It’s a ton of work, but the effort will be worth it in the end when you finally have a slice or two of this amazing cake!

Momofuku Birthday Cake
Ingredients
Crumble
- 100 g granulated sugar 1/2 cup
- 25 g light brown sugar 1 1/2 Tbsp (tightly packed)
- 90 g cake flour 3/4 cup
- 2 g baking powder 1/2 tsp
- 2 g kosher salt 1/2 tsp
- 20 g rainbow sprinkles 2 Tbsp
- 40 g grapeseed oil 1/4 cup
- 12 g clear vanilla extract 1 Tbsp
Cake
- 55 g unsalted butter room temperature (4 Tbsp, 1/2 stick)
- 60 g vegetable shortening 1/3 cup
- 250 g granulated sugar 1 1/4 cups
- 50 g light brown sugar (3 Tbsp tightly packed)
- 3 large eggs
- 110 g buttermilk 1/2 cup
- 65 g grapeseed oil 1/3 cup
- 8 g clear vanilla extract 2 tsps
- 245 g cake flour 2 cups
- 6 g baking powder 1 1/2 tsp
- 3 g kosher salt 3/4 tsp
- 50 g rainbow sprinkles 1/4 cup
- 25 g rainbow sprinkles for sprinkling 2 Tbsp
Frosting (1.5x the original recipe):
- 172.5 g unsalted butter at room temperature (1 1/2 sticks)
- 75 g vegetable shortening 1/4 cup + 1/8 cup
- 82.5 g cream cheese 3 oz
- 37.5 g glucose 1.5 Tbsp
- 27 g corn syrup 1.5 Tbsp
- 18 g clear vanilla extract 1.5 Tbsp
- 300 g powdered sugar sifted, 1 7/8 cups
- 3 g kosher salt 3/4 tsp
- .38 g baking powder pinch
- .38 g citric acid I used 1/4tsp lemon juice
Soak
- 55 g milk 1/4 cup
- 4 g clear vanilla extract 1 tsp
Instructions
Crumble:
- Preheat oven to 300F and line a baking sheet with parchment or a silpat.
- In the bowl of a stand mixer fitted with the paddle attachment, combine all dry ingredients (sugars, flour, baking powder, salt, sprinkles). Mix on low until well combined.
- Add oil and vanilla, mix again on low to distribute until small clusters form.
- Bake for 15mins.
- Cool completely before using on cake.
- Store in an airtight container for 1 week at room temperature or 1 month in the fridge or freezer.
Cake:
- Preheat oven to 350F and spray a quarter-sheet pan (10”x15”) cooking spray and line with parchment or a silpat.
- In a medium bowl, whisk together cake flour, baking powder, salt, and 50g (1/4 cup rainbow sprinkles). Set aside.
- In the bowl of a stand mixer fitted with the paddle attachment, combine butter, shortening, and sugars. Beat on med-high for 2-3mins. Scrape bowl if necessary.
- Add eggs one at a time, fully incorporating after each addition. Scrape bowl.
- Turn mixer to low and stream in buttermilk, oil, and vanilla. Increase mixer to med-high and beat for 4-6minutes until mixture is light, fluffy, and no streaks of fat or liquid remain. Scrape bowl.
- On low speed, add flour mixture and mix just until batter comes together, 30-60 secs.
- Spread cake batter in an even layer in the pan and sprinkle with remaining 25g (2 Tbsp) rainbow sprinkles.
- Bake for 30-35mins or until a cake tester comes out clean.
- Cool completely on a wire rack.
- The cooled cake can be stored in the fridge, wrapped in plastic wrap, for up to 5 days.
Frosting:
- In a medium bowl, sift together confectioners sugar, salt, and baking powder. Set aside.
- In the bowl of a stand mixer fitted with the paddle attachment, combine butter, shortening, and cream cheese. Beat on med-high for 2-3mins until the mixture is smooth and fluffy. Scrape bowl.
- Turn mixer to low and stream in glucose, corn syrup, and vanilla. Increase mixer to med-high and beat for 2-3mins until smooth and glossy white. Scrape bowl.
- Turn mixer to low and add in sugar mixture and citric acid (I used lemon juice). Once combined, turn mister to med-high and leaf for 2-3mins until white and smooth.
- Use immediately, or store it in an airtight container in the fridge for up to 1 week.
Soak:
- Whisk together the milk and vanilla in a small bowl or measuring cup.
Assembly:
- Cut acetate into two 3” high and 20” long strips.
- Place a piece of parchment or silpat onto the counter and invert cake onto it. Peel off parchment/silpat from bottom of the cake.
- Using the cake ring, stamp out 2 circles (start in the corners to be able to get 2 full ones). These will be your top and bottom layers. Stamp out 2 half circles from the remaining scraps.
- Clean cake ring and place in the center of your quarter-sheet pan lined with parchment or a silpat.
- Place 1 strip of acetate inside the cake ring to line it. **Make sure the cake ring is completely dry or you won’t be able to get it out of the ring after freezing!!**
- Place your less pretty full layer into the bottom. Dip a pastry brush into the soak and brush onto the cake layer.
- Using the back of a spoon, spread 1/5 of the frosting in an even layer over the cake.
- Sprinkle 1/3 of the crumble evenly over the frosting. Press down with the back of your hand to anchor them in place. (I reserved the chunkiest crumbs for the very top).
- Using the back of a spoon, spread 1/5 of the frosting in an even layer over the crumble.
- With your index finger, tuck the second strip of acetate between the cake ring and the top 1/4 inch of the first strip of acetate, so that you have a clear ring of acetate 5 to 6 inches tall – high enough to support the height of the finished cake.
- Place the two half circle cake pieces on top of the frosting layer and press in additional cake scraps to fill in the layer. Use the back of your hand to press the scraps together into a flat even layer.
- Repeat steps 6, 7, and 8.
- Place the remaining cake round onto the frosting and cover the top with remaining 1/5 frosting. Spread frosting evenly or a bit messier if you like.
- Top with remaining crumble — either around the edge or in the center, however you like.
- Place sheet pan into the freezer and freeze for a minimum of 12 hours. Cake will keep in the freezer for up to 2 weeks.
- At least 3 hours before serving, remove the cake from the freezer and using your fingers and thumbs, pop the cake out of the cake ring. Gently peel off the acetate and transfer cake to platter or stand.
- Let it defrost in the fridge or counter for a minimum of 3 hours (wrapped well in plastic, the cake can be refrigerated for up to 5 days).


Samantha says
Is the cooking time for the cake incredibly long for anyone else? I just baked it for 22 minutes (at a lower temp), and it’s still overdone. (I’ve tried twice now.) also, is the texture of the cake light and fluffy? Not t for me! It’s almost like a sugar cookie, and the batter rose only as high as the to of the sheet pan.
Olivia says
Hi Samantha! That’s really bizarre…the only thing I can think is that maybe your baking powder is expired and therefore the cake didn’t rise? Though it should only rise to the top of the sheet pan, not higher. Why did you bake it at a lower temp?
Nick says
I only had to cook for 25 minutes, but I just attributed that to my crap oven. My cake definitely rose, though, about doubled in size.
Laurel says
Hi Olivia,
Just wanted to say thank you for this blog post. I’ve been wanting to make the Momofuku Milk Bar Birthday Cake for a while now and I never would have survived the process without your helpful tips! I used three 6″ cake pans because that’s what I had, and the cake turned out really well . All of your cakes and reipies look incredible. I can’t wait to make more of them. Thanks for the inspiration 🙂
Olivia says
Hi Laurel! I’m so glad you found these tips helpful and that your cake was a success! It’s still one of my favourite tasting cakes to date :). Glad to know it turned out well with the 6″ round pans!
Andrea says
I googled “momofuku birthday cake fail” after having the same experience with cake overflowing in my oven… the pan size appears to be the culprit. Thank you so much for this post! Fail, fail better….
Olivia says
Hi Andrea! So glad to hear I’m not alone 🙂 I hope you found it helpful!
Jesser says
OK, so I made this for my daughter’s 9th birthday and I thought I’d share my experiences. We have yet to cut into it, but from the little samples of the pieces I’ve had (for QC purposes, of course!) it’s delicious.
My big deviation was to make the cakes in 3 6″ pans instead of on the sheet. This worked awesome, EXCEPT it leaves the edges darker and less pretty. The 5 9-year-olds I’m serving will surely not give a hoot, but it’s not exactly food-porn perfect. I also could not locate acetate locally (where do you find this stuff?!?!) and I refused to shell out $30-40 for a ton of it off Amazon, so again, not food-porn perfect.
Can’t wait to sample it tonight. I really appreciate all these detailed instructions and you sharing your trials and tribulations! It was super valuable to me.
Olivia says
Thanks so much Jess! I am so glad you found the instructions (and fails :)) helpful! the 3 6″ cake rounds is totally the way I would go next time. I am sure it will taste JUST as amazing :).
As for acetate, it’s not the easiest to find!! I found some in a gourmet food store here in Vancouver, but I remember someone recommending I check an office supply store, like Staples. That’s where I’d check next time!
I hope everyone loves the cake! It’s still one of my faves 🙂
Taylor says
Hi! Thank you so much for posting! Would you recommend trying this cake in a trifle bowl? I was thinking about making it in rounds and layering it in a trifle bowl so I could avoid any potential mistakes during assembly? Wanted to get your advice/thoughts?
Thanks!
Olivia says
Hi Taylor! I actually think that would work perfectly fine! Great idea :).
Axel's Momma says
Wow- thanks for the tip about the size of the pan! I’m going to attempt this baby for my son’s 4th bday party! I want to make 2 tiers, 8 inch & 6 inch- so have to figure out how to increase the recipe to do the larger bottom tiers. Any thought (other than yes I am nuts- when I showed my hubbie a picture of my plan he said with love & sarcasm “Gosh honey, can’t you find a cake that takes a bit more effort.”)
Olivia says
LOL, too funny. This cake is worth the effort! You may be cursing it while you’re making it, but it WILL taste delicious. Two-tiers though, that is epic! I’m gonna want to see a pic ;).
For the 8″ tier, you’ll want to double everything. Or , if you want to do both tiers all at once, then 3x the entire recipe amounts listed here. You’ll need a rather large sheet pan to bake the cake if you go that route though! Or 3 half sheet pans, I suppose :).
For ease, you could use round cake pans instead of a sheet pan. That would skip the step of cutting the cakes out, but wouldn’t leave as rustic edges. Another way to make things a bit easier is to just stack the cakes and frost them rather than placing them in an acetate lined cake ring. The latter gives a cleaner finish, but is a bit more time consuming.
Hope that helps! Please let me know if you have any more questions :).
Connie says
holy dedication – you went all out with getting new equipment! hope your husband liked it!
Olivia says
I knoooow, I went a little crazy. He LOVED the cake, and it truly was one of the best I’ve ever had. I have another Momofuku cake on my radar now that I’ve had some down time from this one!
Kaye says
Thank you for your post and detailed “issues.” I’m also happy to know what size quarter sheet to get for the future! I had the same problems with one of her cakes and was never going to bake one again. You have me hope! I used 6 inch pans and all worked out but not as pretty since I don’t have the acetate. (yet)
I encourage bakers to take the time to make this cake. It’s so good!
Olivia says
Thanks Kaye!! I agree, it was totally worth the effort. It’s one of the BEST cakes I’ve ever had. I will make it again, but next time I would probably use 6″ pans like you did, just for ease :).
Alejandra says
Hi Olivia! WOW! Hats off to you for pulling off this amazing cake! I love baking so…I will sure try and make it! I hope it turns out well 🙂 I just have one question…what cake ring size did you use? I LOVE your blog! Thanks for sharing!
Olivia says
Hi Alejandra! I’m so glad you’re going to try this! It tastes AMAZING. I used a 6″ cake ring for it. Let me know how it turns out!!
heather @french press says
one look at this gorgeous cake and I instantly wanted to make it for my daughters 13th birthday, but then I read your hilarious “fails” and now I’m not so sure I could handle it 🙂 but goodness it is gorgeous
Olivia says
Thank you Heather! The cake was quite an undertaking and I curse every minute of it, but it tastes so, soooo good!
Sara // Dear Skim says
Holy smokes! I just found your blog, but dang — this is some dedication to cake. I have to admit, I laughed throughout the entire post. Your re-telling of the process was brilliant, haha. I don’t know if I would’ve stuck with it! But apparently patience and love of a craft can yield amazing results. The cake looks beautiful, delicious, and I am supremely jealous that I can’t snag a slice through the screen.
Olivia says
Thanks so much Sara! I’m so glad you enjoyed my ranting and that it made you laugh! I was hoping people would find amusement in my failures :D.
Janice @Kitchen Heals Soul says
Beautiful! I started making these Milk Bar cakes in 2012 (I think, or maybe even a little before that) and I LOVE assembling them. It’s my favourite part. It can be tricky because smoothing frosting over layers of crumbs is tough, but I just LOVE it. I wish I worked there and had the task of building the layer cakes all day long. Seriously! Is that weird?
Anyways, for your first attempt, I think it turned out perfectly 🙂
Olivia says
Lol Janice! Too funny. Assembling the cake was definitely my least favourite part, but I was well past done with it by that point. I may give it a try another time, when I have a properly sized sheet pan to start with :).
Claudia | The Brick Kitchen says
Just found your blog through this post and must say that it is beautiful – I love your photos. As for this cake, despite all the stress making it, the end product looks absolutely amazing! I have definitely been tempted to try some of Christina Tosi’s recipes but have not found time to do all the preparation yet…when I do, your adaptations will be very helpful! The infamous crack pie is also on the list to try.
Olivia says
Thanks Claudia!! 🙂 Funny you mention the crack pie, it was on my list before the birthday cake. It’s been on my mind the past few days, so much for the Momofuku break! I might simplify the crust on that one though, hah.
Holly @ Revamperate says
I just stumbled across your blog recently and I absolutely love it! Your recipes and food photography are really amazing 🙂
Olivia says
Thanks so much Holly!! 😀
Ami@NaiveCookCooks says
OMG girl such an amazing job you have done!! Looks stunning! Pinning!!
Olivia says
Thanks Ami!! 😀
Laura@ Baking in Pyjamas says
Wow! What a cake to tackle, I’m not sure If I’d go to those great lengths to make this wonderful cake. You did an awesome job, you’d never know how much trouble you’d encountered. I’m sure your husband was very pleased with his birthday cake.
Olivia says
Thanks Laura! That’s so nice of you to say. I honestly doubt I would go through the trouble to make this again, but I have some shortcuts I would try next time :).
Jenna says
I will never attempt this. You’re practically a saint. I probably would’ve thrown cake at the walls after the first fail. It looks amazing!! Good job, girlfriend 🙂
Olivia says
Lol, thanks Jenna! Trust me, I thought about throwing it at the wall, or off my 23rd floor balcony.
Erin @ Platings and Pairings says
I’m not sure that I’m up for the challenge, but this has got to be the most AMAZING cake I have ever seen!!! Plus, I love that it’s vanilla, not chocolate!!!
Olivia says
Thanks Erin! I love it too and am glad I stuck through it. If I ever do it again it would have to be for a very special occasion!
Thalia @ butter and brioche says
As a massive momofuku fan this is definitely a cake I would love. I have never attempted a momofuku cake recipe before but after seeing this post I definitely am inspired too!
Olivia says
I’m sure you would knock it out of the park Thalia! 🙂
June @ How to Philosophize with Cake says
Ah I feel you, Momofuku cakes are tough! I absolutely love their birthday cake recipe, but have had some fails myself…can totally relate! I usually just make my own substitutions though, like using 6 inch pans or corn syrup instead of glucose or frosting the sides or whatever. Kudos for staying true to the recipe! Looks like the finished product is amazing 🙂
Olivia says
Thanks June! I think next time I would definitely try the 6″ pans. Would be so much easier and still the same great taste. I am grateful for discovering the crumble though, that thing is killer and I’ll definitely be making that again for future cakes!
Alex M. says
I hope someone reads this comment, cause I really could use some help.
I’m going to attempt to make this cake for my boyfriend’s birthday since he’s a big momofuku’s fan, but I have some questions and I hope someone can help me.
I’ve been looking for the pan but I can’t find it! I found a 6″ cake pan, would it work for this recipe? Also if I use it, I’d have to bake 3 cakes individually so I’m not really sure about the time, has someone use the 6″ pan? Instead of the quarter sheet pan??
Olivia says
Hi Alex! I have used 6″ cake pans often, just not for this recipe. It should work no problem, just be sure to divide the batter evenly between the 3 pans. As for baking time, I would start checking at 15mins. If the cakes are still jiggly, give it more time. Ideally you’d have 3 separate 6″ cake pans and bake them at the same time so the batter doesn’t sit out for so long. Let me know how it goes!