

A childhood favorite gets an extreme makeover into this decadent Milk & Cookies Cake! Chocolate chip cookie cake layers, cookie milk soak, vanilla buttercream, and a chocolate drip.
Today I’m bringing you a revised version of one of my oldest recipes. Just when you thought milk & cookies couldn’t get any better!
That classic combination you’d always look forward to as a kid for after school snacks, treats on the weekends, or while watching your favorite cartoons or movies…. it was the best! Well, for some people anyhow.
Truthfully, I was never a fan of milk with my cookies (or drinking milk in general). I’ve had it numerous times but, if I had to choose, I’d take my cookies straight up — maybe nuked in the microwave for a few seconds. Seeing as how most people are fans of milk & cookies though, and I’m a fan of cake (in case you hadn’t noticed), what better than to combine the two?


Ryan has been harassing asking me for a chocolate chip cake for some time now. It’s always been on the radar, but there were more pressing season themed desserts that needed to be knocked out first.
I am (only somewhat) restraining myself from jumping head first into Holiday baking (my favorite) and have been trying to distract myself with some Fall recipes instead. Fall baking is my second favorite, so it hasn’t been too difficult.

This Milk & Cookies Cake doesn’t really fit into either of those themes/ seasons, but you’re getting it anyway. It’s a bit of a break from all the pumpkin and Halloween that’s inevitably going to be getting thrown at you from every direction.
I have been seeing Fall stuff in stores already and I’m sure Costco is just itching to get their Christmas stuff out (or is it already??).

How to make this Milk & Cookies Cake
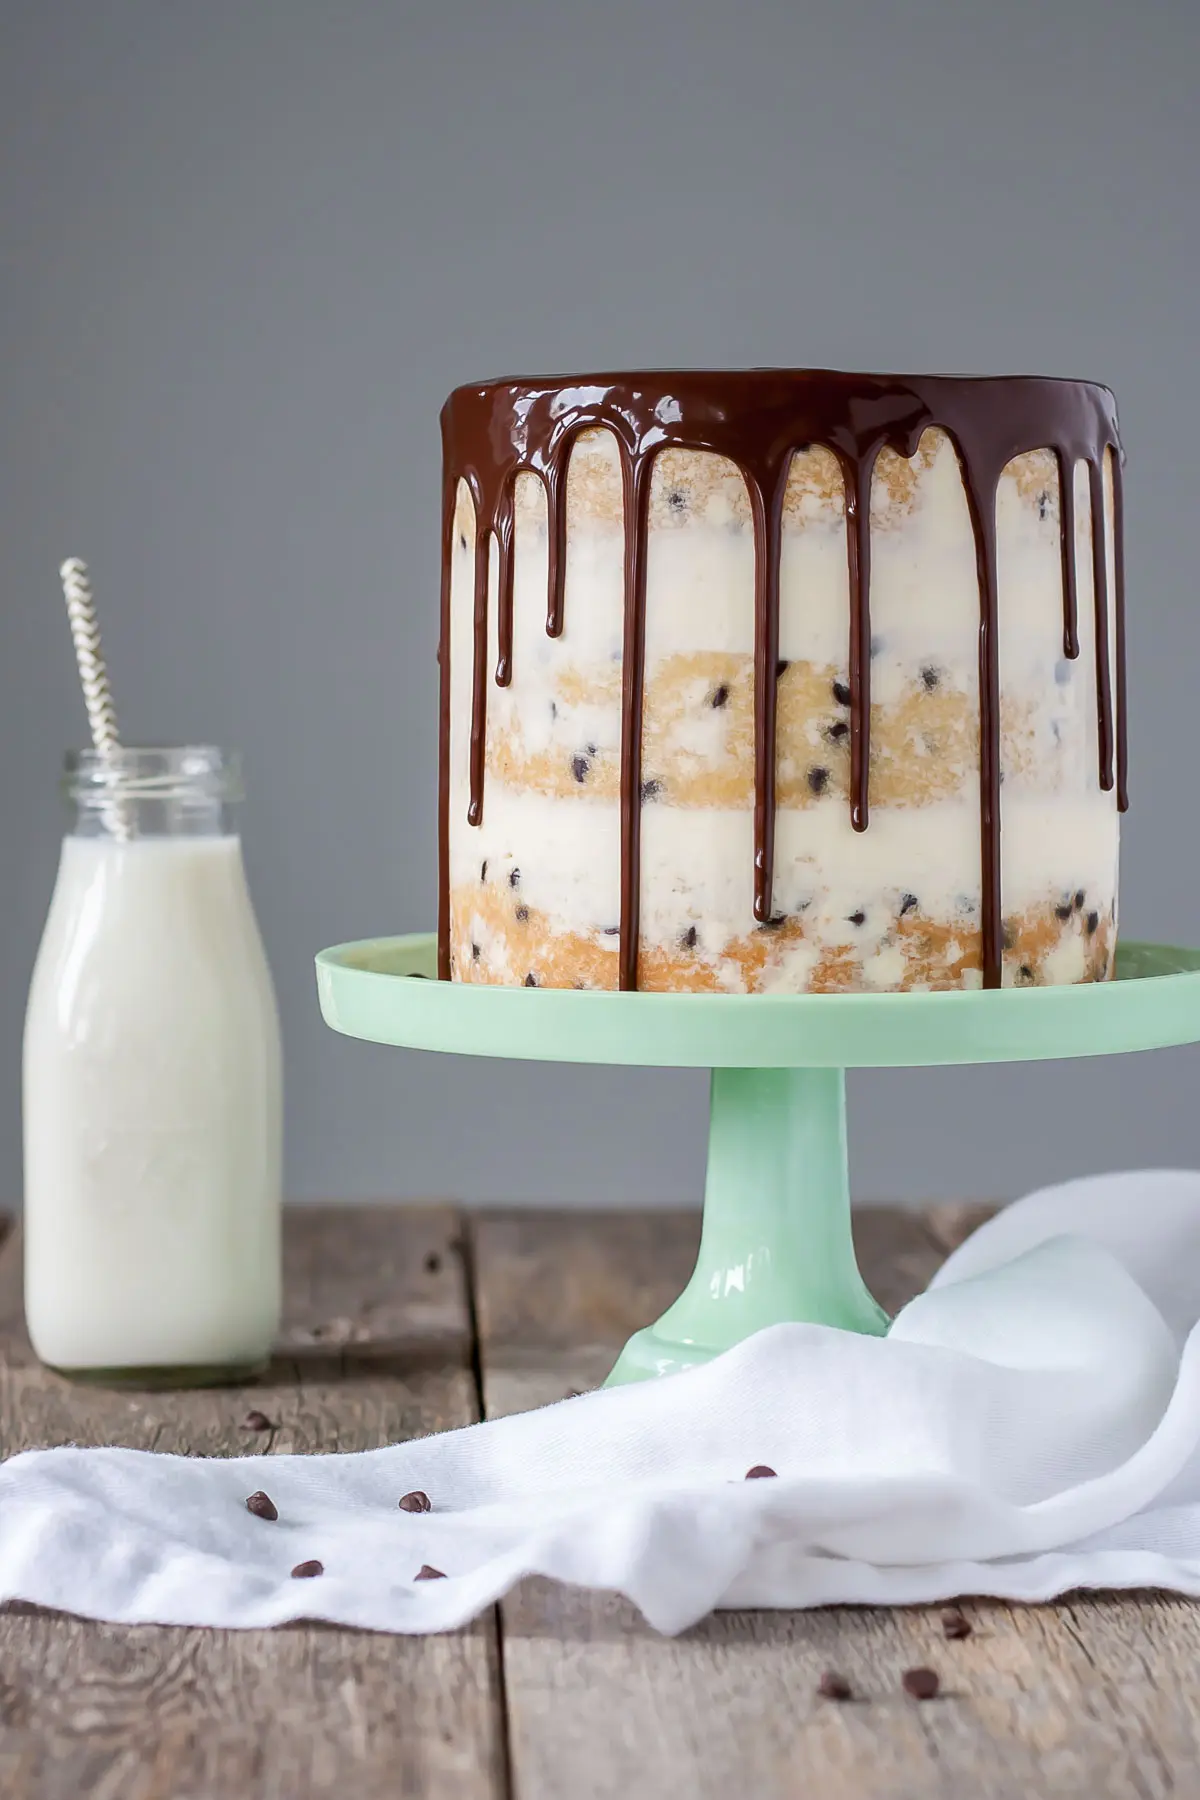
This is a no frills cake, all in all. It’s a basic vanilla cake jazzed up with some brown sugar, cookie milk, and mini chocolate chips. Initially, I was going to do a chocolate buttercream to pair with it, but I figured the vanilla would let the chocolate chip flavor stand out and provide more contrast. That’s when it turned into a Milk & Cookies Cake.
I decided to do a naked cake to let those chocolate chip studded cake layers shine. A drippy ganache which adds a bit of fanciness to this otherwise simple cake.
If you’ve been following this blog for a while, you know that I love ganache drip cakes. It’s a really easy way to add a bit of flair to your cakes – provided that you can get the frosting nice and smooth on the top and edges, which is my biggest challenge.

Cookie Milk Soak
The latest (and greatest?) update to this revised recipe is the addition of cookie milk which is basically chocolate chip cookies steeped in milk to give the milk a cookie flavor. I used the milk in the cake itself and as a milk soak to brush on top of the cake for added moisture and flavor.
I also replaced some of the granulated sugar in the cake recipe for brown sugar to be more cookie-like.
If you prefer though, you can just use regular milk if you don’t have cookies on hand. Regular milk will work fine in the cake recipe and as a soak. I originally used buttermilk in this recipe so you can use that too if you prefer a less sweet cake.

This is a simple yet delicious cake that’s perfect for any occasion. If you’re a milk & cookies lover, I hope you will enjoy this cake version of your favorite treat!
Frequently Asked Questions
How can I convert this recipe?
- The recipe as-is will also work in two 8″ pans. For three 8″ pans, 1.5x the recipe. Baking time may need to be adjusted.
- To make cupcakes, all you need to do is reduce the baking time — start checking at 15mins or so. The recipe will make 1824 cupcakes depending on size.
- For other conversions go here.
Can I make it in advance?
- The cooled cake layers can be baked ahead of time, double wrapped in plastic wrap, and frozen for up to 3 months. Take out 2-3 hours before assembly.
- The frosting can be placed in an airtight container and refrigerated for 1 week for frozen for 3 months. Bring to room temperature and rewhip before using.
- The ganache can be made the day before and left at room temperature overnight or refrigerated for up to a week. You’ll need to bring it to room temperature again before use. I let mine set overnight (with plastic wrap placed directly on the surface). It will be too thick at this point, so I microwave it for 10 secs and stir it until it’s the right consistency. But you just need to let it sit until it’s thick enough to be used as a drip.
- The finished cake (whole or sliced, stored airtight) can be frozen for up to 3 months.
Tips for this Milk & Cookies Cake:
- If you don’t have cookies on hand, you can just use regular milk (or buttermilk) in the cake recipe.
- Likewise, you can replace the brown sugar with granulated sugar.
- The original recipe used buttermilk and all granulated sugar, if you prefer to use that one instead.
- If you’d like to use an easier frosting, you can use my Simple Vanilla Buttercream recipe instead. Half a batch should be enough.
- The drip technique works best on a chilled cake so that the drips set quickly.
- To help ensure cakes come out of the pans cleanly I use homemade cake release or spray my cake pans with Pam for Baking and line the bottoms with parchment paper.
- Be sure to check my Swiss Meringue Buttercream post for tips and troubleshooting.
- To help ensure your cake layers bake up nice and flat, see my Flat Top Cakes post.
***RECIPE REVISED: Aug 8, 2019*** Revised the cake recipe to add in brown sugar and also cookie milk for more of that Milk & Cookies flavor.
***RECIPE UPDATED: Feb 5, 2017*** A few of you mentioned that you found the cake dry and dense so I’ve updated it to a lighter, more fluffy version that hopefully everyone should find delicious!

Milk & Cookies Cake
Ingredients
Cookie Milk Soak:
- 1 1/2 cups milk
- 4-6 chocolate chip cookies enough to be fully submerged in the milk
Cake:
- 2 1/4 cups all-purpose flour
- 2 tsp baking powder
- 1/2 tsp salt
- 3/4 cup unsalted butter room temperature
- 1 cup light brown sugar packed
- 1/2 cup granulated sugar
- 3 large eggs room temperature
- 1 1/2 tsp vanilla extract
- 1 cup cookie milk room temperature (or buttermilk, or regular milk)
- 3/4 cup mini chocolate chips tossed in 1 Tbsp flour
Vanilla Buttercream:
- 3 large egg whites
- 1 cup granulated sugar
- 1 1/2 cups unsalted butter room temperature, cubed
- 1 tsp vanilla extract
Dark Chocolate Ganache:
- 2 oz good quality dark chocolate finely chopped
- 2 oz heavy whipping cream
Instructions
Cookie Milk Soak:
- Place milk and cookies in a medium bowl. Stir well and steep for 20-25mins. Strain into a small bowl using a fine mesh sieve. Gently press the milk out of the cereal using a spatula or wooden spoon. Separate out 1 cup of the cookie milk for the cake. Save the remainder to drizzle onto the cake layers.
Cake:
- Preheat oven to 325F. Grease and flour three 6″ cake rounds and line with parchment.
- In a medium bowl, whisk flour, baking powder, and salt until well combined. Set aside.
- Using a stand mixer fitted with a paddle attachment, cream butter and sugars on med-high until pale and fluffy (3mins).
- Reduce speed and add eggs one at a time fully incorporating after each addition. Add vanilla.
- Alternate adding flour mixture and cookie milk, beginning and ending with flour (3 additions of flour and 2 of milk). Fully incorporating after each addition.
- Fold in chocolate chips and mix until just incorporated. Do not overmix.
- Bake for 35-40mins or until a toothpick inserted into the center comes out mostly clean.
- Place cakes on wire rack to cool for 10mins then turn out onto wire rack. Allow cakes to cool completely.
Vanilla Buttercream:
- Place egg whites and sugar into the bowl of a stand mixer, whisk until combined.*
- Place bowl over a double boiler on the stove and whisk constantly until the mixture is no longer grainy to the touch (approx. 3mins).
- Place bowl on your stand mixer and whisk on med-high until the meringue is stiff and cooled (the bowl is no longer warm to the touch (approx. 5-10mins)).
- Switch to paddle attachment. Slowly add cubed butter and mix until smooth.
- Add vanilla and whip until smooth.**
Ganache:
- Place chopped chocolate and cream into a microwave safe bowl. Stir to combine. Microwave for 20 seconds, stir. Microwave in 10 second intervals, stirring in between, until ganache is smooth and silky. Set aside to cool and thicken slightly before using on cake.
Assembly:
- Trim the tops of the cake layers if needed or poke holes in them with a bamboo skewer. Drizzle or brush each cake layer with about 2 Tbsp cookie milk.
- Place one layer of cake onto a cake stand or serving plate. Top with approximately 2/3 cup of buttercream. Repeat with remaining layers and crumb coat the outside leaving the sides of the cake exposed. Use a bench scraper to smooth out the sides and top of the cake. Chill for 20mins.
- Using a teaspoon, apply ganache near edges like so to create the drips. Pour some ganache on the top of the cake and spread with an offset spatula.
Notes
** The buttercream may look like it’s curdled at some point. Keep mixing until it is completely smooth. ***RECIPE REVISED: Aug 8, 2019*** – Revised the cake recipe to add in brown sugar and also cookie milk for more of that Milk & Cookies flavor. ***RECIPE UPDATED: Feb 5, 2017*** – A few of you mentioned that you found the cake dry and dense so I’ve updated it to a lighter, more fluffy version that hopefully everyone should find delicious!


Mo says
Hello, this cake look amazing, what of cake pans did you use? I love how tall the cake is
Olivia says
Hi Mo! I use three 6″ cake pans from Fat Daddio’s.
Deanna says
I made this cake for Easter dinner, and my family said it was the best thing I have ever baked 🙂 I thought the 6in pans made the cake a little too wobbly when we cut into it, though, so even though it was beautiful being so tall, I think I’ll do 8 or 9 in pans in the future.
So- the ingredients would be the same for 2 8in pans? And I saw that for 3 9in pans, I’d increase ingredients by 50%? What about 2 9in pans- 25%?
Olivia says
Hi Deanna! So glad you and your family liked this one! Conversions for pan sizes are always so tricky. I try to use this site as a guideline: http://www.joyofbaking.com/PanSizes.html
So, in theory, the current recipe makes about 12 cups of batter (three 6″ pans or two 8″ pans).
For two 9″ pans you would need 16 cups so you should 1.3x the recipe. For ease though, 1.5x should work, just don’t fill the pans more than 2/3rds full or so.
For three 9″ pans you would need 24 cups so you should 2x the recipe.
I *really* hope my math is right there :). I hope that helps!
Taylor says
I want to make this for my birthday guests, any advice for scaling it to 9″
Olivia says
Hi Taylor! I would 1.5x the recipe and use two 9″ cake pans. Be sure to only fill each pan no more than 2/3rds full. I hope that helps!
Heidy says
Please tell me where the cake stand and plates are from please and that they are new! 😩 To die for 😻😻. And thanks for the lovely recipe
Olivia says
Hi Heidy! Unfortunately, they are not new and I got them in a discount housewares store (Homesense) 🙁 I am sure you can find similar online though 🙂
Yo.va.na. says
Liv – this cake was amazing! I made it for my birthday party (along with your Oreo cake) and everyone loved them! This cake was not overly sweet but had good flavor and was just perfect – and super easy to make! I accidentally put a 1/4 extra butter in the cake batter so it was moist enough without the simple syrup, though my edges didn’t come out as clean. Oh well 🙂 thanks for another great recipe (I’ve tried 4 so far!)
Olivia says
Yay! So happy to hear that you liked it – and that you’ve tried 4 recipes so far!! 😀
Delanie says
Where do you use the simple syrup? Did I miss it? I can’t wait to make this yummy cake and I want to do it well. Thanks!
Olivia says
Hi Delanie! It’s at the bottom of the Cake instructions. I’ve reordered the instructions to be more clear 🙂 I hope you like it!
Kaela says
Hello! This cake looks great. I am considering subbing brown sugar for white to give it more cookie flavor, any scientific reason why I should not do this? What do you think?
Olivia says
Hi Kaela! You mean using all brown sugar or all white? Either would work perfectly fine 🙂 I specifically put in some brown sugar so that the cake would taste more like chocolate chip cookies (I usually only use white sugar in my cakes).
Love says
Hey! I understand the simply sugar is optional but when does one add it if deciding complete that step?
Olivia says
Hi! The directions for that are with the cake portion 🙂
“Place cakes on wire rack to cool for 10mins then turn out onto wire rack. Poke holes into the warm cakes and brush with some of the cooled simple syrup. Allow cakes to cool completely.”
Kim says
what if you don’t have a stand mixer, just a regular hand held mixer with no paddle attachments?
Olivia says
Hi Kim! A hand mixer will work ok, it just might be more of a challenge for the buttercream as you’ll need to whip it for a good 5-10mins so that it cools before adding the butter.
Erin Vickers-Huff says
Hi Olivia. I love your blog and just made this cake today. I had trouble with the ganache. This is the second time I have had trouble with the same technique. 🙁 The ganache was not liquid enough to pour. I gently tried to coax it over the sides, but the butter cream started to melt.
Can you make any suggestions? I am using Sharffenberger chocolate and heavy whipping cream. So I don’t think the quality of the chocolate should be an issue?
The ganache on your cakes looks so glossy and liquid. Thanks for any tips you can share!
Olivia says
Hi Erin! That is super weird! The ganache should be very thin when it’s hot and you need to cool it completely before use. If it gets too thick once cooled, you can microwave it for about 10 seconds to loosen it up, but no longer, and make sure it’s cool to the touch before using it on the cake. It sounds like something is off in your measurements if the ganache is hot and still not pourable :\.
Jessi Gordon says
I made this cake in two 8″ pans. It was a big hit! Thanks for the recipe.
Olivia says
Thanks Jessi! Glad to hear you liked it! 🙂
Mark says
Thanks for the recipe. 6″ seems a bit on the small side so I’d like to try this out with 9″ pans. Would it work out and would you suggest any modifications besides adding 50% to the recipes? Also, how would the baking time change? Thanks
Olivia says
Hi Mark! If you use three 9″ pans then I would double the recipe. The baking time *should* be fairly similar. There’s a chance the layers will be a bit thinner due to the size difference though, so I would start checking at 30mins or so 🙂
Jess says
Wow wow wowww. I seen this cake last night, and made it today. It was my first attempt at a layer cake, and it turned out amazing. Thanks for sharing!!!
Olivia says
Hi Jess! That is awesome!! I’m so glad you liked it 🙂
Emily says
HI! What size cake pans did you use for this recipe?? Thanks!
Olivia says
Hi Emily! I used three 6″ rounds.
Rosie says
This recipe looked amazing! But I think an ingredient or two is missing from the list. I made the batter as directed, and it was much more of a dough than a batter. More importantly, my cake did not rise AT ALL. It was very dense and small. I tried again and made some modifications. As the recipe currently is listed, you will not get the cake pictured.
Olivia says
Hi Rosie! Sorry to hear this didn’t work out for you. It is definitely a denser cake — more of a pound cake, so the ingredients listed are correct.
Leslie says
This cake did not rise anything like the picture
Olivia says
Hi Leslie! Sorry to hear you had trouble with it. Perhaps your baking powder was expired?
Rebecca Blackwell says
These pictures are making my mouth water. I’ve promised to supply my daughters theater group with bake sale treats, and think I’ll turn this cake into cupcakes for the occasion. It looks like one of those recipes that absolutely everyone will love. Thank you so much for sharing!
Olivia says
Thanks Rebecca!! I hope you like it 😊 Let me know how the cupcakes turn out!
Emily says
Hi Olivia, the cake looks amazing. I’m planning on making it but am worried about it being on the dry side. Would you recommend putting a simple syrup on the cake layers? If so should the syrup be plain or would you recommend any specific flavor? Thanks!
Olivia says
Hi Emily! It does have more of a pound cakey texture for sure. A plain (or vanilla) simple syrup would help make it more moist. I recommend poking holes in the cake with a skewer as soon as it’s come out of the oven and brushing on the simple syrup then :).
Stacy says
Can this be made a day ahead? Keep covered in fridge or just on counter?
Olivia says
Hi Stacy! Yep, it will keep either way, but I recommend putting it in the fridge overnight and then taking it out 2-3 hours before serving.
Stacy says
It won’t get mushy? Should I do the topping after I take it out of icebox the day of or before I put it in the day before?
Olivia says
The cake should not get mushy at all. And ideally yes, do the ganache after taking it out of the icebox.
Stacy says
Thank you so much!
Faigy says
My buttercream became runny after adding the butter, any idea why that might’ve happened?
Olivia says
Hi Faigy! Was the meringue nice and stiff before you added the butter? And cooled completely? If yes to both of those, then I think you just needed to whip it a bit more. I’ve had this happen to me before, right after adding all the butter — most often it gets curdled looking, but one time it got runny. I freaked out a little bit but decided to just walk away from the mixer and leave it whipping. It came together after a couple of minutes.