• Home
  • About
    • About Olivia
    • The Pastry Diaries
    • Privacy & Disclosure
  • eBooks
  • Recipes
    • Cakes
      • Birthday Cakes
      • Bundt Cakes
      • Chocolate Cakes
      • Christmas Cakes
      • Classic Cakes
      • Drip Cakes
      • Easter Cakes
      • Fruity Cakes
      • Halloween Cakes
      • Naked Cakes
      • Thanksgiving Cakes
      • Valentine’s Cakes
      • Vanilla Cakes
    • Cookie Cups
    • Cookies
    • Frostings & Fillings
    • Holiday Desserts
  • Shop
  • Tutorials

Subscribe for the latest recipes:

Liv for Cake

Classic Cake Recipes with a Modern Twist

  • Home
  • About
    • About Olivia
    • The Pastry Diaries
    • Privacy & Disclosure
  • eBooks
  • Recipes
    • Cakes
      • Birthday Cakes
      • Bundt Cakes
      • Chocolate Cakes
      • Christmas Cakes
      • Classic Cakes
      • Drip Cakes
      • Easter Cakes
      • Fruity Cakes
      • Halloween Cakes
      • Naked Cakes
      • Thanksgiving Cakes
      • Valentine’s Cakes
      • Vanilla Cakes
    • Cookie Cups
    • Cookies
    • Frostings & Fillings
    • Holiday Desserts
  • Shop
  • Tutorials

Home » Other Sweets » Mini Key Lime Pies

Mini Key Lime Pies

By Olivia, 61 Comments

This post may contain affiliate links. Please see my full Disclosure Policy for details.
Jump to Recipe

These Mini Key Lime Pies are the perfect bite-sized version of traditional Key Lime Pie.

Tarts on a wooden table.

I don’t typically take the easy road on things, unfortunately. In hindsight I always wish I had – like, what was I thinking?? In this case, I had it set in my mind that I wanted to make mini key lime pies, and I wanted them to be in mini tart pans, NOT in cupcake liners and tins like I’d seen in so many recipes online. Learn from my mistakes people, just use the damn lined cupcake tins like everyone else does. So. Much. Easier.

Overhead photo of tarts on a wooden table.

I didn’t own a mini tart pan, so initially I was on the hunt for those aluminum foil pie plates you can buy in the grocery store, mini ones, but I couldn’t find any. My ideal, obviously, was an actual mini tart pan, but I didn’t think I’d find one, especially since I was not willing to pay full price for something I’d use maybe a handful of times.

Trips to a couple grocery stores left me empty handed — why are mini aluminum foil pans so hard to find?? Probably because I live in Canada and it’s virtually impossible to find anything here. Or at least that’s how it seems when you’re on a mission for a very specific thing and can’t find it in the two stores you go to.

The Ultimate Cake Collection

Over 50 of my very favorite cake recipes all in one place! From Classic Cakes to Holiday favorites and everything in between.

Get your copy today!

Tarts on a wooden table with limes in the background.

I figured I would pop into Homesense to see if I could find anything, though my hopes were not high. If you’ve been to Homesense before, you know it’s a total crapshoot. It’s rare that they have the exact thing you’re looking for at the exact time you’re looking for it.

Well in this case, there it was. One lone mini tart pan staring me right in the face. Just one, and exactly what I was looking for. I figured it was fate. In hindsight, it was actually a test to see if I’d be foolish enough to spend the whole $12 instead of using the perfectly good cupcake tin that was waiting for me at home. I caved and bought it, obviously.

Overhead shot of the tarts and limes

Now, this tart pan likely works perfectly if you’re using a standard pie crust that you trim and press into each tart so it fits. But using a graham cracker crust was a pain in the ass. I had a pretty good makeshift stamper that I could use to press the crust into the bottoms, but the sides were a HUGE pain. It was awkward to press the crust into the sides and get it to stick to the bottom crust.

Halfway through, I gave up and decided that I would just do a bottom crust. I didn’t have the foresight to think that the ones with only the bottom crust may not come out of the pan. They didn’t. The filling totally just glued itself to the sides of the tart pan and wouldn’t budge, even though I placed tinfoil “lifts” under each of the tarts. So those 6 little guys did not get their time in the photo spotlight.

tart shells in a pan.

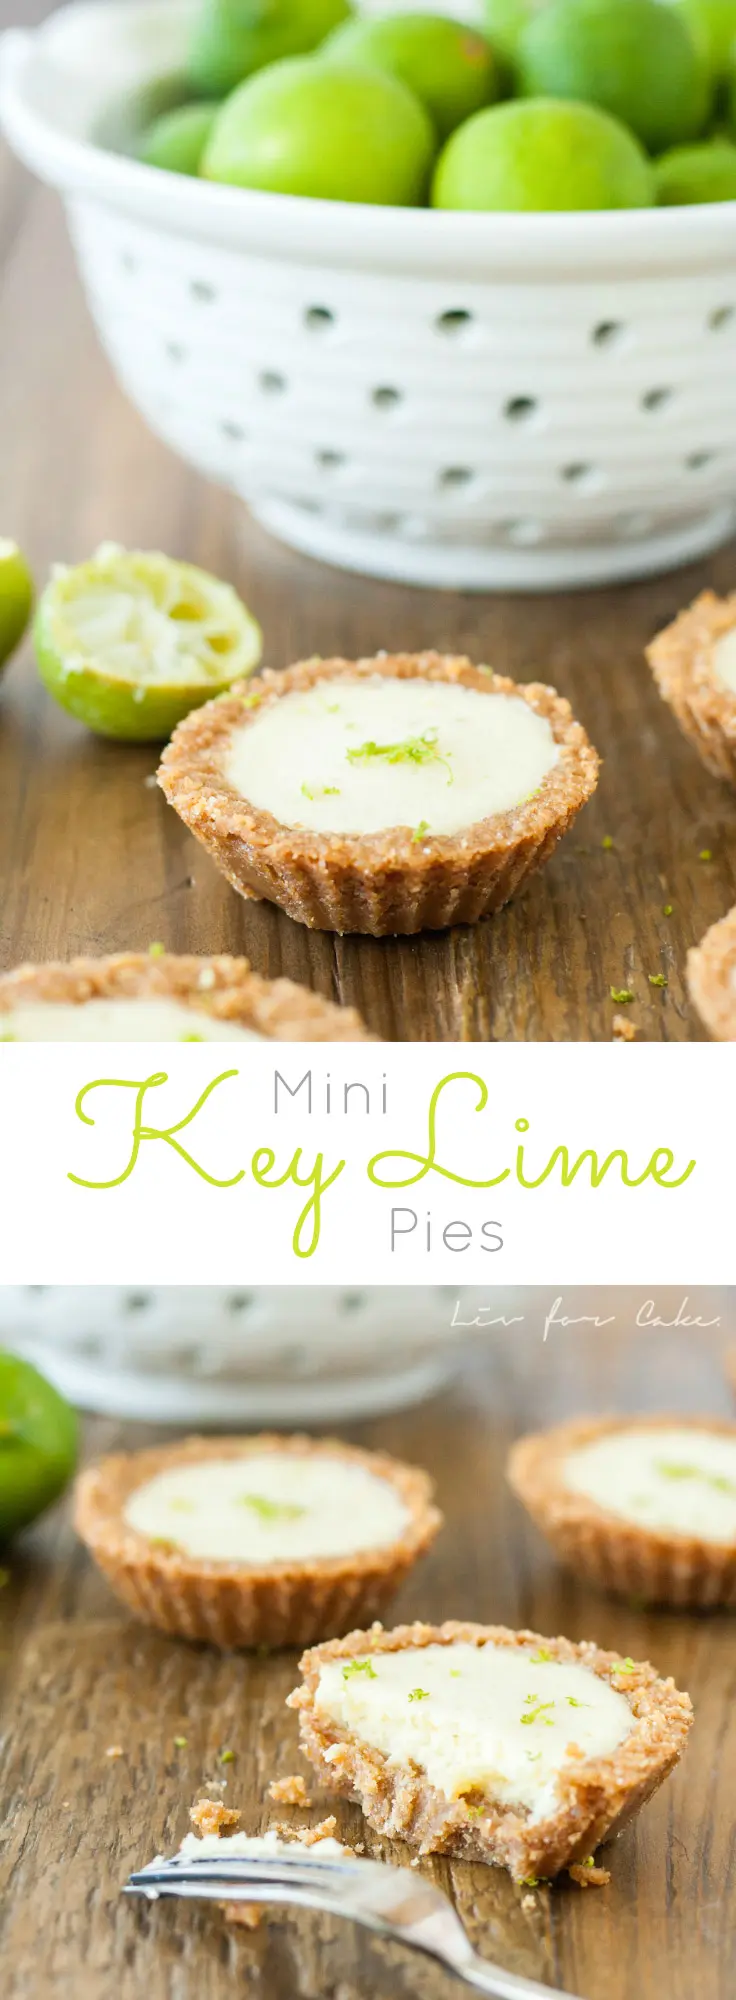
I had extra graham crust and filling, so guess what I did? I got out my cupcake tin and lined it with cupcake liners. Those ones came out perfectly (except that I should have used a bit more filling in each).

Tart using a cupcake wrapper.

Now aside from the whole crust fiasco, I should mention that this is not the easiest recipe. Again, I could have taken the easy route like many recipes out there and used cream cheese or condensed milk. Except that I don’t like cream cheese and I don’t want my key lime pie to taste cream cheese-y, and I didn’t have any condensed milk. But the real reason is that I wanted to modify a recipe we made in school – the lemon sabayon tart – which is, to this day, one of the best things I’ve ever had.

The ingredients for these mini key lime pies are simple — there are only 5. It’s the method that is a bit painful and requires some elbow grease, namely whipping the living daylights out of the filling over a water bath for about 10 minutes. Again, I probably could have used a hand mixer to do this and saved myself both time and energy, but nooooo. In school we used a whisk and did it manually, so I did it that way. Stupid. I now have a blister to show for it. I had flashbacks to school while I was whipping the damn thing, sweating and cursing. Thankfully the end product is worth it.

Tarts on a wooden table.

Perfectly smooth key lime filling with a crunchy graham cracker crust. Heaven.

Tart with a piece cut out.

I do like the look of the tart ones better, but next time I would 100% use the cupcake tins and liners – tastes just as delicious with minimal effort!

If you love Key Lime Pie, you will love this mini version!

tart on a wooden table.
Print Rate
4.23 from 9 votes

Mini Key Lime Pies

These Mini Key Lime Pies are the perfect bite-sized version of traditional Key Lime Pie.
Course Dessert
Cuisine Pie, Tart
Prep Time 40 minutes
Cook Time 15 minutes
Total Time 55 minutes
Servings 12
Calories 189kcal
Author Olivia

Ingredients

Crust:

  • 1 1/2 cups graham crackers
  • 6 Tbsp unsalted butter melted, 85g
  • 1/3 cup granulated sugar

Filling:

  • 2 large eggs
  • 1/3 cup granulated sugar
  • 5 Tbsp key lime juice 6-7 key limes
  • zest of 1 key lime
  • 4 Tbsp unsalted butter melted, 57g
US Customary - Metric

Instructions

Crust:

  • Preheat oven to 350F and line a standard 12 cupcake tin with paper liners.
  • In a medium bowl, combine graham cracker crumbs, sugar, and melted butter.
  • Divide crust evenly amongst the 12 liners, approx. 1 heaping Tbsp in each. Press firmly into the bottom of each liner.
  • Bake for 5-7 minutes. Set aside on cooling rack.

Filling:

  • Preheat oven to 300F.
  • Prepare a bain marie (water bath) on the stove.
  • Once the water is boiling, place eggs, sugar, key lime juice and zest into a large bowl and begin whisking.
  • Whisk vigorously over the boiling bain marie until thick and light (approx. 5-10mins). Take on and off bain marie every once in a while to prevent setting/cooking eggs. Alternatively, try using a hand mixer. The mixture is ready when it's light, thick (like pudding), and ribbons form when you run your whisk through it.
  • Remove from heat and whisk in melted butter.
  • Pour into pre-baked tart crusts and bake for 5-7minutes until set. The center of the pies should jiggle just slightly the pan is nudged.
  • Cool completely on a wire rack, then place in fridge for at least 2 hours.
  • Serve cold, topped with whipped cream if desired.

Recipes You May Like

  • Cake on a white cake stand and a black background.
    Key Lime Pie Cake
  • A cake sitting on top of a table
    Lime & Coconut Cake
  • A coconut cake sitting on top of a table
    Coconut Cake
  • Two mini cakes decorated with fresh raspberries.
    Raspberry Vanilla Mini Cakes
Calories: 189kcalCarbohydrates: 20gProtein: 1gFat: 11gSaturated Fat: 6gCholesterol: 56mgSodium: 87mgPotassium: 38mgSugar: 13gVitamin A: 340IUVitamin C: 1.9mgCalcium: 17mgIron: 0.6mg
The nutritional information and metric conversions are calculated automatically. I cannot guarantee the accuracy of this data. If this important to you, please verify with your favourite nutrition calculator and/or metric conversion tool.

photo collage.

Learn How to Bake the Perfect Cake!

Tips, techniques, and troubleshooting to help ensure your cakes come out perfect every single time!

Get your copy today!

Hungry for more?

Join our Baking community on Facebook!
Follow Liv for Cake on Facebook, Instagram, Pinterest, and Twitter
Or sign up to get free recipes by email!

Subscribe for the latest recipes

July 5, 2015

Comments

    Leave a Reply Cancel reply

    Your email address will not be published. Required fields are marked *

    Recipe Rating


  1. Kate says

    September 19, 2020 at 1:02 PM

    2 stars
    It tasted good but it was really complicated and didn’t work i had to add more things and freeze them. I wouldn’t recommend it unless you really know what you are doing.

    Reply
    • Olivia says

      September 21, 2020 at 10:19 AM

      Hi Kate! Sorry to hear you had trouble with this one.

      Reply
  2. Martje says

    September 13, 2019 at 4:47 AM

    2 stars
    Made these for a party but ended up not serving them, just overly sweet and sugary. The crust made it too sugary, i did like the filling but it was overpowered by that crust. Had to drive to the store last minute to get some pre made pies. Such a shame.

    Reply
    • Olivia says

      September 16, 2019 at 9:21 AM

      Hi Martje! Sorry to hear you didn’t love these. I don’t find them too sweet myself, especially with the tart filling.

      Reply
  3. Jane Reynolds says

    January 29, 2019 at 11:15 AM

    Hi Olivia, I am getting up the courage to make these key lime tarts. Can I use a double boiler?

    Reply
    • Olivia says

      January 30, 2019 at 4:29 PM

      Hi Jane! Yes, that’s basically what I used!

      Reply
  4. Jennifer says

    December 24, 2018 at 10:06 AM

    This is the second time that I tried whisking the ingredients for the filling (dumped the first one exactly as stated in the recipe.. It does NOT thicken. Am I missing something???

    Reply
    • Olivia says

      December 24, 2018 at 10:40 AM

      Hi Jennifer! It takes a really long time to thicken, you can use a hand mixer to speed up the process (I mentioned this in my post). I’m not sure why you dumped the first batch though??

      Reply
  5. Sandi says

    November 1, 2018 at 10:22 AM

    5 stars
    Try Winners, I recently got two sets of (6) individual size tart tins (with removable bottoms) for $15.00. Also, check Amazon, I got a mini cheese cake pan (looks like a muffin pan), with removable bottoms, and I have been using it like crazy for all kinds of recipes. Off to try your recipe, sounds delish

    Reply
    • Olivia says

      November 1, 2018 at 12:07 PM

      Good tip!! I love Winners/Homesense. I hope you like this recipe!

      Reply
  6. Mariah Franklin says

    June 6, 2018 at 6:40 AM

    I will be making this for the first time. If I use a mixer, do I need the water bath?

    Reply
    • Olivia says

      June 6, 2018 at 4:11 PM

      Hi Mariah! The water bath is needed to cook and thicken the curd.

      Reply
  7. Miriam says

    March 30, 2018 at 9:57 AM

    I know this is an old post, and I saw your comment that said you returned the pan, but for anyone else who wants to make mini tarts, they do make liners for that size. (I’m sure you can get them online if you can’t find them locally.) You can also make your own liners using parchment paper. Either way, the mini or standard size muffin pans make cute little tarts!
    Another option for mini-tarts is to use a cream cheese based crust, like this one: https://www.pamperedchef.com/recipe/MISSING+CATEGORY/Basic+Tart+Dough/12350

    Reply
    • Olivia says

      April 2, 2018 at 3:01 PM

      Thanks so much for the tips Miriam!! 🙂

      Reply
    • Brenda says

      August 22, 2018 at 1:00 PM

      Hi! I have looked all over the internet and in stores for mini tart pan liners, can’t find them anywhere! Where did you find them? Thanks!

      Reply
      • Deborah says

        June 13, 2019 at 3:20 PM

        I get them on Amazon. I am also from Canada and use the tins to make butter tarts.

        Reply
  8. Alyssa Dorn says

    December 6, 2017 at 8:23 AM

    Hi Olivia!

    This is the only recipe I’ve found so far that doesn’t call for condensed milk! I hate using that stuff. What do you think about making this in a larger tart pan? I have 5 inch ones, a 9 inch, and an 11 inch. What do you think would work??

    Thank you!

    Reply
    • Olivia says

      December 6, 2017 at 5:33 PM

      Hi Alyssa! I actually have no idea which one would work best. It’s been a couple years since I made this and I wouldn’t want to steer you wrong. My gut says 9″ though, but don’t hold me to it!! Haha. Let me know if you try it 🙂

      Reply
      • Alyssa says

        December 10, 2017 at 9:43 AM

        Thanks for your response! I’ll keep you updated if I decide to try it in the 9” 😊

        Reply
      • Cookiegirl says

        August 9, 2019 at 3:03 AM

        Since what the baking step dues is set the filling, and tarts are basically disks so height (top to bottom) doesn’t change no matter the diameter of the pan or volume of filling, you could probably just bake for the same amount of time.

        Reply
  9. Linda says

    September 24, 2017 at 8:08 AM

    4 stars
    This is exactly how you learn when young that proper utensils are worth the price. Some reasearch online will help to know the shortcomings of different things.
    I bought my tart pans with removable bottoms from Amazon at a very good price and throughout the years I have used them often.
    Your tarts look wonderful and your perseverance is admirable!

    Reply
    • Olivia says

      September 25, 2017 at 4:07 PM

      Thanks so much Linda! And it’s so true — investing in high quality tools is the way to go!!

      Reply
  10. Giselle says

    June 8, 2017 at 4:08 PM

    5 stars
    I will not bake anything with sweetened condensed milk in it, so I was happy to find this recipe. These are delicious. Thank You.

    Reply
    • Olivia says

      June 9, 2017 at 5:01 PM

      So glad you liked them Giselle!! 🙂

      Reply
  11. Elizabeth Federman says

    May 22, 2017 at 2:26 PM

    5 stars
    Olivia, I’m so happy that I happened upon this recipe. I had way too many limes and found this. Hands down, it’s the best Key Lime filling I’ve ever tried. I almost shed a tear imagining you wisking this by hand. The electric mixer was most definitely my friend today. Can’t wait to try some of your cakes. Thanks for spreading joy!

    Reply
    • Olivia says

      May 23, 2017 at 8:16 AM

      Hi Elizabeth! I think I till have PTSD from that whisking by hand, haha! Never again. The filling was delicious though and I am so glad you liked it 🙂 You’ll have to let me know which cakes you try!

      Reply
  12. Deanna says

    November 21, 2016 at 5:56 PM

    These look amazing!! Do you use salted or unsalted butter?

    Reply
    • Olivia says

      November 22, 2016 at 9:08 AM

      Hi Deanna! I use unsalted butter. Will update the recipe!

      Reply
  13. Pam says

    July 16, 2016 at 6:55 PM

    This dessert is the bomb. I have an indoor keylime tree that produced enough this year to make this yummy dessert. My husband has celiac disease so I used a gluten free shortbread cookie and we both loved. They also freeze well. Thank you for sharing this recipe.

    Reply
    • Olivia says

      July 16, 2016 at 9:18 PM

      Hi Pam! I’m so glad you liked these and I love the shortbread cookie idea! I’ll have to try that 🙂

      Reply
  14. Lindsay says

    June 13, 2016 at 4:30 PM

    Is it imperative to use bain marie? I assume that it is. But I just wanted to know if anyone has done it without?

    Reply
    • Olivia says

      June 13, 2016 at 8:43 PM

      Hi Lindsay, for this particular recipe, yes. There may be other Key Lime Pie recipes out there that use different ingredients though!

      Reply
  15. Ella J says

    May 9, 2016 at 7:20 AM

    Hi! The person I am making this for doesn’t eat processed sugar and so I was wondering how I should alter the recipe/what sugar I should use? Thanks

    Reply
    • Olivia says

      May 9, 2016 at 10:01 AM

      Hi Ella, you could try using honey or something similar, though I haven’t tried it so can’t guarantee the results.

      Reply
      • Cindy says

        June 4, 2017 at 3:05 PM

        also try coconut sugar, or agave nectar, even though nectar would liquefy it more.

        Reply
  16. Lori says

    May 7, 2016 at 6:33 PM

    5 stars
    Made these for a party and they were delicious. I used a regular pie crust because I dont like graham cracker crust but the pie custard is yummy. Cant wait to make them again.

    Reply
    • Olivia says

      May 7, 2016 at 7:03 PM

      Hi Lori! So glad you liked them 🙂 I love the custard too!

      Reply
  17. Brandy says

    April 3, 2016 at 10:32 AM

    Love your site – just found it. I made this recipe today, but I only had enough filling for 10 tarts. I followed the directions exactly except for using regular lime juice in stead of key lime (I have some I need to use). Any ideas? Maybe more lime juice?

    Thanks!

    Reply
    • Olivia says

      April 3, 2016 at 10:38 AM

      Hi Brandy! As long as you used the same amount of line juice 5Tbsp, it shouldn’t make a difference. The only thing that comes to mind is maybe you had slightly smaller eggs or you could have whipped the filling a bit more to incorporate more air. I hope you liked them!!

      Reply
      • Brandy says

        April 3, 2016 at 10:54 AM

        Thanks for the response! I haven’t eaten them yet…..they’re still chilling 🙂 Maybe I will try with a hand mixer next time. After all, I have a box of graham crackers and a bottle of juice.

        Reply
        • Olivia says

          April 3, 2016 at 11:16 AM

          I am for SURE using a hand mixer next time. Hand whipping is too much of a work out! haha

          Reply
  18. Jacquie Favrin says

    February 21, 2016 at 5:26 PM

    Hi Olivia!

    So my husband has asked me to find a key lime pie recipe with a meringue top! Could I use this recipe with a 9″ graham cracker crust?

    Reply
    • Olivia says

      February 21, 2016 at 7:37 PM

      Hi Jacquie! You could totally use this recipe, but I would suggest doubling it to ensure you have enough to fill a 9″ pie. Let me know how it turns out 🙂

      Reply
  19. Crystal says

    July 10, 2015 at 5:26 PM

    I love your blog! Your pictures are amazing! I am from Vancouver, BC, born and raised! I now live in Edmonton, AB. I just started my blog in March, having so much fun learning the food photography portion!

    Reply
    • Olivia says

      July 10, 2015 at 5:32 PM

      Thanks Crystal!! So funny, I grew up in Edmonton! Going to peek at your blog now 🙂

      Reply
  20. Laureen Fox says

    July 10, 2015 at 5:21 PM

    Those Mini Key Lime Pies look delish! I had the idea rolling around in my head to make some gluten free (for me!). Gluten free flours are notorious their baking pan stickability. I will def use the cupcake liners!

    Reply
    • Olivia says

      July 10, 2015 at 5:33 PM

      Thanks Laureen! DEFinitely go with the cupcake liners! Haha.

      Reply
  21. Shareba @ In Search Of Yummy-ness says

    July 10, 2015 at 11:36 AM

    I hate when things stick to baking pans! I agree though, the tarts are super cute! I’m sure it tastes great no matter what shape they are 🙂

    Reply
    • Olivia says

      July 10, 2015 at 2:10 PM

      Thanks Shareba! 😀

      Reply
  22. Sofia // From the Land we Live on says

    July 10, 2015 at 9:20 AM

    I love the crust technique and the cupcake ones are also cute! I’m with you on the filling…it sounds like one of my favourite lemon tarts. Way better than cream cheese or condensed milk!

    Reply
    • Olivia says

      July 10, 2015 at 9:31 AM

      Thanks Sofia! I think I’ll try it with condensed milk next time just to see how it turns out 🙂

      Reply
  23. Melissa says

    July 10, 2015 at 9:06 AM

    I had a mini key lime pie at rustique pies in Montreal in May and i was hooked! Yours are even prettier and i bet that cream filling is just divine!

    Reply
    • Olivia says

      July 10, 2015 at 9:09 AM

      Thanks Melissa!! That’s so nice of you to say. I love a good key lime pie!

      Reply
  24. Manila Spoon (Abby) says

    July 9, 2015 at 2:17 PM

    5 stars
    Perfect little bites of delicious key lime pie for portion control! Not that I will be able to exercise self-control as these pies look totally scrumptious!!!

    Reply
    • Olivia says

      July 9, 2015 at 6:00 PM

      I know, right? Portion control means having 2-3 minis, haha.

      Reply
  25. Rachel @ Simple Seasonal says

    July 9, 2015 at 7:21 AM

    What a beautiful dessert. It looks like your hard work and patients paid off. Key Lime Pie I associate with some amazing college spring break memories. Not the wild kind… More the sitting on a boat eating a key lime pie while watching the sunset kind. Looking at your cute little pies, aside from making me want one, takes me back to that memory!

    Reply
    • Olivia says

      July 9, 2015 at 8:37 AM

      Aww, thanks so much Rachel! That sounds like a pretty awesome memory! 🙂

      Reply
  26. allie @ Through Her Looking Glass says

    July 8, 2015 at 6:29 PM

    5 stars
    Ha Ha! you bought the tart pan. YAY for Olivia. I love it when I do a simple splurge I know I shouldn’t. It’s just delicious, especially when we’re talking tart pans. Wish you lived (pun intended) around the corner. I have a beaucoup of little tart pans with removable bottoms. I was lucky enough to score them at yard sale years ago for something like $3. I’ve definitely gotten my money’s worth. I love anything key lime and that includes your adorable tarts here. The photos are just beautiful. Wish I could sample one….

    Reply
    • Olivia says

      July 8, 2015 at 6:39 PM

      Thanks Allie!! That’s exactly what I need, mini tart pans with removable bottoms! They are now on my list. I have since returned the pan I bought (shhh!), it just wasn’t worth it, even for only $12.

      Reply
  27. Cali @ Cali's Cuisine says

    July 7, 2015 at 5:52 AM

    Heaven indeed! Sometimes it is fun to get in the kitchen to have fun working on a more complicated recipe. Looks like this was a smashing success. I L-O-V-E key lime anything and wish I could reach through my computer screen to grab one of your tasty mini key lime morsels! YUM!

    Reply
    • Olivia says

      July 7, 2015 at 10:17 AM

      Thanks Cali! Key Lime is one of my fave desserts too 🙂

      Reply
How To Bake The Perfect Cake

Learn How to Bake the Perfect Cake!

Tips, techniques, and troubleshooting to help ensure your cakes come out perfect every single time!

Get your copy today!

Featured Posts

A cake sitting on a mint green cake stand and a black background.

Cinnamon Toast Crunch Cake

A cake sitting on top of a table

Chocolate Dulce de Leche Cake

A close up of a stack of cookies

Oatmeal Chocolate Chip Cookies

Mocha cake close up

Chocolate Mocha Cake

This Pecan Pie Cake is perfect for your holiday get-togethers! Brown sugar cake layers and buttercream filled with traditional pecan pie filling. | livforcake.com

Pecan Pie Cake

Two cookie cup halves stacked on top of each other with caramel oozing out.

Caramel Cookie Cups

featured
olivia

Welcome to liv for cake!

I'm Olivia, a professionally trained pastry chef, recipe developer, and photographer from Vancouver, BC. Creating classic cake recipes with a modern twist.
Read More

sig

Subscribe for the latest recipes:

Copyright © 2010 - 2021, Liv for Cake. All Rights Reserved. Privacy & Disclosure
Design by Pixel Me Designs