

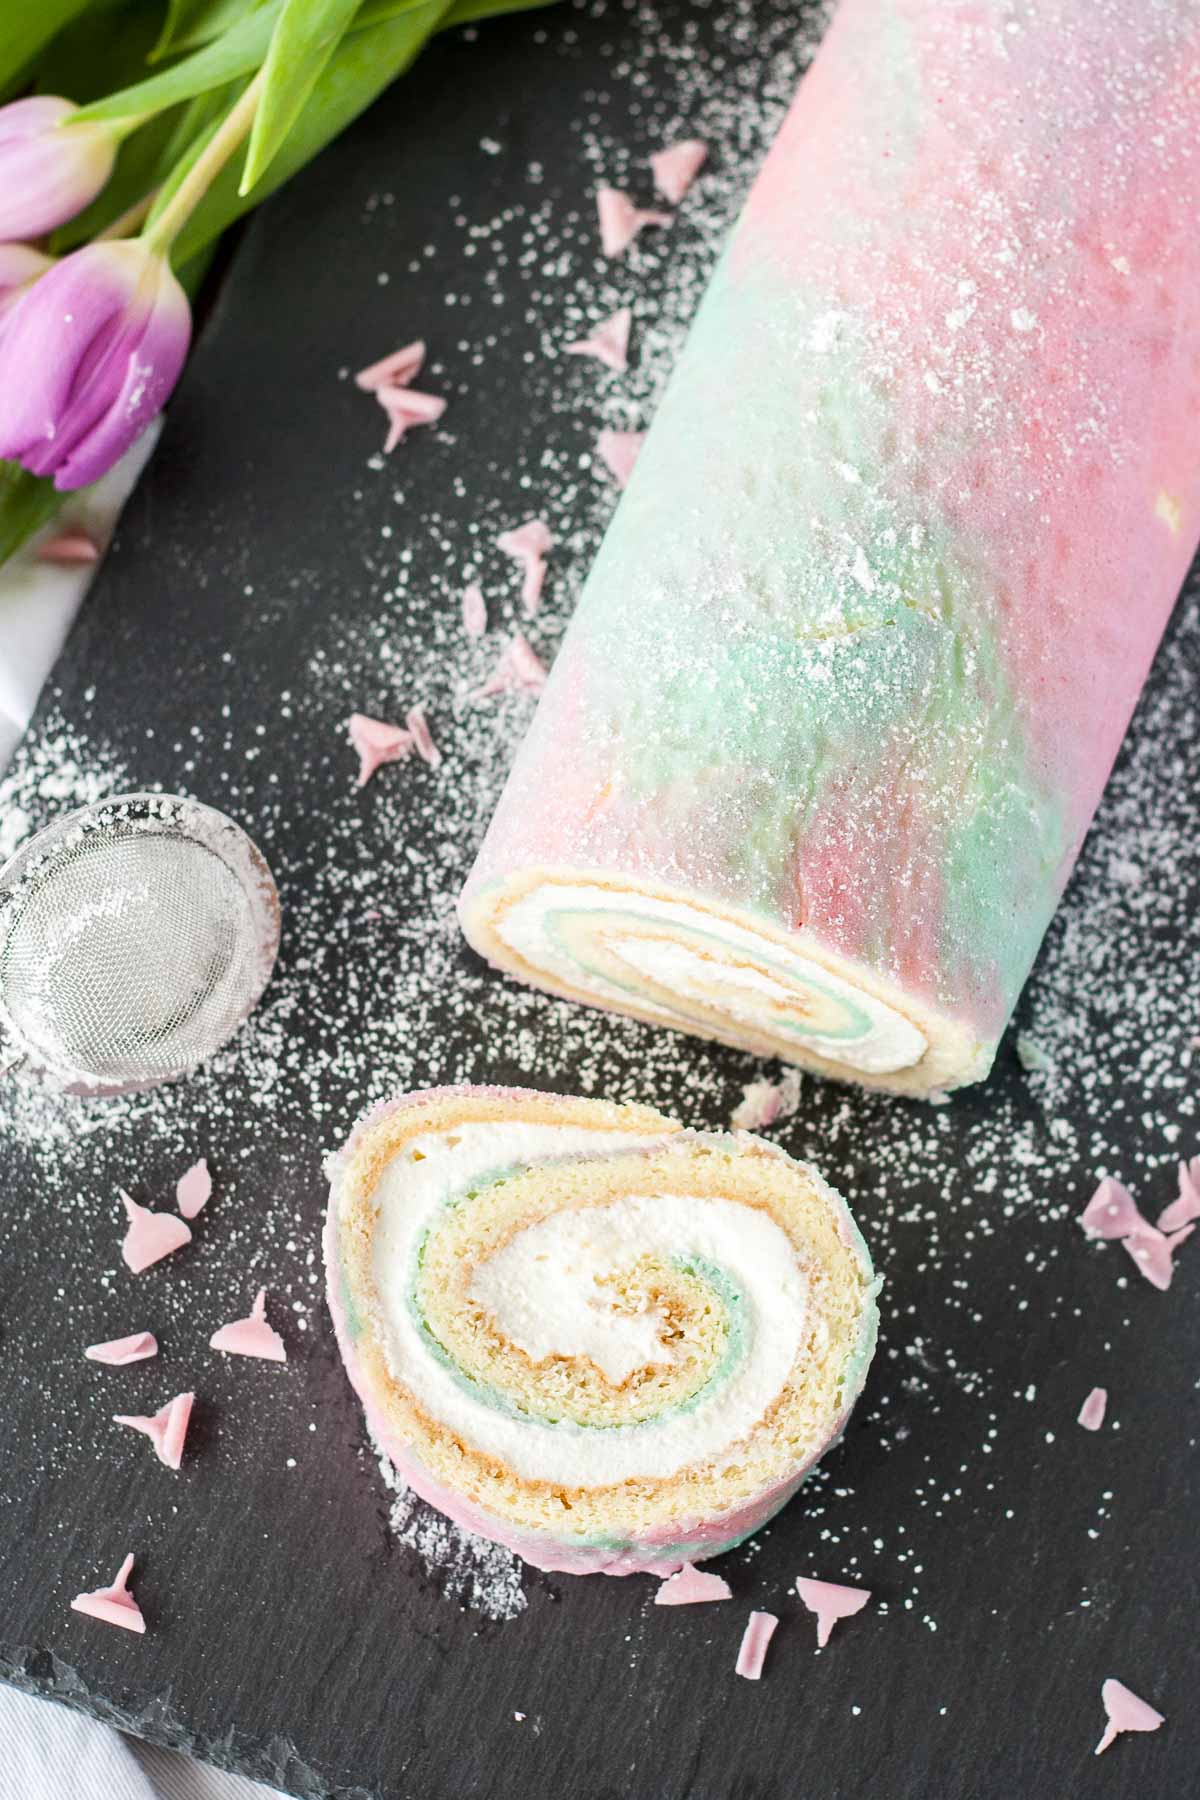
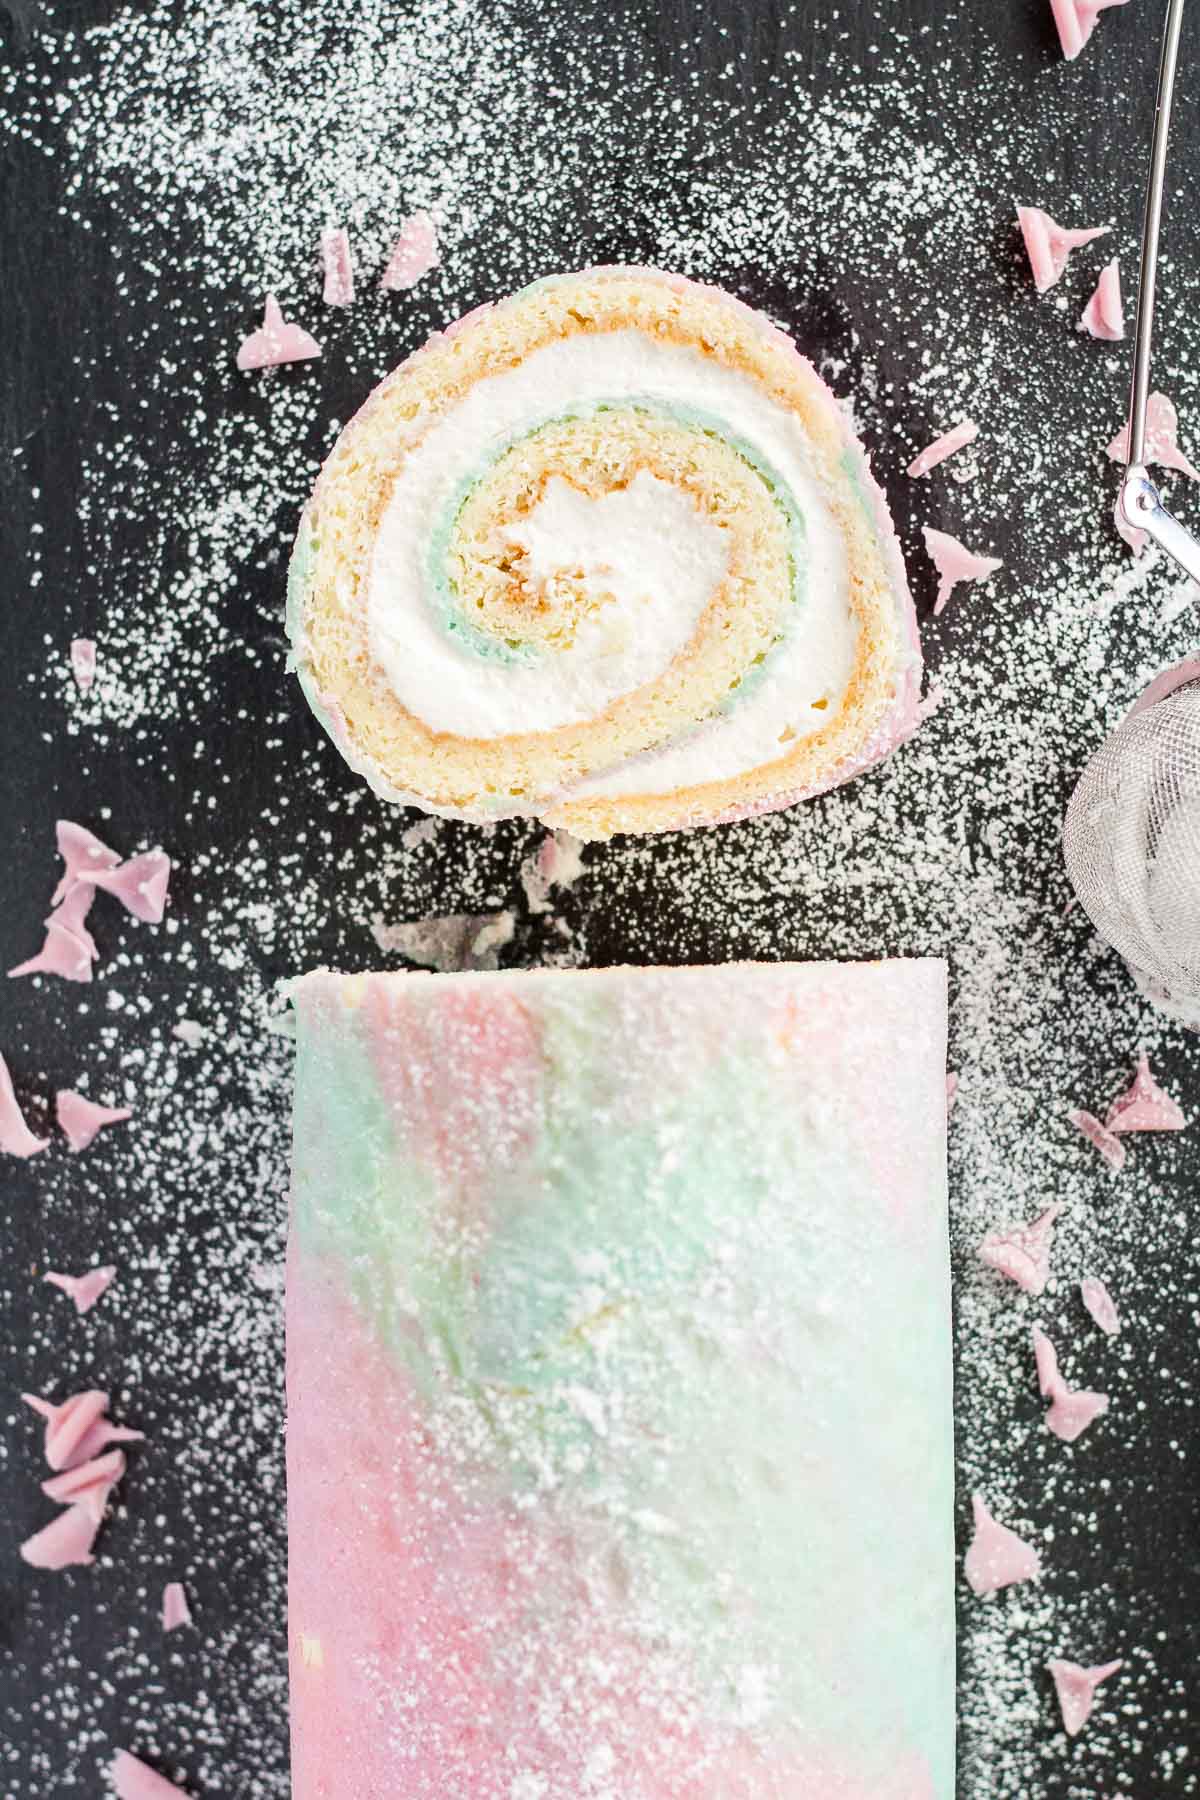
An easy way to fancy up a classic swiss cake roll with a pretty watercolor pattern.

If you saw me in the kitchen, you’d never guess that I enjoy baking. I’m irritable and stressed out, and that’s when things are going well. If things aren’t, well, it’s best you stay as far away from the kitchen as possible. Ryan can tell you this from experience, for sure. Such was the case with this cake roll.
I’d been psyching myself up to make a cake roll since early January. I don’t know why I was so anxious about it exactly… I had made them in school before, and it wasn’t really a big deal. It is a bit of a process though, or at least I made it out to be one in my head, specifically because I wanted to do a pattern on it. That was my biggest hurdle — deciding how I wanted to do the pattern. I have this perfectionist complex coupled with the laziness of only wanting to do things ONCE, so I procrastinated for weeks.

So, the Valentine’s Cake Roll turned into a Spring Cake Roll. I finally mustered up the courage and kinda winged it. A patterned cake roll is actually really easy to do. You basically just pipe/spread a design onto a silicone mat or parchment, chill that, then spread the cake batter on top and bake.
I had some ideas of how I wanted to do the pattern, but none of them worked. I had only made a small amount of paste (just enough for what was needed), so it would have been hard to fill a piping bag and use a tip. I decided to try filling a plastic sandwich bag and clipping off the end. Has anyone actually used this technique with success? It was pretty much the worst thing ever. I tried to pipe nice round dots with it, only to end up with wonky, lopsided ovals. That was Epic Fail #1.
Then I tried doing these designs with my offset spatula. Kind of like those fancy schmears you see on dessert plates in restaurants. That was Epic Fail #2.
Finally, I scraped everything off and said &*%$ it. I elaborated on Fail #2 and covered the whole thing with alternating schmears of color. Going for kind of a “watercolor” look and hoping it wouldn’t look like total crap. I couldn’t really tell what it looked like after I had spread it on, since it would be the underside that was visible once the cake was done. Whatever, I was over it, into the fridge it went while I made the cake batter.
The batter was pretty straightforward, except that I made the mistake of cranking my mixer on high right away while whipping the egg yolks and not putting the guard up or covering it with a tea towel. When I finally looked over, I could see that all of the cabinets, counters, floor, and appliances in the vicinity had been nicely splattered with whipped egg yolks. &%^$. Ryan was looong gone by this time. Smart guy.
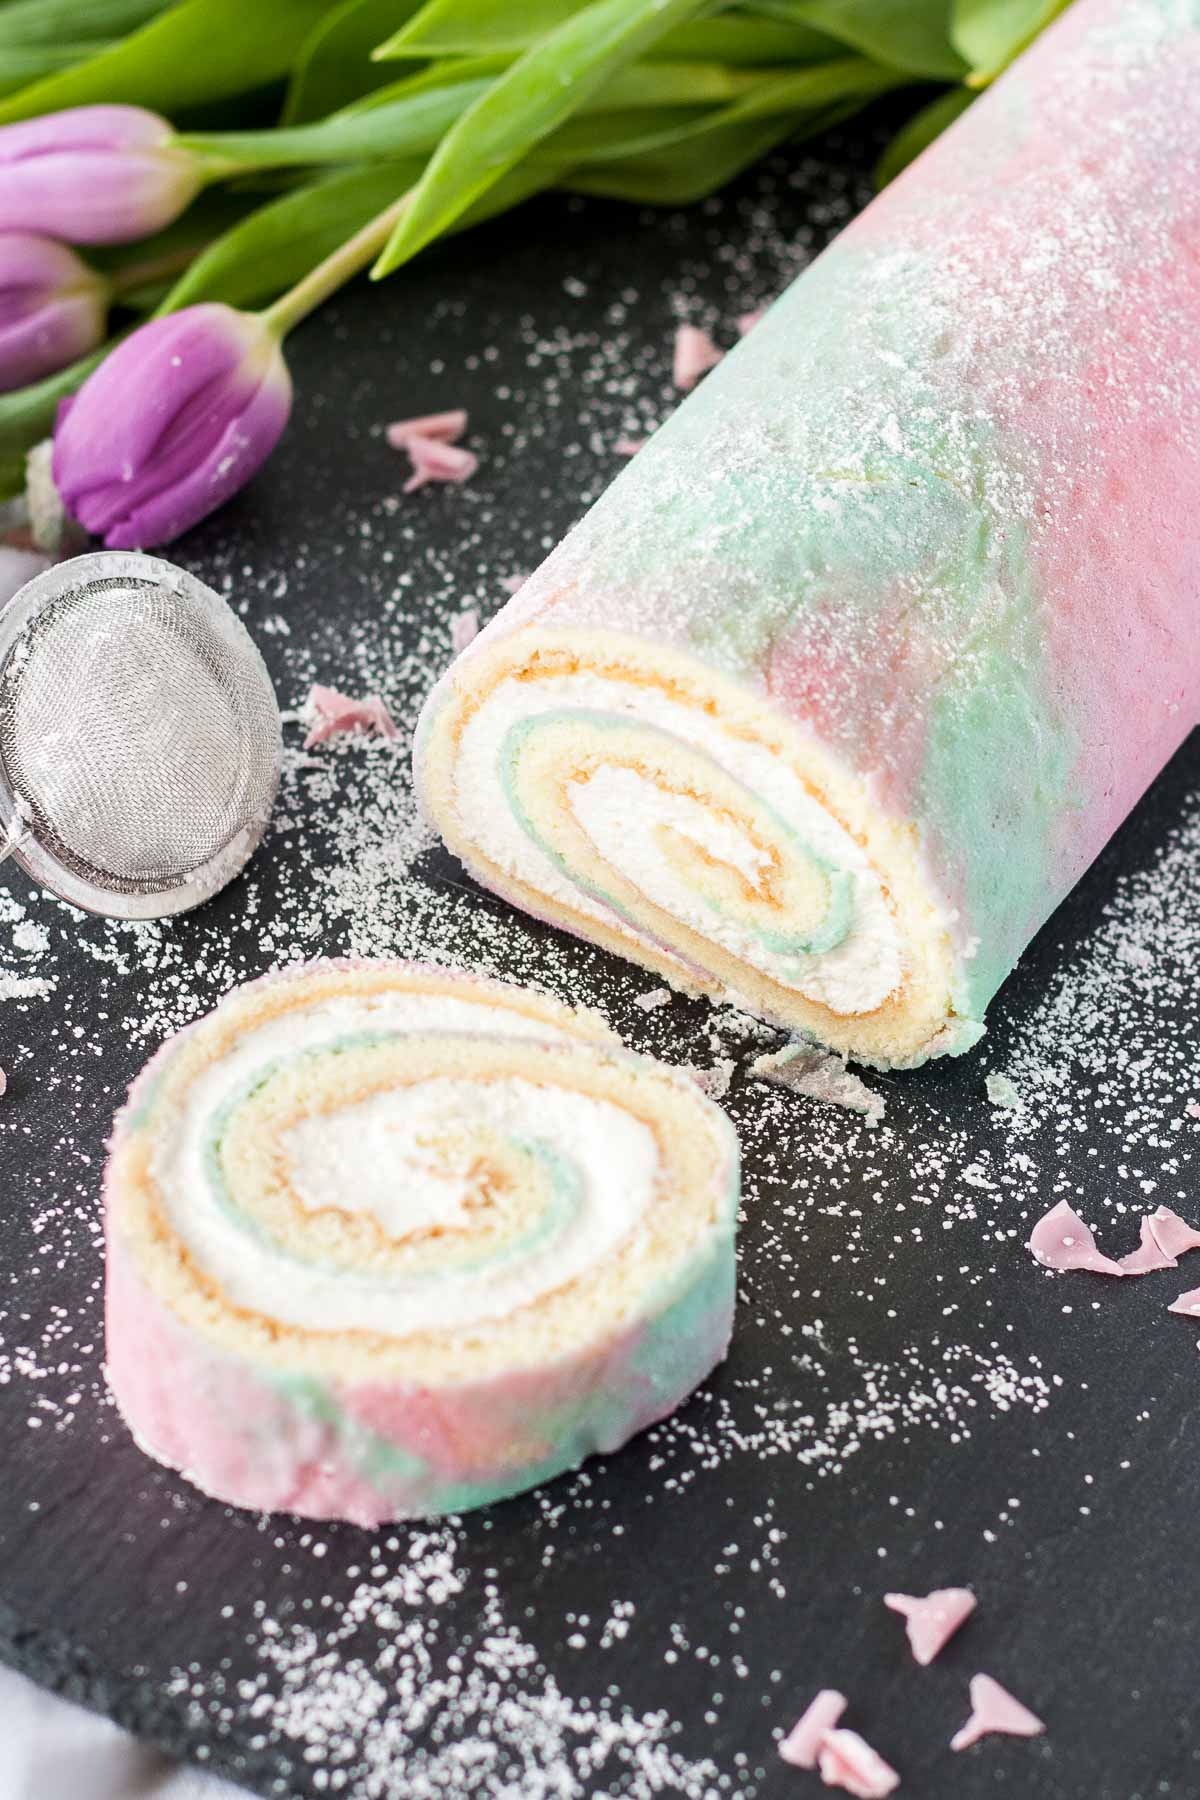
Thankfully, everything went swimmingly from then on. The cake baked up perfectly in my crappy uneven-baking oven, rolled up with no cracks, and the pattern turned out better than I thought it would!
I watched this video to see how to roll the cake up. It’s actually a good overall video of making a cake roll form start to finish. The only thing I did differently was use a silicone mat and roll the cake right up with the mat. I feel like it’s easier overall, so if you have a silicone mat, just use that!
The most important thing is that you roll the cake up while it’s still hot. DO NOT skip this step or it will crack all over when you try to roll it later. Roll it up hot, let it cool, unroll, frost, roll up again, done.

I thought the cake might be bland and boring but it actually tastes amazing, despite the fact that I forgot to add the vanilla, so… don’t do that. Although, to be honest, it tasted so good that I’m not sure the vanilla is necessary.
This cake is delicious! A delicate vanilla sponge with a light vanilla whipped cream — a perfect and easy dessert for any time of year.
Notes & tips for this Watercolor Cake Roll:
- Be sure to roll the cake up while it’s still hot. DO NOT skip this step or it will crack all over when you try to roll it later. Roll it up hot, let it cool, unroll, frost, roll up again, done.
- If using parchment paper – spray sheet pan with cooking spray, line with parchment and spray again.
- Watch this video for more information on how to make and roll the cake.

Watercolor Cake Roll
Ingredients
Color Paste:
- 1/4 cup cake flour 33g
- 2 Tbsp unsalted butter 25g, room temperature
- 3 Tbsp powdered sugar 25g
- 1 large egg white reserve yolk for cake
- color gel
Cake:
- 1/4 cup cake flour 33g, sifted
- 3 Tbsp cornstarch
- 4 large eggs
- 1 large egg yolk from paste recipe
- 1/2 cup granulated sugar
- 1 Tbsp granulated sugar
- 3/4 tsp vanilla extract optional
- 1/4 tsp cream of tartar optional
Whipped Cream:
- 1 cup heavy whipping cream 250ml, cold
- 1 Tbsp + 1 tsp granulated sugar
- 1/2 tsp vanilla extract
Instructions
Color Paste:
- Line a 12″ x 17″ sheet pan with a silicone mat or parchment paper.*
- Sift powdered sugar into a small bowl. Sift flour into another.
- Cream butter and powdered sugar with a wooden spoon till smooth and pale. Add egg white and sifted flour and cream until smooth.
- Separate paste and add a small amount of color gel into each using a toothpick.
- Spread onto silicone mat in a swirling pattern, alternating colors. Place in fridge to set as you make the cake batter.
Cake:
- Preheat oven to 450F.
- Whisk flour and cornstarch in a small bowl. Set aside.
- Separate 2 eggs. Place whites into a grease free bowl and set aside.
- Place the two yolks into the bowl of an electric mixer fitted with the paddle attachment. Add additional 2 eggs, reserved egg yolk and 1/2 cup of sugar. Beat on high for 5 minutes, until pale and tripled in volume. Beat in vanilla. **
- Sift flour mixture over beaten eggs in 2 batches. Fold in until no streaks of flour remain.
- Clean mixer bowl (if you don’t have an extra) and wipe down with lemon juice to ensure there is no trace of grease.
- Whip egg whites until foamy and add in cream of tartar. Whip until soft peaks and slowly add in 1 Tbsp of sugar. Whip until stiff peaks.
- Gently fold whites into cake batter. Spread evenly in pan (on top of chilled color paste) and bake for 7mins or until cake is golden brown and springs back to the touch.
- While still hot, loosen the edges with a small metal spatula or knife. Sprinkle cake lightly with powdered sugar and turn out onto parchment.
If using a silicone mat:
- Flip cake over again with the silicone mat attached and roll up with the mat. Roll entire thing in a clean dish towel and allow to cool.
If using parchment:
- Remove parchment from bottom of cake. Sprinkle powdered sugar over a clean tea towel. Flip cake over onto tea towel, roll up, and allow to cool completely.
Whipped Cream:
- Place mixer bowl and whisk into the fridge for 30mins to chill.
- Place cream, sugar, and vanilla into mixer bowl and whip on high until stiff peaks.
Assembly:
- Gently unroll cake. Spread whipped cream evenly over surface leaving a 1/2″ border. Roll up tightly and refrigerate for 30mins or up to 3 hours. Serve same day.


Kim says
I have laughed and laughed over your comments. I believe we are “cake sisters”. My baking experiences aren’t always pleasant. Thank you for making me laugh and for your recipe. I plan on making it soon.
Olivia says
Hi Kim! I’m so glad you enjoyed it 🙂 Always a baking adventure over here! Let me know if you try it.
Kelly says
Recipe was easy to follow and cake came out great. My only problem was that when I rolled the cake after putting on the whipped cream, the pastel paste layer kept sticking to the silpat instead of the cake. I was able to put it back in place on the cake, but any thoughts as to why that happened? Should I have greased my silpat?
Olivia says
Hi Kelly! No, I don’t grease my silpat. Was it a Silpat brand mat that you used or some other brand? I’ve never had anything stick like that!
Dianne says
Was I supposed to Spray the Silpat mat?? I didn’t…
Olivia says
Hi Dianne! No, I did not spray either.
Dianne says
I’m thinking of making this for Easter. What are your thoughts about a thin layer of raspberry jam, then the Whipped cream?? I feel like Easter needs raspberry!!
Olivia says
Hi Dianne! I think that would be totally delicious! Love that combo.
sophie says
awesomeeeeeee
i love this so much!
what fillings do you recommend without using cream tyy!
Olivia says
Hi Sophie! So glad you love it! You can use a buttercream if you prefer or a mousse, or even just something simple like jam.
Maya says
Beautiful cake! I was just wondering what the texture of the color paste is like once it’s baked? Does it separate from the actual sponge is some places? 🤔 just wondering whether to use the cake batter itself for patterns..(before adding the egg whites of course)
Olivia says
Hi Maya! It doesn’t separate at all! I know some people just use the cake batter for it though.
Lauren says
I made this for my mother’s birthday. It was a really delicate and light treat! When I took the cake out of the oven I was worried because it looked a lot more brown than the photos but once I put a dusting of powdered sugar on it, it got that nice pastel finish. Next time I think I will make a bit more paste as there were some areas that I could not spread to cover the whole cake. Thanks for the great recipe and instructions!
Sheila says
Just finished making this. I love your recipes. I’ve made a number of rolls in the past but first time to do inlay. Your directions were great and love the way it turned out. So springy like the season and the texture. Thank you.
Olivia says
Hi Sheila! Thanks so much for the amazing feedback. I’m so glad you liked it 🙂