

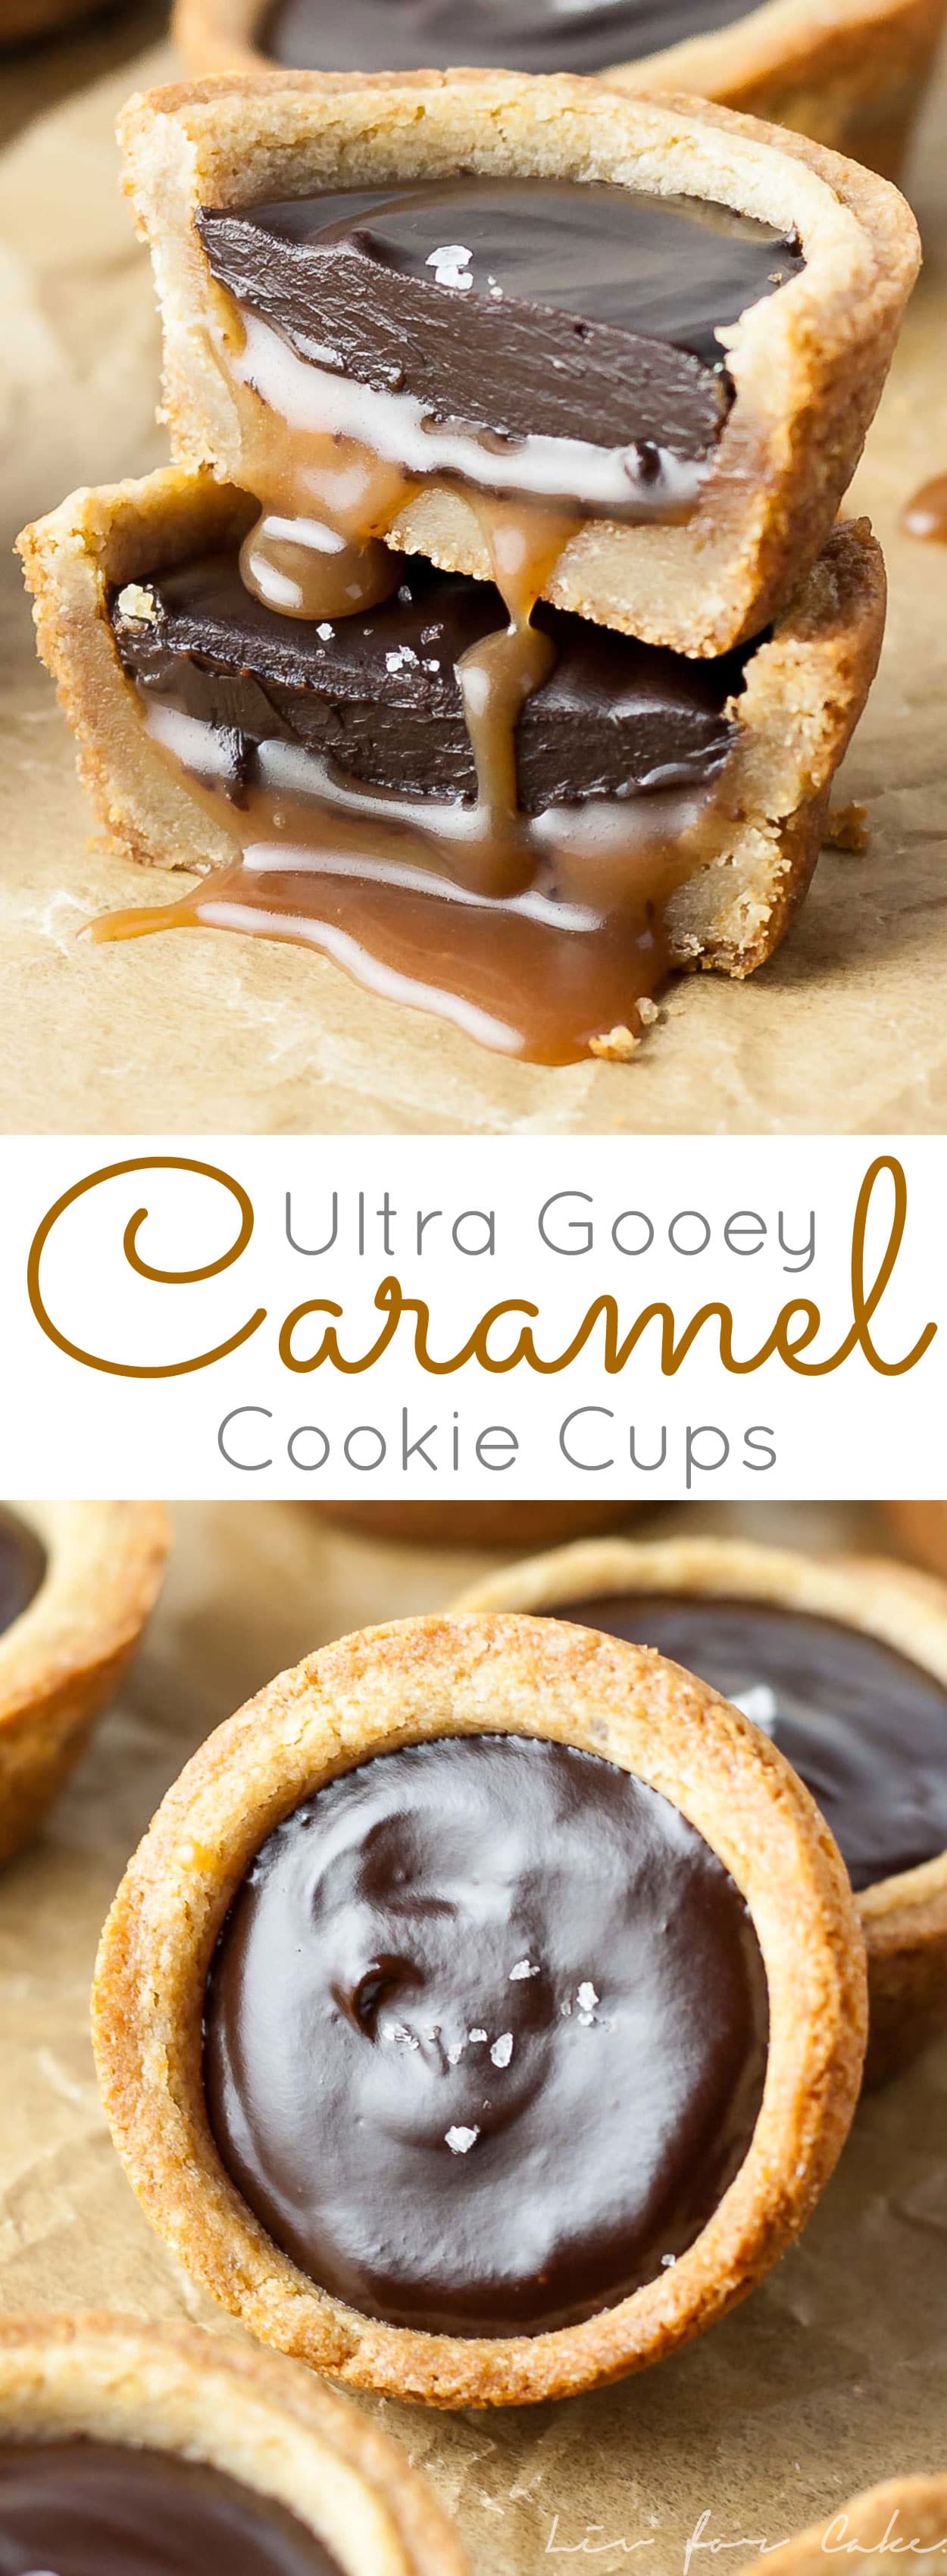
Chewy caramel cookie cups loaded with gooey caramel and topped with a silky dark chocolate ganache.

Gooey is an understatement. You’re going to need a napkin nearby when eating one of these Caramel Cookie Cups, but I’m guessing you’re ok with that. I mean, LOOK at that caramel. Heaven.
I’ve collaborated with a few Canadian blogger friends once again, and this time Charlene from Chew Street came up with a Chocolate theme for Valentine’s Day.


The idea for these Caramel Cookie Cups came to me from this pin which uses a clever two-pan method, but that’s not how I ended up making them. That WAS my plan, but I was worried the cookie dough would be too firm and wouldn’t bake/shape up properly.

To make the cookie crust, I adapted my favorite chocolate chip cookie recipe minus the chocolate chips, used a large cookie scoop to portion it, and baked them up.
I still baked them in a muffin tin, but then I used the cap from my Pam for Baking cooking spray to press down into the cookies right after they came out of the oven.
You could use any small jar or container as long as it’s smaller than the muffin tin cup size. You need to do this when the cookies are still HOT though, so be careful not to burn yourself.

I made the caramel from scratch, but you could use store-bought as well.
Caramel and I are not exactly friends. For some reason, I always struggled with it in pastry school. Then again, working with boiling sugar is not my favorite thing to do. I was stressing a bit about making it, but it was actually easier than I remembered, and every bit as delicious.
The caramel sauce is a bit on the thinner side, even after chilling, so if you’d like it thicker just use a bit less cream in the recipe. You’ll need to refrigerate this before using it in the cups, so I recommend making it as the cookie dough is chilling.
Be sure to check out my How to Make Caramel post for a detailed tutorial.

The chocolate ganache is incredibly simple to make. Chop some chocolate, boil some cream, and you’re done. It’s really important that you use good quality chocolate.
I used Callebaut Dark Chocolate because it’s easily available to me. The dark chocolate worked well here, cutting against the sweetness of the caramel for the perfect overall balance. But you can use milk chocolate if you prefer.
Whichever you choose, good quality chocolate really makes a big difference in both flavor and texture, so try to get the best you can.
Typically I would let the ganache sit in the fridge overnight, but it would get too firm in this case. You just need to cool it to room temperature so it doesn’t soften the caramel when you pour it on.

I used a measuring cup and a teaspoon to fill each of the cups, but you could use a piping bag if you prefer. I poured in some caramel, placed the cups in the freezer for 30mins, then topped with the chocolate ganache and some sea salt. How much caramel/chocolate you add in each cup is up to you!
These Caramel Cookie Cups are ultra decadent and delicious. Plus, you can easily try different combinations of cookie, filling, and chocolate. I already have a few ideas on my radar.
Be sure to check out the delicious Chocolate-themed recipes from my Canadian blogger friends after the recipe!
Notes & tips for these Caramel Cookie Cups:
- You can use store-bought caramel if you prefer, though I would recommend Dulce de Leche since i find it a bit thicker.
- Be sure to check out my How to Make Caramel post for a detailed tutorial.
- Ensure the ganache and caramel are completely cool before pouring them into the cups.
- Chill the cups once the caramel layer is in to firm them up.
- These freeze very well! Store in fridge for up to 5 days or in freezer (in an airtight container) for 1-2 months.

Caramel Cookie Cups
Ingredients
Cookie Cups:
- 1 cup unsalted butter room temperature
- 1/2 cup granulated sugar
- 1 cup light brown sugar packed
- 2 1/4 cups all-purpose flour
- 1/2 tsp baking soda
- 1 tsp sea salt
- 2 tsp vanilla extract
- 2 large eggs room temperature
Caramel:
- 1 cup granulated sugar 200g
- 1/4 cup water
- 150 ml heavy whipping cream room temperature
- 1/2 cup unsalted butter 100g, room temperature
Ganache:
- 250 g good quality dark chocolate finely chopped
- 125 ml heavy whipping cream
Instructions
Cookie Cups:
- Preheat oven to 350°F. Spray 2 regular sized muffin tins with cooking spray.
- Whisk together flour, baking soda, and salt, set aside.
- Beat butter and sugars on med-high until light and fluffy (approx. 2-3mins). Reduce speed and add eggs (one at a time), and vanilla. Beat until combined.
- Add flour mixture a little at a time and mix until just combined.
- Using a large cookie scoop (3 Tbsp) scoop dough into muffin tins, press down to flatten slightly.
- Bake for approx. 15mins or until browned and mostly set.
- Remove from oven and immediately use a small jar or container to press firmly down in the center to create a well. Cool in pans for 15mins, then place on wire rack to cool completely.
Caramel:
- Place sugar and water into a medium pot, stir to combine, but to not stir from this point forward. Cook over high heat, washing down the sides of the pot with a pastry brush dipped in water as needed to prevent crystals.
- Cook until desired color of caramel is reached and immediately remove from heat. Very slowly, add heavy cream. The mixture will bubble up (a lot) and boil. Add butter, return to heat, and bring back to a boil. Cook for 2 minutes stirring constantly.
- Remove from heat and let cool to room temperature. Transfer to a container and place in fridge to thicken.*
Ganache:
- Place chopped chocolate and cream into a microwave safe bowl. Stir to combine. Microwave for 20 seconds, stir. Microwave in 10 second intervals, stirring in between, until smooth and silky. Set aside to cool completely before using.**
Assembly:
- Using a measuring cup or a teaspoon, pour some of the thickened caramel into each cup. Place in freezer for 30mins to set.
- Remove from freezer and use the same method to top with ganache. Sprinkle with sea salt if desired and place in fridge to set.
Notes
** The ganache can sit on the counter overnight. Place plastic wrap directly onto ganache to prevent a skin from forming.
Sweet & Savory Chocolate Recipes for Valentine’s Day
3-Ingredient Dairy-Free Chocolate Raspberry Cups by The Refreshanista
Chocolate Dipped Honeycomb by My Kitchen Love
Chocolate Spice Fig Truffles by The Busy Baker
Cocoa-Rubbed Drumsticks by Chew Street
Dark Chocolate Rosewater Truffles by The Cinnamon Scrolls
Mocha Waffle Torte by Cocoa Bean, The Vegetable
Savoury Chocolate Ravioli with Ricotta-Beet Filling by Imagelicious
Two-Bite Mochi Brownies by The Chewy Life


El Hachmi says
Je n’ai pas eu le résultat voulu mais c’est pas grave !
J’ai eu des muffins à la place 😂 à voir si c’est bien le même goût que les originaux !
Olivia says
Hi El! They will puff up and look like muffins, at that point you need to press down on them with a small jar 🙂
Shruti says
Recipe is great! I love your cookie cups.
Need some advice though. I slightly burnt my caramel sauce. It is tasting a bit bitter 🙁 any way of fixing it?
Olivia says
Hi Shruti! Unfortunately, I don’t think there’s any way to fix it 🙁 I have a detailed tutorial on it here: https://livforcake.com/caramel-sauce-recipe/
Madeline says
I really want to make these, but I am a little concerned about the caramel part. When you say cook until the desired color of caramel is reached, about how long do you think? Knowing me I would totally ruin it!
Olivia says
Hi Madeline! It really depends on the stove! It can take around 10mins. I pretty much watch it like a hawk after a couple mins or so as it can quickly go from golden brown to burnt!
Shannon says
Could you make these in mini muffin tins instead? How would you adjust baking time if so?
Olivia says
Hi Shannon! Yes, that should work fine. I haven’t tried myself, but i would start checking them at 7mins or so.
Davey says
Some of your measurements are confusing could you put them in ounces I don’t understand ml or grams
Olivia says
Hi Davey, I don’t have measurements in ounces, but you can easily convert them on google.
Nancy says
It would be really helpful if all the measurements were in imperial, like the cream and chocolate.
Olivia says
Hi Nancy, you can convert the measurements here:
http://www.onlineconversion.com/weight_volume_cooking.htm
Frances says
These were okay. We followed the recipe to a T but somehow the recipe only yielded 11 tarts rather than 20. We also found that it was quite ineffective to press the tarts down after they were baked. It probably would have been better to make a well before they went into the oven. Still, they tasted pretty darn good 🙂
Olivia says
Hi Frances! Strange that they only made 11 tarts — maybe your cookie scoop is bigger than mine! You could totally make a well before baking, but it would still puff up a bit and require *some* pressing down. I’m going to try that way next time. I’m glad you still liked them!!
Nicole says
These are great gift ideas too! Thanks for sharing! Totally Pinned!
Olivia says
Thanks Nicole!
Victoria says
Looks delicious… But I’m curious about that white layer in the photo that is not mentioned in the recipe.l at all.
Olivia says
Hi Victoria, There is no white layer, that’s just the light reflecting off of the caramel.
Kristina says
I have made them the whole family love them. I have now been asked to make them for a function. I would like to know how long can I keep them out on the counter once they filled? A week or less just worried about the cream. Thanks so much for any advice.
Olivia says
Hi Kristina! So glad you liked these! I would refrigerate them if you can, but they should last a 2-3 days on the counter (they may get quite soft at room temp for that long).
Sarah says
Looks great! Can I ask what the white layer is?
Olivia says
Hi Sarah! There is no white layer, that’s just the light reflecting off of the caramel.
Michelle | The Secret Ingredient Is says
Well these just look SO divine, oh my! I adore everything about these gooey treats- the cookie cups, the chocolate, the caramel, I wouldn’t be trusted around a batch! Yum.
Olivia says
Haha, it was so hard to eat just one. And I am with you on the gooey desserts! Yum.
Lianne says
Looks very, very nice!
Olivia says
Thank you Lianne!
Jennifer A Stewart says
Gorgeous and so easy looking!! I am a sucker for dark chocolate and that little dusting of sea salt on top is perfect! I am going to be making these for my hubby for Valentine’s day, I just hop they look as good as yours!
Olivia says
They are really easy actually! And so good. Let me know how they turn out! 🙂
Olga says
I have to do this ones…. I need to do this ones!!!!!!!!!!!!!!!!!!!! incredible
Kind regards from spain
Olivia says
Thanks Olga! Definitely give them a try!! 🙂
Samantha @MyKitchenLove says
I’m seriously wondering if I have time tonight to make these. They look amazingly gooey and delicious. I love dark chocolate and caramel together; stuff my foodie dreams are made of.
Olivia says
Dark choc and caramel is one of my faves too! It goes so well with the cookie. I hope you try these!
Amanda | The Cinnamon Scrolls says
Caramel is not my friend either. Every time I make it I either burn it or myself, or it turns into a rock. Your caramel looks perfect! Look at that shine! That ooze! I’m dying over here. And that sea salt topping? Spot on. *applauds*
Olivia says
Hah, glad to hear I’m not on my own! Though after this batch, I think we can maybe start to be friends, we’ll see. Thank you!! <3
Angela | The Chewy Life says
OH my! That is one heck of a sweet treat! The shine of the caramel is making my mouth water 🙂
Olivia says
Thanks Angela! They are pretty decadent for sure!
Jessica @ Sweetest Menu says
Yes, yes, yes AND YES! Loving these Liv. Pinned!
Olivia says
Thanks Jessica! <3
Mel @ The Refreshanista says
Olivia, you have outdone yourself! These cookie cups look unreal. I love caramel & chocolate together especially with sea salt! Delish.
Olivia says
Ahh thank you!! xo